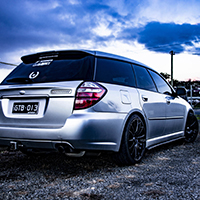
Member Profile - James' GT spec B Wagon - GTB013

Show off what mods you've done to your car.

Re: Member Profile - James' GT spec B Wagon - GTB013

Postby jamescd » Sat Mar 08, 2025 11:39 am

Alright, another update.

I know I mentioned subframe bushes way back when, and I was unsure what I wanted to do. In the end I bit the bullet and got the Energy Suspension (194102G) from RockAuto. Fitment was the usual, I burned out the old bushes and then cut the old bush sleeves and chiseled them out. Push in the new ones, job done.
The rear end also got:
JDM alloy trailing arms
JDM upper alloy arms
Whiteline adjustable lower arms (KTA124, I got these second hand and bought the KSK124 kit to refresh them)
Cusco pillow ball endlinks (684 317 A)
Cusco endlink mount (684 316 S)
Cusco Rear Arm Bracing (680 478 A)
Fresh Whiteline bushes in every spot
-Trailing Arm Front Bush (W63398)
-Trailing Arm Rear Bush (W63394)
-Upper Control Arm Inner Bush (W63396)
-Upper Control Arm Outer Bush(+/- 1.25deg caster adjustment) (KCA399)
-Differential Subframe Bushes (KDT906)
-Differential Moustache Bar Bushes (KDT905)
-Toe Lock-out Bolts (KCA307)

Image
Image
Image

I have also fit a VA quick rack (2.4 turns lock to lock). To go with the rack I installed a Cusco steering rack brace (692 026 A) along with a set of Whiteline rack bushes (KSR207).
In order to complete the upgrade I also installed the u-joint from a VA STI. These are just a straight piece compared to the factory Liberty u-joint which has a built-in rubber damper.
Image
Image

I trimmed the outer tie rods to allow for a better range of adjustment.
Image
I also replaced the Whiteline bump steer correction kit with a new Hardrace kit (Q0796). I also installed Cusco endlinks (667 318 A).
Image


In further suspension mods, I got the Caster top hats for the Shockworks. The new hats move the suspension top mount further towards the rear of the car giving more positive caster.
Image

I also forgot to mention about the transmission mount stuff I added in the last post, but it also crosses over as I bought the Cusco kit which also includes the engine mounts (660-911-SET). I also fit the Whiteline Transmission Subframe Bushes (KDT901).
Image

My old setup had some heat wrap around the wastegate piping where it ran over the C/V boot, I didn't love this, so I have added the Cusco Heat Shield (6A1 047 F)
Image

I have also done some more engine work since the last post.
I didn't trust the AVCS sprockets that I had, so decided to rebuild them.
My top tip is to make sure you have the right tool. A lot of places sell the bit by itself, but the Toledo 301318 set comes with the correct bit and is only about $25 and available at a lot of local tool shops.
Image
The ins and outs of cleaning them is to undo the bolts, take the gears apart (carefully), clean everything, and then put them back together in the reverse order.
Image
Image
The other tip when reassembling is to use a camshaft to line everything up when torquing down the bolts.
Image

As you can see, even from a non-spun bearing engine, these weren't exactly clean
Image

I used this guide, my only other thing to be aware of is that using a pick to split the gears can lead to you stabbing the gasket, and that is not a part that's available separately.
https://www.iwsti.com/threads/avcs-gear ... ng.279112/

The long block is mostly together, most bits are the same in terms of fuel bits and pieces (more is being updated, but I'll mention it when I do it). The main change at this point is that the injectors are ID1700XDS rather than the 1050s that were in there before.
Image

With the timing belt on, it became pretty clear that the timing is a bit out due to changes in deck height and gasket thickness.
Image
I made a degree wheel and piston stop
Image
Image

After taking some measurements on the RH bank, I found that both intake and exhaust were roughly 10 degrees retarded.
I then installed an eccentric idler and that has changed the intake to being 3 degrees retarded and the exhaust to 2 degrees advanced. I am happy enough with this result and at least know what the numbers are. I still need to take some measurements on the LH bank, but it should be close to the RH side.

I also painted my brakes which I have been meaning to do for ages.
Big thanks to Boxer Beauty for making some custom decals for the Alcons
Image

The rear Brembos still need some work as the dogbones put the caliper mounting bolts in the same spot as the aluminium trailing arm.
Ideally I find a set of TbSTI backing plates, but I'm not holding my breath, the other option is custom dogbones that rotate the calipers down slightly to give the bolt enough clearance.
User avatar
jamescd
 
Posts: 143
Joined: Mon Oct 13, 2014 9:35 pm
Location: Hobart, Tasmania
Car: 2007 Liberty GT spec b
Real name: James
Profile URL: viewtopic.php?f=10&t=35401

Re: Member Profile - James' GT spec B Wagon - GTB013

Postby jamescd » Sat Nov 29, 2025 2:50 pm

A fairly big update since the last one (it has been 7 months).

One of the large parts of this build has been the wiring harness.
The ECU Master EMU Pro 8 is at the centre of it all, and I wanted to go all out, making a concentrically twisted harness with DR-25 sheathing. I even did this for the auxiliary harness in the engine bay.

For the interior harness I just opted for spec 44 wire and braid sheathing. While this is also plenty for an engine harness, I wanted the engine bay wiring to be super neat and robust.
Image

Before doing the car side wiring, a lot of the factory wiring was just out, with the whole engine harness being cut off at the bulkhead. With it cut, and the extra wires pulled out from the interior side too, it was time to terminate the body wiring that was still needed. This is for controlling all the body side functions, like the tacho, fans, A/C, brake switch, clutch switch, and a bunch of others.
Image

The engine harness required full fresh measurements, so a rope harness was made to ensure branches and connectors were at the right point.
Image
Image

With the interior all done, the bulkhead could be mounted. I made custom mounts which replace the factory grommets. These are currently resin printed.
Image

With all the planning done done, the harness could be assembled.
Image
Image
Image
Image
Image
Image
Image
Image
Image

With the harnesses done, it was time for the fab.
The intercooler needed new piping, and a new up-pipe and dump needed fabricating.

The up-pipe was fabbed first to get the turbo in place for the intercooler. (no pics)

The intercooler piping was next.
Image
Image
Image
Image
Image

Then the dump. I wanted plumb-back for the gate, as I don't love a screamer on a street car.
Image
Image
Image

This was a lot of after work hours and weekends. A huge thank you to my friend T who did 90% of the fit-up and all the welding. The car absolutely wouldn't be done without his help.

While this was happening I replace the headlight lenses.
Before:
Image

After:
Image

With all the fab work done, the engine needed to come back out so the clutch could go in.
Image

An alignment was also done.
Image


The other thing that needed a lot of plumbing was the fuel system. I picked up a Process West twin pump surge tank which is installed low next to the transmission. This has a pair of twin Walbro 460s.
Image

There was also the flex fuel sensor which needed to be added. I designed a custom bracket to hold the FPR which could then have the flex sensor directly mounted to it.
Image
Image

I also fit an F750 fuel filter in the bay.
Image
User avatar
jamescd
 
Posts: 143
Joined: Mon Oct 13, 2014 9:35 pm
Location: Hobart, Tasmania
Car: 2007 Liberty GT spec b
Real name: James
Profile URL: viewtopic.php?f=10&t=35401

Re: Member Profile - James' GT spec B Wagon - GTB013

Postby jamescd » Sat Nov 29, 2025 3:09 pm

A chunk of this post is copy/pasted from my write up for work about this, just if you happen to have read it ad think it sounds familiar.

The final push to get the car done was pretty hectic. I was hoping to get the car done for the national meet (those I saw there will know that I didn't make the deadline).

With everything pretty much done. A lot of things were very much rushed to get the car done, I dislike my original catch can, and the coolant tank works, but isn't great. These will be fixed, but with the time crunch it was a focus on get it going, not get it perfect.

I was booked on the Spirit of Tas on September 11, and had the dyno booked for the 2nd. Prior to this we attempted to get the car going, but just weren't having any luck.

As mentioned about three updates ago, while preparing this build I had a few issues with finding a set of heads that either worked, or that weren’t total duds. The T20 heads weren't good, but I kept the cams from them, and in the end I got some B25 heads off marketplace.

“Perfect, a set of single AVCS heads, I’ll still be able to use the spicy cams from the original EJ20 heads”

With the B25 heads built, on the engine, and the car wired, my date with the dyno was fast approaching and final checks were happening to make sure everything was working as expected. Generally things were going well, a couple of slight revisions and calibration changes, but nothing too massive to fix. Except for one problem, there was no camshaft position signal.

No amount of settings changes fixed the output, ohming out the wiring confirmed that it was correct, why wasn’t there a cam signal? Both cams were displaying the same problem.

After being up until 1am trying to fix this, with the dyno appointment booked for 8am the same morning, I woke up at 5:30am to try and get to the bottom of this and hopefully still make it to the dyno.

To test that the sensors were working and that the ECU was definitely receiving a signal I pulled the sensor out of the heads and waved a magnet near it while I ran a scope. Lo and behold, there was a cam signal.

So the ECU received a signal, the cam sensor worked, and I knew there were lobes on the cams, so why wasn’t this working?

Then, at 6:30am while staring into the engine bay, surrounded by frost, I remembered that EJ20 and EJ25 cams use a different style of trigger and that EJ20 AVCS heads use a 2 pin VR sensor, not a 3 pin hall sensor (except for the quad AVCS EJ20 Lib heads for some reason).

The problem becomes fairly obvious when you look at the cams. The original cams are the “USDM” style, while the ones I have are the “JDM” style. The paddles on the JDM style are shorter than the raised section of the USDM style, this meant that my sensors which were expecting the larger cams just weren’t close enough to pick up a signal.
Image Image


At that point I knew this wasn’t a problem that would be solved that morning and unfortunately had to cancel the dyno session.

I didn’t stop though, I had a single spare EJ20 VR cam sensor in the shed, so i pulled it out and went to fit it in the heads to see if that would solve my problem.

It didn’t fit.

The sensor housing was too large, and the mounting hole was at totally the wrong distance to bolt to the heads. That didn’t matter though, after shaving down the sensor so it would fit in the hole and just jamming it in hoping it would stay in position, I ran a couple of jumper wires to the existing harness. With this setup janked in place I ran another scope, and was relieved to see a cam signal.
Image Image


While not ideal, at least it was a signal.

I wasn’t looking forward to having to shave down every sensor and find a way to mount them, but at least it was a path forward.

Feeling exhausted and fairly defeated I went into work for the day. While I possibly should have taken the day off and slept, I’m glad I didn’t, as within 2 minutes of talking through the problem with T he had come up with a great solution.

“Why don’t you just use a couple of cherry sensors?”

Holy shit, what a great idea, I’m not using a Subaru ECU, I don’t need to be constrained to the Subaru parts bin to fix this problem.

The next day, T’s spare Cherry sensor and a chunk of spare aluminium had formed a test rig to make sure that this plan would work.

Image

It worked.

With the proof of concept done, another cherry sensor was ordered and a better mount was designed.

The next day this was installed, and fortunately both sides worked.

Image Image


Cam signals were now in the ECU.

This was only the first part of the problem though.

JDM cams have 4 equally spaced paddles on the cams. Unfortunately this means that even with the signals, the ECU can't know where the cam is in relation to the crank.

How does Subaru deal with this?

They have a third cam sensor on the back of the AVCS gear. This has a pair of teeth that mean the ECU can know where the engine is. This meant putting in a third sensor, which there wasn't wiring for, and which I didn't have a bracket on the heads for.

Fortunately, there was an off-the-shelf bracket available, and being a VR sensor a single dual core shielded wire ran from the bulkhead fixed the wiring side.

This fixed the problem, the car now ran.

I had well and truly missed the dyno and ended up taking my mate Seb's car to the National meet.
User avatar
jamescd
 
Posts: 143
Joined: Mon Oct 13, 2014 9:35 pm
Location: Hobart, Tasmania
Car: 2007 Liberty GT spec b
Real name: James
Profile URL: viewtopic.php?f=10&t=35401

Re: Member Profile - James' GT spec B Wagon - GTB013

Postby jamescd » Sat Nov 29, 2025 3:23 pm

Once back from the national meet, I booked back in for the dyno.

I had a couple of weeks before then, so I did a couple more things that needed doing.

I gassed the A/C. I was worried it might not work given the system was open for 4 years, but it works great.
Image

I installed a PDM for controlling the two Walbro 460s in the surge tank.
Image

I designed and 3D printed a mount for my Powertune dash.
Image

I also installed eyelids.
Image

The dyno day came around and the car performed great!
Image
Image
Image

This was just a run-in day, so lots of load and just holding the engine at rpms to get heat into the rings. The dyno tuner and engine builder had a long conversation about break-in, so I am deferring to their expertise.

Even with it just being a run-in day, the car happily made 212kw. This is a great result given it is on conservative timing, wastegate boost (15psi), and only revving to 5k rpm.

I have another few thousand km to do before I go back put some ethanol in it and turn everything up, but I am loving having the car back on the road.
Image

I will do an update to my build list at some point soon, as there is a fair bit that is different.
User avatar
jamescd
 
Posts: 143
Joined: Mon Oct 13, 2014 9:35 pm
Location: Hobart, Tasmania
Car: 2007 Liberty GT spec b
Real name: James
Profile URL: viewtopic.php?f=10&t=35401

Re: Member Profile - James' GT spec B Wagon - GTB013

Postby Ric » Sun Nov 30, 2025 11:44 am

That is amazingly impressive, and well done diagnosing the CAM sensor problem and finding a workaround!
User avatar
Ric
Site Admin
 
Posts: 6481
Joined: Fri Oct 06, 2006 11:08 pm
Location: Melbourne
Car: OLD: MY06 3RB Wagon NEW: MY21 Outbck
Real name: Ric
Profile URL: viewtopic.php?f=7&t=12

Re: Member Profile - James' GT spec B Wagon - GTB013

Postby Yowie » Thu Dec 18, 2025 6:28 am

Wow. Quality work.
User avatar
Yowie
 
Posts: 611
Joined: Tue Jul 21, 2015 10:05 pm
Location: Brisbane
Car: SH Forester XT

Re: Member Profile - James' GT spec B Wagon - GTB013

Postby jamescd » Sun May 03, 2026 12:56 pm

I have updated the first page to have the current mod list.

Run in is almost over, but I have a couple of things I want to address before it goes on the dyno again.
I have a valved exhaust to go in which is the main one as I don't want to change the exhaust post-tune.

Otherwise there are a couple of smaller things:
-I've got a few small oil leaks (pretty sure one is the seal on the AVCS sprocket, but C23 make them now, so that helps).
-The catch can leaks and just isn't great or in a spot I like, as an extension of this, I want to change up the coolant overflow and other tanks in the bay.
-I have RSD 13k eccentric idlers to go on (will likely do these at the same time as chasing the AVCS area leak).

Otherwise I have done a few things since the last update.

Due to the rush for the dyno I didn't have the rear Brembos fitted. This was due to the original brackets being symmetrical and causing the caliper mounting bolts to foul on the rear trailing arm (only a problem due to going to the aluminium arms). I got a set of brackets designed and machined which fix this issue as the are side specific and move the caliper slightly as well as being slightly thinner to drop the bolt head height in relation to the trailing arm.
Image
Image

I had an abs light pop up, fortunately I could look at the CAN data in the logs and see that all three rear fine, except the rear right which was stuck at 3640.80km/h, this is a CAN message of FF FF which is just the maximum value (65535*0.055555 which is the maximum CAN value with the scaling used by Subaru). THis just seems to be the error state, possibly to ensure that the odometer still increases (even if it increases faster than it should).
I got a replacement sensor and pulled the old one, which as you can see was obviously broken. The speedo is now way closer and the abs light is gone.
Image

I also got a few goodies from Japan, the first of which is a Zero/Sports radiator panel
Image

I also found a new set of wheels. A nice set of WedsSport SA-35R in 18x8.5 +45. Another 15 spoke in almost the same design and specs as my old set, but in silver. I have wanted silver for a long time, and after a long ride on a slow boat they have arrived. Despite being almost the same specs I wasn't certain of brake clearance, so as soon as they arrived I did a test fit, and have zero regrets. These will get the tyres swapped from the black SA-15Rs and will be the daily wheels and the 15Rs will become track wheels with some sticky rubber.
Image
Image

A set of blue STI wheel nuts popped up and I got those too, as I have wanted them for a while (but not at the $400 Partsouq want). They will look great in combination with the new Weds.
Image

I also nabbed a blue Prova rear view mirror to match the two wing mirrors.
Image
User avatar
jamescd
 
Posts: 143
Joined: Mon Oct 13, 2014 9:35 pm
Location: Hobart, Tasmania
Car: 2007 Liberty GT spec b
Real name: James
Profile URL: viewtopic.php?f=10&t=35401

Re: Member Profile - James' GT spec B Wagon - GTB013

Postby nvmylh » Fri Jun 05, 2026 10:05 am

Awesome work, do the alloy rear arms still use the same steel backing plate/caliper mounting plate as the steel arms? Can I ask how much the adapters were? Cheers
nvmylh
 
Posts: 147
Joined: Thu Apr 15, 2010 1:15 pm
Location: Melbourne
Car: '08-H6-Wagon

Re: Member Profile - James' GT spec B Wagon - GTB013

Postby jamescd » Sat Nov 14, 2026 3:26 pm

nvmylh wrote:Awesome work, do the alloy rear arms still use the same steel backing plate/caliper mounting plate as the steel arms? Can I ask how much the adapters were? Cheers


Yeah, same everything as the regular arms on an AUDM in terms of brake setup, I'm just running the brackets and DBA conversion rotors.

Retail would be around the $550 mark for them.
User avatar
jamescd
 
Posts: 143
Joined: Mon Oct 13, 2014 9:35 pm
Location: Hobart, Tasmania
Car: 2007 Liberty GT spec b
Real name: James
Profile URL: viewtopic.php?f=10&t=35401

Re: Member Profile - James' GT spec B Wagon - GTB013

Postby jamescd » Sat Nov 14, 2026 4:38 pm

It has been a little while since the last update and a bit has been done.

I ended up booked to go to Subinats, and I wanted to have all the power before then. I booked in the dyno for the week before (start of October).
I knew there were a few bits I wanted to sort before the full power dyno run, so in September the car went back on the hoist.

The list of things I wanted to sort was as follows:
-add the varex muffler to allow the cutting of noise when doing highway driving
-refresh timing components (mainly fitting the RSD high RPM eccentric idlers)
-investigate the oil leak behind the timing cover
-add bracket to up-pipe to help support turbo
-add heat shielding to the exhaust
-add EGT sensors (or at least provisions for them) while the exhaust was off
-fix the catch can situation (the old one leaked and I didn't like the location)
-fix the slow leak from the gearbox seals

With the car on the hoist I pulled everything off, headers, up pipe, dump, timing parts.
Image

With everything off I looked for the oil leak(s)...
Image

And I couldn't find a single wet patch behind anything. Absolutely nothing.

I had thought my leak was probably from the reused seals in the AVCS sprockets, as when I had refreshed them last time, the seals weren't available separately. Company 23 now conveniently offers replacement seals separately to the assembly, so I had picked up a set in preparation. I was already in there, so I pulled them apart and put in the new seals.
Image

The other reason I was in doing timing was to replace the secondhand IAG eccentric idler with a pair of 15,000RPM rated Rally Sport Design iders.
Image

Again, it was a bit of a "while I'm in here" job, so I replaced the tensioner and the belt too.
Image

Now, onto that leak that I was chasing... I posted to my insta story and a mate commented that he had the same symptoms when his power steering pump was leaking. After a bit more digging, lo and behold that was exactly the problem. It was leaking from basically everywhere. Subaru only sell the top o-ring separately, so I went digging for a seal kit for the whole pump.

I ended up going for this kit off ebay
"POWER STEERING PUMP SEAL KIT TO SUIT SUBARU LIBERTY TURBO 6/03 - 6/09 ( 8760)" (title in case the listing is removed, seller was Steering Rebuilds Australia P/L)
https://www.ebay.com.au/itm/172805696328

It rocked up and seemed like it would do the job.

I pulled the whole pump and just dumped it in the ultrasonic because it was grot.
Image

After a lot of scrubbing and cleaning it was ready to come apart. I used this video a fair bit for basic reference, but otherwise it really was a case of paying attention to how it came apart and putting it back together the same.
https://www.youtube.com/watch?v=oXjUaEGHAlU

It is worth mentioning this really was just a re-seal. My pump worked fine, it just leaked like a sieve, so if you have bigger problems, this probably isn't a solution. I also didn't do anything to the switch passthrough as mine wasn't leaking.
Image

With it all back together though, it has worked perfectly ever since, no leaks, no problems.

Next up it was time to replace the gearbox seals (again). The Burson seals had never quite done the job, so with a set of Subaru replacements I set to work replacing them.
This went fine, right up until I split one of the outer sundial o-rings. Which in itself, wouldn't be a problem, but at this point I had a week before the dyno and needed the car back together.
Image

Fortunately a few mates and a local bearing supplier were able to sort me out with replacements and the box went back together.

With the exhaust off a bracket was made to attach the up-pipe to the engine. Then holes were dilled for EGT bungs and I started to put heat shield on it.
Image
Image
Image

Unfortunately after putting holes in the headers we discovered that there was a big crack in one of the primaries.
Image

It could have been repaired, but given I wanted EGT bungs and heat shielding it just didn't seem worth putting all that effort into something that might just fail shortly anyway. It also probably could have been repaired before the dyno, but again, it is a lot of work for something that won't be sticking around. I bought a used set of headers and hoped they would arrive in time (this was maybe a week and a half before the dyno).

Fortunately they arrived two days before the dyno, so I was able to put them on the night before. They already had heat wrap, so because of time I left that on there, and I will cover them with the insulation and stainless sheet (as well as fitting EGT bungs) at a later date.
Image

The rest of the exhaust was going to get a Varex muffler put in the centre to allow me to close the valve for quieter highway driving and cruising. Unfortunately the muffler was just too big to fit anywhere, so I jumped on marketplace and found a resonator to put in with the hope of achieving similar. I found a Dynomax muffler which seemed to fit the bill and it was only $100 on marketplace new in box. Honestly the workmanship on the Dynomax isn't amazing, and it is slightly low (speedbumps are slightly scrapy), but it went in and the car is a lot less droney on the highway.

The other thing I wanted to sort was the catch can. The original was poorly made, sat in a bad spot, and was just an eyesore (I made it).
I wanted something that was out of the way, had ports for both heads and the crank breather and also returned to the PCV and turbo inlet. I also wanted a cover to help isolate the intake from the bay.

I took a few basic scans with my phone (thank Kiri Engine) and imported them to fusion to see what room I had to play with.
I used a combination of CAD, cardboard, and aluminium to work out the exact spacing for everything.
Image
Image
Image
Image

I cut the cover from sheet with a grinder and got the catch can laser cut.
Once it arrived and I got it welded (by a mate), it went in
Image
(just like the simulations)

The cover also got chopped (probably slightly too judiciously)
Image

Everything was sort of half done the day before the dyno, I had been waiting for box seals, headers, and catch can to be welded. Somehow it all went together, with new catch can hoses going in, the exhaust bolting up. First fill with non-run in oil.
Image

I drove it home (the exhaust wrap on the headers was very smokey). I finished the car at about 8:30pm, and I still had to get e85 for the dyno. I also needed some jerrys cans. Fortunately Bunnings is open until 9pm, so I hustled and made it in time to grab 3 jerrys. I then went to the closest united to fill them up... Of course, the after-hours machine was broken, so no e85 for me. The car also didn't want to boost properly, and sounded odd coming off boost (no choo choo, more a screech)

In the middle of the night I had the recollection that I didn't remember putting the throttle body clamp back on. I woke up early and went and checked, and I found the very obvious problem:
Image
I also still needed e85, so I drove to the nearest servo to the dyno which has e85, and checked that the car made boost again while I was at it. Fortunately it was all good.

Then I headed for the dyno.
Image

The car had some decent runs, but unfortunately there were a couple of issues that stopped us doing the full power tune, or e85 tuning.
The wideband sensor wasn't reading correctly, which is an instant no-go on the e85 tuning, but the AVCS wasn't behaving either, swinging wildly around the target. We weren't sure if the AVCS problem was mechanical or electrical, so given the wideband also needed replacing a decision was made to call it a day.

With that said, on 98 fuel and gate pressure (14psi) the car made 271kw.
Image

A fair bit short of the goal, but nothing to be sniffed at. I could also now rev it to 8k, which is great even without a bucket of power.


So not the ideal outcome, but nothing went badly wrong and the car was at least good for the ~2500km trip to and from Sydney the next week.

The roadtrip went without a hitch, the exhaust was quieter, the car drove really nicely in every scenario that was thrown at it.
It made it to Subinats
Image

I saw the sights
Image

And then I drove it all the way back home.

It all went great...

Until I turned into my driveway. That's the exact moment the front driveshaft decided it didn't like being in the gearbox any more and dumped all the gearbox fluid on the ground.
Image

I have since tried replacing the cir-clips
Image
Image

I have tried no circlips, different shafts, wailing on them with a hammer... And still nothing. The shafts seem to go all the way in, but there is no force retaining them, you can pull them back out by hand.

As it sits the car is on jack stands, as far as I can tell the shafts have never seated properly, I just got lucky right up until that moment. I have some stub shafts to try, but as it stands I don't trust the front diff install, so I will likely put the front end back together, put the car back on the hoist and drop the box and re-check the diff numbers.

Once that is sorted I still have to finish sorting the AVCS (a new wideband went in on the same afternoon as dyno day). The plan for that is to double check the banjos, and then look at the tune itself some more (I have checked the tune and got them closer, but it still doesn't seem as close as it should be).

Anyway, big update, thank for reading, hopefully the next one ends with the car back on all four wheels.
User avatar
jamescd
 
Posts: 143
Joined: Mon Oct 13, 2014 9:35 pm
Location: Hobart, Tasmania
Car: 2007 Liberty GT spec b
Real name: James
Profile URL: viewtopic.php?f=10&t=35401

Previous

Return to Post your mods

Who is online

Users browsing this forum: No registered users and 5 guests

cron