Android Tablet Install

Stereos, amps, phone kits, Navi...

Re: Android Tablet Install

Postby Statts » Tue Apr 09, 2013 8:51 pm

krosbow wrote:
NRV155 wrote:Just WOW. This is very ingenious. Does the cold air from the aircon have any effect on the tab, like condensation or anything, or even hot air overheating the tab?


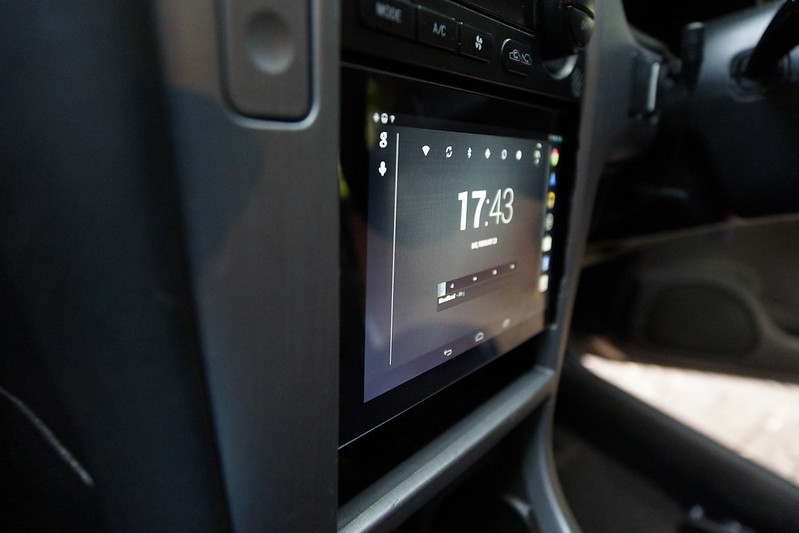
No problems with cold or heat yet, I had the tablet in primed for about 3 weeks, with 5 or so days 35° + with no issues, i have also had some close to zero days once in and painted, and also haven't had any issues. The aircon gets incredibly cold, much more than i thought, it may chill the end of the tablet where the power connects in, but no issues, fingers crossed.

The tablet isn't a Nexus either, its a Freelander PD10 - http://dx.com/p/freelander-pd10-3g-7-ca ... -961167126

Didn't really want to shell out on a Nexus, till I knew what problems I'd have, although I did design my install to be able to be upgraded with a newer 7" tab.


Good thing about the Nexus 7 is the development for it. I'm testing out Timur's USB-ROM which supports charging and USB OTG, has drivers and firmware built in for DAC's and DVB tuners as well as a whole host of features that suit fixed installations.
MY06 3.0R-B
Cusco bars & links, AVO mounts, JSpeed LCA bushes
Prova intake, HKS resonator trumpet, HKS panel filter
E85 KiDo tuned
User avatar
Statts
 
Posts: 494
Joined: Wed Apr 07, 2010 5:37 pm
Location: Adelaide
Car: 05 3.0R-B
Real name: Chris
Profile URL: viewtopic.php?f=10&t=14975

Re: Android Tablet Install

Postby krosbow » Tue Apr 09, 2013 8:58 pm

Statts wrote:Good thing about the Nexus 7 is the development for it. I'm testing out Timur's USB-ROM which supports charging and USB OTG, has drivers and firmware built in for DAC's and DVB tuners as well as a whole host of features that suit fixed installations.


Nice!
User avatar
krosbow
 
Posts: 18
Joined: Tue May 24, 2011 8:02 pm
Car: MY05 LGT

Re: Android Tablet Install

Postby krosbow » Sat Apr 13, 2013 1:52 pm

As requested, here is a post on how I completed my Android tablet install. I have been lurking and using some of the great info on this forum for some time, and decided that now is the time to give back - hopefully this can help some others as the forum has helped me. Mod's feel free to move or edit as required.

Items Required/Used In The Install
  • Freelander PD10-3G 7" Tablet
  • Bluetooth OBDKey®
  • Male USB A to angled Mini USB B cable for charging - Custom made from existing USB cable
  • 5V/2A Cigarette to Female USB A Charger
  • Extra Cigarette socket to splice into factory loom(s)
  • Stereo 3.5MM 90 degree to 3.5MM plug
  • Anycarlink AL-1080A: For MP3/USB/SD/Aux
  • Jaycar Ground Loop Isolator
  • Momentary on, push button switch for relocating tablets power switch
  • Single poll, single throw switch for relocation of factory 'bright' button
  • High quality and universal matt screen protector. (iPad mini cut to size for this install.)
  • Miscellaneous wire, sandpaper, connectors, paint and filler.
  • Dremel
  • Patience
Approximate cost
  • Around $450AU, excl labor.
Applications Installed on the Tablet
  • AutomateIt - Used for automation of the tablet, including screen brightness and timeout, as well as power saving shutdowns and disabling of radios etc.
  • Desktop VisualizeR - Used for creation of image based widgets, that work as shortcuts.
  • droid VNC server - Used to remote the tablet while in the car/garage from the desktop PC.
  • Google Maps/Navigation - Self Explanatory!
  • Super AppLock - Used to password protect any applications that contain personal information or settings, thus enabling the tablet to not need a screen lock, but still maintain some basic security.
  • PlayerPro - Great music player, mainly for great widgets, folder browsing, cover art download and EQ.
  • Torque - Quite common OBD2 application.
  • Tablet Talk - Used to intercept SMS and Calls over Wifi from Phone, does not support audio but allows caller ID etc.
  • Widgetsoid - Great widgets app for switching things on and off, with some customization.
Build Steps
  1. Firstly I created a wiring diagram in Visio, to work out exactly how this was going to fit together, this also helped working out what components were needed.
    Image
  2. Next I completed some rough test fits with the bezel and tablet, working out some angles and how much would need to be built up.
    Image
    Image
  3. At this time I also completed some fitment checks of how much would need to be removed from the RHS vent pipe, at this stage it seemed I would lose the first vent fin from the RHS, this was later confirmed as correct, with minimal/no impact on airflow etc.
    Image
  4. Next I opened up the tablet, and with assistance from a mate soldered two wires onto the tablets power button, to allow the button to be relocated off the tablet, to another location in the vehicle, thus allowing the ability to boot and shutdown the tablet. A word on tablet selection: When I started this project the Nexus 7 had not commenced its rapid price dive as it has over the last month, and I could not really justify hacking up a $300 plus tablet on something quite as experimental as this - however the following design is relatively future proof, allowing brackets to be attached to a new 7" device with similar dimensions.
    Image
  5. The cutting begins - I had already sliced out the separator between the info display and the factory cubby, but in this step I also trimmed the bezel back for filling, the approximate cut mares are still visible in the photo.
    Image
  6. Next I knew I needed to build the sides of the fascia back further into the dash, to a) get the OEM look, but also to b) minimize the disruption and destruction of the RHS vent. Plastic was glued into the channels between where the vents mount and the visible side of the fascia. I found some Phillips headlight packing, which has a near perfect contour for the inner side of the bezel. This area did need some reinforcement later down the track.
    Image
    Image
  7. The bogging begins - I used Septone Fibreglass Filler to start building the sides of the fascia up.
    Image
  8. Once I had built the sides to a even finish, I used a wooden model of the tablet to work out the approximate angle the screen would sit at, to allow cutting any excess filling off to create a flush surface to mount the tablet against, this also needed to be done to work out what filling was needed for the top and bottom areas of the fascia.
    Image
  9. The sides are now cut, and the filing of the top of the fascia could commence. I used a take-away containers plastic to fill against, and hot melt glued them into place, wile also using the existing gussets for added strength.
    Image
  10. The top section being filled.
    Image
    Image
  11. The bottom section was then filled using the same take-away container method as the top. This later needed to be built back slightly, to place the tablet on a more vertical angle in the car. I used a paper diagram of the tablet for rough fitment while filling too.
    Image
  12. Sanding and fine tuning could now take place, this was quite tedious, possibly because of my lack of experience completing this type of activity. An off-cut of decking timber was used as a sanding block, to get a uniformed profile for all four corners. Septone Blade Putty was used to fill any small imperfections.
    Image
    Image
  13. In between sanding and filling the section of the RHS vent pipe that needed to be cut was measured, as indicated in white paint marker. Everything forward of the cut was later scraped, as it was not needed. Also the cut needed to be moved slightly further back to allow the felt padding to be added between the fascia and tablet. At this same time I also modified the base plate in the RHS vent that supports the vertical vent fins, this needed to be cut to allow the tablet to protrude into the vent, but still maintain the right screen alignment, this involved using the Dremel to cut the plate near where the furthest left vent fin attaches.
    Image
  14. Once all fine tuning, shaping and sanding was completed the fascia was primed using Septone Plastic Primer Filler
    Image
  15. Next felt was applied to be the buffer between the tablet and the fascia, this was in perpetration for mounting the tablet to the vents. I used Floor Protection Felt from Bunnings.
    Image
  16. Next the tablet was guided down the RHS vent, pressed flush against the LHS vent, and centered horizontally against the fascia/felt, in preparation for attaching the brackets.
    Image
  17. Next brackets were aligned between the tablet and vents in preparation to glue them onto the tablet using Araldite. The other end of the brackets was bolted to the vent tubes using M10 nuts and bolts, painted black in the tubes. Final fitment is demonstrated in the 3rd photo, that is from final assembly.
    Image
    Image
    Image
  18. Once alignment was completed and the tablet, brackets and fascia were assembled, the installation was then tested in the car for about a month of varying temperatures and road surfaces. Once I was satisfied with this the install was disassembled, and the felt removed, followed by re-installing the vent louvers prior to top coat paint, this was due to issues experienced when putting the louvers back in, and them grazing the paint. Once the louvers were installed they were masked to prevent them being painted. It was noted at this time that a matt screen protector would be needed to reduce glare.

    Septone Matt Black paint was used for the final finish, I did about 6 light coats, then waited for 48 hours for the curing process, prior to unmasking the vents and proceeding.
    Image
  19. Final assembly could now begin, firstly with a new adhesion of Floor Protection Felt, followed by trimming and installing the matt screen protector.
    Image
  20. Power and audio cables were ran down the RHS vent prior to gluing, the nuts that hold the bracket (unpainted in this picture) are also visible. The USB cable was modified (bent and twisted) by me to allow it to clear the second vent, as well as run on the correct angle through the vent pipe. The audio cable had to have a small amount of the plug whittled of to clear the second vent too.
    Image
  21. Wiring was routed out of the rear of the vent.
    Image
  22. Next I prepared to glue the fascia to the vents and tablet assembly. Prior to the tablet install this was not glued, but had 8 small tabs, most of these were damaged prior to me commencing the project, so I have removed them and would be hot melt gluing the two sections together, this also needed to be done, as the vents were supporting the tablet. Black hot melt glue was used, It was quite expensive, but any seepage would be less noticeable. Hot melt glue is also not permanent, allowing for easier future upgrades.
    Image
    Image
  23. This photo demonstrates the close but working proximity of all items in the RHS side of the install.
    Image
  24. Bench testing could now be completed prior to installing the unit into the car.
    Image
  25. This photo demonstrates the final fitment of the rear of the tablet.
    Image
  26. Next the 'accessories bay' was finished, this is located in the space within the glove-box where the factory Sat-Nav DVD would usually be, in this location the extra cigarette socket is located, the Anycarlink, and the Ground Loop Isolator (removed from the case, as well as the input and output jacks being reversed to allow a F to M configuration instead of a M to F). Power and audio wiring for the tablet is also routed through a few small incisions in the RHS of the opened box.
    Image
  27. Some may ask why the power is in this location and not hidden behind the install, I have completed this so I can also charge the tablet from mains on the USB connector, and can also (in the future) use USB OTG and USB LAN if required.
    Image
  28. Installed!
    Image

I hope this will enable you to add a tablet to your Liberty! Feel free to reply or PM with any further questions.
User avatar
krosbow
 
Posts: 18
Joined: Tue May 24, 2011 8:02 pm
Car: MY05 LGT

Re: Android Tablet Install

Postby wcefan » Sat Apr 13, 2013 2:03 pm

Holy crap. Very nice and detailed guide. Thanks a lot man.
User avatar
wcefan
 
Posts: 172
Joined: Fri Feb 08, 2013 1:43 am
Location: Perth, WA
Car: MY06 Liberty GT tbSTI #25
Real name: Cameron

Re: Android Tablet Install

Postby bigBADbenny » Sat Apr 13, 2013 5:44 pm

Unblvbl!!! Love it :mrgreen:
User avatar
bigBADbenny
 
Posts: 10474
Joined: Tue Oct 04, 2011 6:36 pm
Location: Collingwood, Melbourne
Car: MY07 GT-B 6MT OBP Wagon
Real name: Ben Richards
Profile URL: http://tinyurl.com/agvbzop

Re: Android Tablet Install

Postby HoFF » Sat Apr 13, 2013 5:49 pm

That's some great work there.

Sent from my C6603 using Tapatalk 2
User avatar
HoFF
-stickered-
 
Posts: 1447
Joined: Sun Sep 05, 2010 11:39 am
Location: Southern Highlands NSW
Car: MY06 3RB Liberty Wagon 6MT MY09 Foz
Real name: Tom
Profile URL: viewtopic.php?f=10&t=13577&start=255

Re: Android Tablet Install

Postby Coops75 » Fri Apr 19, 2013 6:02 pm

Excellent write up, thank you.
Coops75
 
Posts: 47
Joined: Wed Oct 31, 2012 5:27 pm
Location: Canberra
Car: MY07 2.5i

Re: Android Tablet Install

Postby peadya100 » Fri Apr 19, 2013 8:11 pm

Thats truly amazing!!
If i wasnt so lazy id do that myself :lol:
Diamond Works SI-DRIVE Covers - Subaru Liberty/Legacy MY07 to MY09

https://www.facebook...aruDiamondWorks
subaru.diamondworks@gmail.com
User avatar
peadya100
-stickered-
 
Posts: 2243
Joined: Wed Dec 08, 2010 1:21 pm
Location: Norah Head, Central Coast
Car: 2007 Liberty GT-B Wagon
Real name: Adam
Profile URL: viewtopic.php?f=10&t=21072

Re: Android Tablet Install

Postby Graphite » Fri Apr 19, 2013 8:24 pm

Some brilliant work here guys - and great 'How to' krosbow 8)
2.0 GT spec.B BP5 with a few mods...
Image
... And now I will show you the most excellent way... 1 Corinthians 12 v 31.......
Graphite
 
Posts: 256
Joined: Thu Jan 26, 2012 10:53 pm
Location: Nova Scotia, Canada
Car: Legacy (Liberty) 2.0GT spec.B JDM 04
Real name: Mick

Re: Android Tablet Install

Postby nickknack » Fri Apr 19, 2013 10:00 pm

Just found this thread! I have a nexus 7 in my B4, pics below. Given I don't have as much extra space as you gen4 guys, mine sits where the head unit was, and audio is via bluetooth or aux in to a head unit I mounted under the passenger seat. What are you doing for volume adjustment?

@Harrybob, are you having issues with discharging at all? My tablet is losing ~5-10% overnight, and the weak charging current of the 12V battery means a 20min commute is not really enough to recoup this loss. The screen goes off and it goes into aeroplane mode at night.

Image

Image
User avatar
nickknack
 
Posts: 155
Joined: Tue Apr 17, 2012 3:01 pm
Location: Canberra
Car: Black MY02 Liberty B4
Real name: Nick
Profile URL: viewtopic.php?f=7&t=16448

Re: Android Tablet Install

Postby TheFirstEskimo » Mon Apr 22, 2013 9:45 am

Nice work guys. This is the next mod I'll be doing for sure. Just saw these going for $79 on catch of the day.

http://www.dxtreme.com.au/D703b/d703bspec.html

Would this be any good? Doesnt look like its got bluetooth which could be a pain.
User avatar
TheFirstEskimo
 
Posts: 219
Joined: Thu Aug 25, 2011 11:53 am
Location: Sydney
Car: MY07 Liberty GT Wagon
Real name: Mick
Profile URL: viewtopic.php?f=10&t=21725

Re: Re: Android Tablet Install

Postby circlethesky » Mon Apr 22, 2013 10:16 am

TheFirstEskimo wrote:Nice work guys. This is the next mod I'll be doing for sure. Just saw these going for $79 on catch of the day.

http://www.dxtreme.com.au/D703b/d703bspec.html

Would this be any good? Doesnt look like its got bluetooth which could be a pain.


To be honest you get what you pay for with android tablets.
As it's just a car install it would probably do the job, though if you load it with music and movies (even on the sd card) it would get really slow and unresponsive. Having lag and apps force closing while you're driving would be very painful and frustrating.

The nexus 7 is more expensive but is one of the best tablets on the market, in the end its up to you but I wouldn't trust the one you linked.
Matt - MY04 2.5i Liberty - SE Melbourne
User avatar
circlethesky
 
Posts: 211
Joined: Mon Feb 25, 2013 4:28 pm
Location: Melbourne
Car: MY04 2.5i Liberty
Real name: Matt
Profile URL: viewtopic.php?f=10&t=25229

Re: Android Tablet Install

Postby Harrybob » Mon Apr 22, 2013 12:17 pm

nickknack wrote:Just found this thread! I have a nexus 7 in my B4, pics below. Given I don't have as much extra space as you gen4 guys, mine sits where the head unit was, and audio is via bluetooth or aux in to a head unit I mounted under the passenger seat. What are you doing for volume adjustment?

@Harrybob, are you having issues with discharging at all? My tablet is losing ~5-10% overnight, and the weak charging current of the 12V battery means a 20min commute is not really enough to recoup this loss. The screen goes off and it goes into aeroplane mode at night.


I initially had issues with charging as I was having the screen in full brightness mode and having bluetooth on all the time, the tablet would use more power then what it was being supplied even with a 2.1amp usb car charger.

Since then I have changed a setting so it dims the screen when not in use but returns to full brightness when you touch the screen and have also got audio to go via aux rather then bluetooth, with this setup I have managed to maintain power at 100%.

Sorry I don't have a guide for my install, didnt take any pictures along the way but it pretty much is what krosbow did with his guide.
Harrybob
 
Posts: 69
Joined: Tue Apr 05, 2011 11:28 am
Location: Melbourne, VIC
Car: MY07 Liberty 3.0R Spec.B
Real name: Sonti

Re: Re: Android Tablet Install

Postby circlethesky » Mon Apr 22, 2013 1:06 pm

Harrybob wrote:
nickknack wrote:Just found this thread! I have a nexus 7 in my B4, pics below. Given I don't have as much extra space as you gen4 guys, mine sits where the head unit was, and audio is via bluetooth or aux in to a head unit I mounted under the passenger seat. What are you doing for volume adjustment?

@Harrybob, are you having issues with discharging at all? My tablet is losing ~5-10% overnight, and the weak charging current of the 12V battery means a 20min commute is not really enough to recoup this loss. The screen goes off and it goes into aeroplane mode at night.


I initially had issues with charging as I was having the screen in full brightness mode and having bluetooth on all the time, the tablet would use more power then what it was being supplied even with a 2.1amp usb car charger.

Since then I have changed a setting so it dims the screen when not in use but returns to full brightness when you touch the screen and have also got audio to go via aux rather then bluetooth, with this setup I have managed to maintain power at 100%.

Sorry I don't have a guide for my install, didnt take any pictures along the way but it pretty much is what krosbow did with his guide.


Only thing I need to know is how you modified the bezel! I have no idea where to start once I find a spare to use.
Matt - MY04 2.5i Liberty - SE Melbourne
User avatar
circlethesky
 
Posts: 211
Joined: Mon Feb 25, 2013 4:28 pm
Location: Melbourne
Car: MY04 2.5i Liberty
Real name: Matt
Profile URL: viewtopic.php?f=10&t=25229

Re: Re: Android Tablet Install

Postby Statts » Mon Apr 22, 2013 3:10 pm

circlethesky wrote:
Harrybob wrote:
nickknack wrote:Just found this thread! I have a nexus 7 in my B4, pics below. Given I don't have as much extra space as you gen4 guys, mine sits where the head unit was, and audio is via bluetooth or aux in to a head unit I mounted under the passenger seat. What are you doing for volume adjustment?

@Harrybob, are you having issues with discharging at all? My tablet is losing ~5-10% overnight, and the weak charging current of the 12V battery means a 20min commute is not really enough to recoup this loss. The screen goes off and it goes into aeroplane mode at night.


I initially had issues with charging as I was having the screen in full brightness mode and having bluetooth on all the time, the tablet would use more power then what it was being supplied even with a 2.1amp usb car charger.

Since then I have changed a setting so it dims the screen when not in use but returns to full brightness when you touch the screen and have also got audio to go via aux rather then bluetooth, with this setup I have managed to maintain power at 100%.

Sorry I don't have a guide for my install, didnt take any pictures along the way but it pretty much is what krosbow did with his guide.


Only thing I need to know is how you modified the bezel! I have no idea where to start once I find a spare to use.


Modifying bezels takes more time and patience than I have. I ordered the 7" AV panel set from Japan.
MY06 3.0R-B
Cusco bars & links, AVO mounts, JSpeed LCA bushes
Prova intake, HKS resonator trumpet, HKS panel filter
E85 KiDo tuned
User avatar
Statts
 
Posts: 494
Joined: Wed Apr 07, 2010 5:37 pm
Location: Adelaide
Car: 05 3.0R-B
Real name: Chris
Profile URL: viewtopic.php?f=10&t=14975

PreviousNext

Return to Audio options

Who is online

Users browsing this forum: No registered users and 5 guests