Hey all,
So I am revisiting this situation that I have. I want different wheels... simple as that.
But the tyres I have at the moment are still pretty much brand new (Pirelli P7s), and if I want to upgrade, I would probably go for a wider tyre or go for a bigger sized rim. So right now, the upgrade will need to be on hold...
So... I thought, why don't I just do it myself? But the thought of sanding and painting them myself sounds like a big job.. I then thought... ahh I'm sure there are shops out there that will do this type of work. I visited Alliance Rim Repair in Malaga and got a quote of about $170 per rim (ex. GST) to get the gutter rash out and paint them satin black, coz they also said my wheels are beyond repair (which I think is BS). Not quite worth it when for another couple of hundred I could go for bigger and different rims. So I am now revisiting the topic of doing them myself again.
I know Champ from these forums was keen to help me, and so I have started this little project yesterday afternoon (yes in the 40 degree Perth heat).. Went to Auto Pro in Innaloo, go seek a guy there called Sam, really helpful guy, have always gone to him since buying my whole stereo from him. He advised the type of sandpaper, paints and gloss for the job. All the equipment cost to about $60 - consists of 2x Satin black paints (in spray cans), 2x Clear coat paint, and 4x sandpaper (2x 150 coarseness, and 2x 270 coarseness (I think).
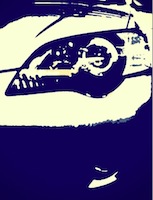
So far I have sanded back all 4 wheels, all I need to do now is sand them again with the finer paper (higher the number, the finer it is), and then prep and paint them. Yes, the car will be out of commission for the day... so take out the bike or clean those walking shoes!
Here's my progress thus far...

Australian Liberty Owners Club
Painting My Wheels take 2.
17 posts
• Page 1 of 2 • 1, 2
Painting My Wheels take 2.
![]() by d-chang » Mon Mar 12, 2012 3:17 pm
by d-chang » Mon Mar 12, 2012 3:17 pm
- Attachments
-
- photo 3.jpg (253.19 KiB) Viewed 4392 times
-
- photo 1.JPG (118.31 KiB) Viewed 4392 times
-
- photo 2.JPG (115.21 KiB) Viewed 4392 times
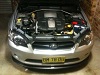
Below car has been gone for quite some time now... blew bottom end bearing and dealership screwed me! Now driving 2008 WRX with ~65k kms on the clock. Only has cat back exhaust and tune by KiDo at the moment! More to come... but slowly!
Purchased recently (12/11/2013), already with: Stage 2 Pedders lowered springs, rear Whiteline sway bar, Advan Racing TCII 18x8 wheels, k&N pod filter, custom 3" exhaust system from turbo back with Magnaflow mufflers. ECUTEK tune of some sort (hopefully soon to be fixed)..... now FIXED!! Now KiDo Tuned!
Added: HID kit, EZ lip equivalents to the front and sides, and various LED treatments, oem boot spoiler, [LGT WRC] plates, GFB Respons BOV for extra Pssscchhh! --> Gone... I couldn't afford it's heart transplant... but keep a look out, as it will come back on sale soon!
-
d-chang - -stickered-
- Posts: 636
- Joined: Tue Feb 21, 2012 6:29 pm
- Location: Perth, Western Australia
- Car: MY05 Liberty GT
- Real name: Daniel
- Profile URL: viewtopic.php?f=7&t=15749
Re: Painting My Wheels take 2.
![]() by STI-47W » Mon Mar 12, 2012 4:17 pm
by STI-47W » Mon Mar 12, 2012 4:17 pm
i would like to see how these turn out. I want to do the same thing to my sti wheels.
cant wait to see the end result.
cant wait to see the end result.
Custom [MY STI] Number plate for sale. viewtopic.php?f=3&t=19766
-
STI-47W - formerly illest
- Posts: 284
- Joined: Mon Nov 15, 2010 2:11 pm
- Location: Sydney
- Car: 2006 Liberty Tuned by STI
- Real name: Marco
Re: Painting My Wheels take 2.
![]() by champ » Mon Mar 12, 2012 5:05 pm
by champ » Mon Mar 12, 2012 5:05 pm
40degC heat... gosh, you sure are keen! 
Progress looks good so far
Progress looks good so far
-
champ - -stickered-
- Posts: 1303
- Joined: Sun Aug 01, 2010 9:49 pm
- Location: Joondalup, WA
- Car: MY07 GT Spec.B Tuned by STi 6MT OBP
- Real name: Ian
Re: Painting My Wheels take 2.
![]() by d-chang » Mon Mar 12, 2012 5:26 pm
by d-chang » Mon Mar 12, 2012 5:26 pm
champ wrote:40degC heat... gosh, you sure are keen!
Progress looks good so far
STI-47W wrote:i would like to see how these turn out. I want to do the same thing to my sti wheels.
cant wait to see the end result.
Stay tuned guys.... don't hold your breath... I am hoping to do the job on Thursday when I have my next day off... otherwise it will be next weekend.
I will take photos of the equipment i have so you can probably get the same.
Hahaha Champ, yeah I was just lazing around the house... then said, screw it... I am going to do it!
Below car has been gone for quite some time now... blew bottom end bearing and dealership screwed me! Now driving 2008 WRX with ~65k kms on the clock. Only has cat back exhaust and tune by KiDo at the moment! More to come... but slowly!
Purchased recently (12/11/2013), already with: Stage 2 Pedders lowered springs, rear Whiteline sway bar, Advan Racing TCII 18x8 wheels, k&N pod filter, custom 3" exhaust system from turbo back with Magnaflow mufflers. ECUTEK tune of some sort (hopefully soon to be fixed)..... now FIXED!! Now KiDo Tuned!
Added: HID kit, EZ lip equivalents to the front and sides, and various LED treatments, oem boot spoiler, [LGT WRC] plates, GFB Respons BOV for extra Pssscchhh! --> Gone... I couldn't afford it's heart transplant... but keep a look out, as it will come back on sale soon!
Purchased recently (12/11/2013), already with: Stage 2 Pedders lowered springs, rear Whiteline sway bar, Advan Racing TCII 18x8 wheels, k&N pod filter, custom 3" exhaust system from turbo back with Magnaflow mufflers. ECUTEK tune of some sort (hopefully soon to be fixed)..... now FIXED!! Now KiDo Tuned!
Added: HID kit, EZ lip equivalents to the front and sides, and various LED treatments, oem boot spoiler, [LGT WRC] plates, GFB Respons BOV for extra Pssscchhh! --> Gone... I couldn't afford it's heart transplant... but keep a look out, as it will come back on sale soon!
-
d-chang - -stickered-
- Posts: 636
- Joined: Tue Feb 21, 2012 6:29 pm
- Location: Perth, Western Australia
- Car: MY05 Liberty GT
- Real name: Daniel
- Profile URL: viewtopic.php?f=7&t=15749
Re: Painting My Wheels take 2.
![]() by Bryzie » Mon Mar 12, 2012 11:18 pm
by Bryzie » Mon Mar 12, 2012 11:18 pm
Hey mate, I did the same thing with my rims. I know its a bit late but my word of advice would be to strip the tyres. I found it really hard to get good coverage on the edge of the rim (right in the corner between the lip and the tyre). Looked the goods, lasted about 3 months then slowly started chiping off. Ended up getting them powder coated about a week ago. Picked up a set of rims of ebay, swapped them and sent mine off to get coated. So Ive got s spair set of rims (same as yours) sitting in the garage if you wanted to use them
- Bryzie
- Posts: 40
- Joined: Tue Sep 06, 2011 8:58 pm
- Location: Perth, WA
- Car: MY08 Liberty 2.5Wag
Re: Painting My Wheels take 2.
![]() by d-chang » Tue Mar 13, 2012 2:00 pm
by d-chang » Tue Mar 13, 2012 2:00 pm
Bryzie wrote:Hey mate, I did the same thing with my rims. I know its a bit late but my word of advice would be to strip the tyres. I found it really hard to get good coverage on the edge of the rim (right in the corner between the lip and the tyre). Looked the goods, lasted about 3 months then slowly started chiping off. Ended up getting them powder coated about a week ago. Picked up a set of rims of ebay, swapped them and sent mine off to get coated. So Ive got s spair set of rims (same as yours) sitting in the garage if you wanted to use them
Hey Bryzie,
Yeah good point... I did think of that... but I got no way of getting the tyres on/off. I'm still going to see how I go, thanks for the advice and the offer of the wheels though. Maybe if I botch them up badly I will hit you up! haha!
Below car has been gone for quite some time now... blew bottom end bearing and dealership screwed me! Now driving 2008 WRX with ~65k kms on the clock. Only has cat back exhaust and tune by KiDo at the moment! More to come... but slowly!
Purchased recently (12/11/2013), already with: Stage 2 Pedders lowered springs, rear Whiteline sway bar, Advan Racing TCII 18x8 wheels, k&N pod filter, custom 3" exhaust system from turbo back with Magnaflow mufflers. ECUTEK tune of some sort (hopefully soon to be fixed)..... now FIXED!! Now KiDo Tuned!
Added: HID kit, EZ lip equivalents to the front and sides, and various LED treatments, oem boot spoiler, [LGT WRC] plates, GFB Respons BOV for extra Pssscchhh! --> Gone... I couldn't afford it's heart transplant... but keep a look out, as it will come back on sale soon!
Purchased recently (12/11/2013), already with: Stage 2 Pedders lowered springs, rear Whiteline sway bar, Advan Racing TCII 18x8 wheels, k&N pod filter, custom 3" exhaust system from turbo back with Magnaflow mufflers. ECUTEK tune of some sort (hopefully soon to be fixed)..... now FIXED!! Now KiDo Tuned!
Added: HID kit, EZ lip equivalents to the front and sides, and various LED treatments, oem boot spoiler, [LGT WRC] plates, GFB Respons BOV for extra Pssscchhh! --> Gone... I couldn't afford it's heart transplant... but keep a look out, as it will come back on sale soon!
-
d-chang - -stickered-
- Posts: 636
- Joined: Tue Feb 21, 2012 6:29 pm
- Location: Perth, Western Australia
- Car: MY05 Liberty GT
- Real name: Daniel
- Profile URL: viewtopic.php?f=7&t=15749
Re: Painting My Wheels take 2.
![]() by Bryzie » Tue Mar 13, 2012 10:22 pm
by Bryzie » Tue Mar 13, 2012 10:22 pm
Haha yeah no worries. I took mine down to bridgestone in osbourne park, by the time I got my last wheel out the back the wags the firs was stripped. $10, in and out in no more than 15mins. Too easy. Good luck anyways budd
- Bryzie
- Posts: 40
- Joined: Tue Sep 06, 2011 8:58 pm
- Location: Perth, WA
- Car: MY08 Liberty 2.5Wag
Re: Painting My Wheels take 2.
![]() by d-chang » Sat Mar 17, 2012 1:36 am
by d-chang » Sat Mar 17, 2012 1:36 am
Just an update guys....
So... I spent majority of my day off yesterday doing this project. Hope you guys find this helpful. My piece of advice to you all, get a friend to help you, and it would be better if you have access to trolley jacks or multiple car jacks... or prop them up on bricks. haha!
So from where I last left this thread, I had just sanded off the gloss on the rims. I was going to do this whole job on the car... but luckily I didn't, TAKE YOUR WHEELS OFF, even if it means doing them one at a time.
So from where I left off... what you will need to get are the following items from Bunnings or an Automotive store.
- 2 cans of degreaser
- 2 cans of primer
- masking tape
- sandpaper (320) - I don't really understand the grading, so will have to get back to you
- rubber disposable gloves
- newspapers
So I started off pretty good, masking off areas that I didn't want paint on, and carefully washing off all the marks etc from the rim. But because of the time lost from taking the first wheel off, time was against me...
Here are the following processes that I took to get to the result I have got now...
- Once all the remaining gloss on the rim has been sanded off, prop your wheel against a wall or an area with little to no wind and spray your wheels with the degreaser. The one I bought is from Bunnings, and its made by the same mob that make WD-40, this stuff foams up on the wheel and eats through the gunk that builds up at the wheel nut area and the rim itself
- Leave it for about 3-5 minutes and either wash or wipe your wheel with a cloth with water. Don't forget in the wheel nut area
- Once they are dry and clean, you can now prime it. Again, prop up in an area with not much wind and spray it with primer. Beware, this stuff has strong fumes (I almost got high off it!)!
- Once the primer has dried (about 5-10mins), this is the important stage of sanding any spots, blemishes and rough areas on the rim.
- Once you're happy with the result (i.e.. all smooth), prime it again and leave to dry.
- And again sand out any spots and rough areas. If you can also, during this stage do a wet-sanding as well.
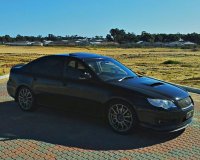
And that's where I am at, at the moment. I got extremely tired from jacking up (and down) the car 8 times and removing/putting on the wheels back, my upper thighs are aching very badly!! All in all... the above process took me about 7 hours to complete (and thats including lunch). I know there are more correct/proper ways to do a job like this, but I am happy with my results thus far. Infact, I am thinking of keeping my wheels the 'primer' colour, looks different! Gives my car a slight 'underground look'.
Don't mind my tyres, they are covered in primer residue, due to my lack of time and laziness!
Hope this helps all you guys potentially undertaking this project. Yes, its harder said than done... but its quite fun when you see the results at the end..
So... I spent majority of my day off yesterday doing this project. Hope you guys find this helpful. My piece of advice to you all, get a friend to help you, and it would be better if you have access to trolley jacks or multiple car jacks... or prop them up on bricks. haha!
So from where I last left this thread, I had just sanded off the gloss on the rims. I was going to do this whole job on the car... but luckily I didn't, TAKE YOUR WHEELS OFF, even if it means doing them one at a time.
So from where I left off... what you will need to get are the following items from Bunnings or an Automotive store.
- 2 cans of degreaser
- 2 cans of primer
- masking tape
- sandpaper (320) - I don't really understand the grading, so will have to get back to you
- rubber disposable gloves
- newspapers
- photo 2.JPG (139.28 KiB) Viewed 4209 times
So I started off pretty good, masking off areas that I didn't want paint on, and carefully washing off all the marks etc from the rim. But because of the time lost from taking the first wheel off, time was against me...
- photo 3.JPG (130.21 KiB) Viewed 4209 times
Here are the following processes that I took to get to the result I have got now...
- Once all the remaining gloss on the rim has been sanded off, prop your wheel against a wall or an area with little to no wind and spray your wheels with the degreaser. The one I bought is from Bunnings, and its made by the same mob that make WD-40, this stuff foams up on the wheel and eats through the gunk that builds up at the wheel nut area and the rim itself
- Leave it for about 3-5 minutes and either wash or wipe your wheel with a cloth with water. Don't forget in the wheel nut area
- Once they are dry and clean, you can now prime it. Again, prop up in an area with not much wind and spray it with primer. Beware, this stuff has strong fumes (I almost got high off it!)!
- photo 4.JPG (120.63 KiB) Viewed 4209 times
- Once the primer has dried (about 5-10mins), this is the important stage of sanding any spots, blemishes and rough areas on the rim.
- Once you're happy with the result (i.e.. all smooth), prime it again and leave to dry.
- And again sand out any spots and rough areas. If you can also, during this stage do a wet-sanding as well.
And that's where I am at, at the moment. I got extremely tired from jacking up (and down) the car 8 times and removing/putting on the wheels back, my upper thighs are aching very badly!! All in all... the above process took me about 7 hours to complete (and thats including lunch). I know there are more correct/proper ways to do a job like this, but I am happy with my results thus far. Infact, I am thinking of keeping my wheels the 'primer' colour, looks different! Gives my car a slight 'underground look'.
Don't mind my tyres, they are covered in primer residue, due to my lack of time and laziness!
- photo 5.JPG (114.24 KiB) Viewed 4209 times
Hope this helps all you guys potentially undertaking this project. Yes, its harder said than done... but its quite fun when you see the results at the end..
Below car has been gone for quite some time now... blew bottom end bearing and dealership screwed me! Now driving 2008 WRX with ~65k kms on the clock. Only has cat back exhaust and tune by KiDo at the moment! More to come... but slowly!
Purchased recently (12/11/2013), already with: Stage 2 Pedders lowered springs, rear Whiteline sway bar, Advan Racing TCII 18x8 wheels, k&N pod filter, custom 3" exhaust system from turbo back with Magnaflow mufflers. ECUTEK tune of some sort (hopefully soon to be fixed)..... now FIXED!! Now KiDo Tuned!
Added: HID kit, EZ lip equivalents to the front and sides, and various LED treatments, oem boot spoiler, [LGT WRC] plates, GFB Respons BOV for extra Pssscchhh! --> Gone... I couldn't afford it's heart transplant... but keep a look out, as it will come back on sale soon!
Purchased recently (12/11/2013), already with: Stage 2 Pedders lowered springs, rear Whiteline sway bar, Advan Racing TCII 18x8 wheels, k&N pod filter, custom 3" exhaust system from turbo back with Magnaflow mufflers. ECUTEK tune of some sort (hopefully soon to be fixed)..... now FIXED!! Now KiDo Tuned!
Added: HID kit, EZ lip equivalents to the front and sides, and various LED treatments, oem boot spoiler, [LGT WRC] plates, GFB Respons BOV for extra Pssscchhh! --> Gone... I couldn't afford it's heart transplant... but keep a look out, as it will come back on sale soon!
-
d-chang - -stickered-
- Posts: 636
- Joined: Tue Feb 21, 2012 6:29 pm
- Location: Perth, Western Australia
- Car: MY05 Liberty GT
- Real name: Daniel
- Profile URL: viewtopic.php?f=7&t=15749
Re: Painting My Wheels take 2.
![]() by Jack_Keaka » Sat Mar 17, 2012 1:57 am
by Jack_Keaka » Sat Mar 17, 2012 1:57 am
looks good so far mate! considered doing the same to my rims but have since realised I'm too lazy.
btw sandpaper grading or 'grit' is measured by how many grains per square cm. so a 320 would have on average 320 bits of grain per cm. a 60grit would have 60 and so on. so the smaller the number the less sand there is (but bigger grains), the more coarse the paper is.
btw sandpaper grading or 'grit' is measured by how many grains per square cm. so a 320 would have on average 320 bits of grain per cm. a 60grit would have 60 and so on. so the smaller the number the less sand there is (but bigger grains), the more coarse the paper is.
Apparently i've never been on live television before
-
Jack_Keaka - Posts: 3348
- Joined: Wed Mar 23, 2011 1:39 am
- Location: Antarctica
- Car: 21 Forester
- Real name: Jack
- Profile URL: viewtopic.php?f=10&t=18091
Re: Painting My Wheels take 2.
![]() by d-chang » Sat Mar 17, 2012 2:24 am
by d-chang » Sat Mar 17, 2012 2:24 am
Jack_Keaka wrote:looks good so far mate! considered doing the same to my rims but have since realised I'm too lazy.
btw sandpaper grading or 'grit' is measured by how many grains per square cm. so a 320 would have on average 320 bits of grain per cm. a 60grit would have 60 and so on. so the smaller the number the less sand there is (but bigger grains), the more coarse the paper is.
Haha thanks mate! Yeah I was feeling the same too, but because my rims looked pretty hacked up, I didn't like the look of them. So just bit the bullet and did them! haha
Ohh sweet, thanks for the description of the sandpaper. Ahh sick... so the ones I used then was, 150 (sanding off the gloss), 270 (sanding the first coat of primer) and then 320 for the final sand.
Below car has been gone for quite some time now... blew bottom end bearing and dealership screwed me! Now driving 2008 WRX with ~65k kms on the clock. Only has cat back exhaust and tune by KiDo at the moment! More to come... but slowly!
Purchased recently (12/11/2013), already with: Stage 2 Pedders lowered springs, rear Whiteline sway bar, Advan Racing TCII 18x8 wheels, k&N pod filter, custom 3" exhaust system from turbo back with Magnaflow mufflers. ECUTEK tune of some sort (hopefully soon to be fixed)..... now FIXED!! Now KiDo Tuned!
Added: HID kit, EZ lip equivalents to the front and sides, and various LED treatments, oem boot spoiler, [LGT WRC] plates, GFB Respons BOV for extra Pssscchhh! --> Gone... I couldn't afford it's heart transplant... but keep a look out, as it will come back on sale soon!
Purchased recently (12/11/2013), already with: Stage 2 Pedders lowered springs, rear Whiteline sway bar, Advan Racing TCII 18x8 wheels, k&N pod filter, custom 3" exhaust system from turbo back with Magnaflow mufflers. ECUTEK tune of some sort (hopefully soon to be fixed)..... now FIXED!! Now KiDo Tuned!
Added: HID kit, EZ lip equivalents to the front and sides, and various LED treatments, oem boot spoiler, [LGT WRC] plates, GFB Respons BOV for extra Pssscchhh! --> Gone... I couldn't afford it's heart transplant... but keep a look out, as it will come back on sale soon!
-
d-chang - -stickered-
- Posts: 636
- Joined: Tue Feb 21, 2012 6:29 pm
- Location: Perth, Western Australia
- Car: MY05 Liberty GT
- Real name: Daniel
- Profile URL: viewtopic.php?f=7&t=15749
Re: Painting My Wheels take 2.
![]() by rooby » Sat Mar 17, 2012 7:49 am
by rooby » Sat Mar 17, 2012 7:49 am
Pity you weren't able to make a couple of quick trips to the tyre shop and get them to remove the tyres & valve stems for you.
It would make the job much easier and I would not expect anywhere to charge you more than $20.
It would make the job much easier and I would not expect anywhere to charge you more than $20.
-

rooby - Posts: 2186
- Joined: Tue May 31, 2011 12:09 am
- Location: Canberra
- Car: MY07 Liberty GT Spec.B
- Real name: Reuben
Re: Painting My Wheels take 2.
![]() by d-chang » Sat Mar 17, 2012 9:41 am
by d-chang » Sat Mar 17, 2012 9:41 am
rooby wrote:Pity you weren't able to make a couple of quick trips to the tyre shop and get them to remove the tyres & valve stems for you.
It would make the job much easier and I would not expect anywhere to charge you more than $20.
Yeah I know... I would've been absolutely spent! The closest tyre shop is about 15 minutes drive away! haha! Ahhh, this is not a full spec job, just something to get me by til my tyres wear out!
Below car has been gone for quite some time now... blew bottom end bearing and dealership screwed me! Now driving 2008 WRX with ~65k kms on the clock. Only has cat back exhaust and tune by KiDo at the moment! More to come... but slowly!
Purchased recently (12/11/2013), already with: Stage 2 Pedders lowered springs, rear Whiteline sway bar, Advan Racing TCII 18x8 wheels, k&N pod filter, custom 3" exhaust system from turbo back with Magnaflow mufflers. ECUTEK tune of some sort (hopefully soon to be fixed)..... now FIXED!! Now KiDo Tuned!
Added: HID kit, EZ lip equivalents to the front and sides, and various LED treatments, oem boot spoiler, [LGT WRC] plates, GFB Respons BOV for extra Pssscchhh! --> Gone... I couldn't afford it's heart transplant... but keep a look out, as it will come back on sale soon!
Purchased recently (12/11/2013), already with: Stage 2 Pedders lowered springs, rear Whiteline sway bar, Advan Racing TCII 18x8 wheels, k&N pod filter, custom 3" exhaust system from turbo back with Magnaflow mufflers. ECUTEK tune of some sort (hopefully soon to be fixed)..... now FIXED!! Now KiDo Tuned!
Added: HID kit, EZ lip equivalents to the front and sides, and various LED treatments, oem boot spoiler, [LGT WRC] plates, GFB Respons BOV for extra Pssscchhh! --> Gone... I couldn't afford it's heart transplant... but keep a look out, as it will come back on sale soon!
-
d-chang - -stickered-
- Posts: 636
- Joined: Tue Feb 21, 2012 6:29 pm
- Location: Perth, Western Australia
- Car: MY05 Liberty GT
- Real name: Daniel
- Profile URL: viewtopic.php?f=7&t=15749
Re: Painting My Wheels take 2.
![]() by simonnomiss » Sat Mar 17, 2012 9:49 am
by simonnomiss » Sat Mar 17, 2012 9:49 am
ive done mine twice now and managed to get it done in a day, my advice to you.... mask up those wheels! paint on tyre is annoying to get off
- simonnomiss
- Posts: 68
- Joined: Mon Dec 12, 2011 11:10 pm
- Location: Launceston
- Car: 2006 Grey Liberty Wagon safety pack
- Real name: simon
Re: Painting My Wheels take 2.
![]() by champ » Sun Mar 18, 2012 3:12 pm
by champ » Sun Mar 18, 2012 3:12 pm
Looking forward to seeing your work-in-progress later at the meet.
-
champ - -stickered-
- Posts: 1303
- Joined: Sun Aug 01, 2010 9:49 pm
- Location: Joondalup, WA
- Car: MY07 GT Spec.B Tuned by STi 6MT OBP
- Real name: Ian
Re: Painting My Wheels take 2.
![]() by d-chang » Sun Mar 18, 2012 3:41 pm
by d-chang » Sun Mar 18, 2012 3:41 pm
champ wrote:Looking forward to seeing your work-in-progress later at the meet.
Hahaha! Yeah for sure! What time are you planning to get there?
Below car has been gone for quite some time now... blew bottom end bearing and dealership screwed me! Now driving 2008 WRX with ~65k kms on the clock. Only has cat back exhaust and tune by KiDo at the moment! More to come... but slowly!
Purchased recently (12/11/2013), already with: Stage 2 Pedders lowered springs, rear Whiteline sway bar, Advan Racing TCII 18x8 wheels, k&N pod filter, custom 3" exhaust system from turbo back with Magnaflow mufflers. ECUTEK tune of some sort (hopefully soon to be fixed)..... now FIXED!! Now KiDo Tuned!
Added: HID kit, EZ lip equivalents to the front and sides, and various LED treatments, oem boot spoiler, [LGT WRC] plates, GFB Respons BOV for extra Pssscchhh! --> Gone... I couldn't afford it's heart transplant... but keep a look out, as it will come back on sale soon!
Purchased recently (12/11/2013), already with: Stage 2 Pedders lowered springs, rear Whiteline sway bar, Advan Racing TCII 18x8 wheels, k&N pod filter, custom 3" exhaust system from turbo back with Magnaflow mufflers. ECUTEK tune of some sort (hopefully soon to be fixed)..... now FIXED!! Now KiDo Tuned!
Added: HID kit, EZ lip equivalents to the front and sides, and various LED treatments, oem boot spoiler, [LGT WRC] plates, GFB Respons BOV for extra Pssscchhh! --> Gone... I couldn't afford it's heart transplant... but keep a look out, as it will come back on sale soon!
-
d-chang - -stickered-
- Posts: 636
- Joined: Tue Feb 21, 2012 6:29 pm
- Location: Perth, Western Australia
- Car: MY05 Liberty GT
- Real name: Daniel
- Profile URL: viewtopic.php?f=7&t=15749
17 posts
• Page 1 of 2 • 1, 2
Return to Suspension, Brakes, Wheels and Tyres.
Who is online
Users browsing this forum: No registered users and 16 guests