
Australian Liberty Owners Club
Wagon sunroof fixed!
31 posts
• Page 2 of 3 • 1, 2, 3
Re: Wagon sunroof fixed!
![]() by bosc0 » Mon Oct 29, 2012 12:50 pm
by bosc0 » Mon Oct 29, 2012 12:50 pm
If you put all the parts that you have awaiting installation, they would take up more room in your garage than the wagon does. Put them on, put them on!!!
-
bosc0 - Posts: 2637
- Joined: Thu May 08, 2008 8:22 am
- Location: Melbourne
- Car: GT SpecB wagon
- Real name: Jake
Re: Wagon sunroof fixed!
![]() by bigBADbenny » Mon Oct 29, 2012 1:04 pm
by bigBADbenny » Mon Oct 29, 2012 1:04 pm
I had to rent a lockup! 
But yeah, swap n sell...
But yeah, swap n sell...
-

bigBADbenny - Posts: 10421
- Joined: Tue Oct 04, 2011 6:36 pm
- Location: Collingwood, Melbourne
- Car: MY07 GT-B 6MT OBP Wagon
- Real name: Ben Richards
- Profile URL: http://tinyurl.com/agvbzop
Re: Wagon sunroof fixed!
![]() by PinkK » Tue Oct 30, 2012 8:58 am
by PinkK » Tue Oct 30, 2012 8:58 am
Good to hear Benny  Like the new tint work, that is definitely on my future save up list.
I hear you on that front, I have a nice little pile of things to put on the Lib that I have brought over the last few months but motivation and time is escaping me...
bigBADbenny wrote:I had to rent a lockup!
But yeah, swap n sell...
I hear you on that front, I have a nice little pile of things to put on the Lib that I have brought over the last few months but motivation and time is escaping me...
-
PinkK - -stickered-
- Posts: 481
- Joined: Thu Jun 21, 2012 4:54 pm
- Location: Melbourne
- Car: MY08 Liberty GT Spec. B Wagon
- Real name: Alex
Re: Wagon sunroof fixed!
![]() by peadya100 » Tue Apr 02, 2013 9:48 am
by peadya100 » Tue Apr 02, 2013 9:48 am
Sorry to rehash an old thread Benny....
i was wondering, in your roof lining removal did you take the upper part of the B pillar trim off? If so was it as hard as the A pillar? I really want to replace mine due to cosmetic damage but if its as hard as you said the A pillar was then i wont bother.
i was wondering, in your roof lining removal did you take the upper part of the B pillar trim off? If so was it as hard as the A pillar? I really want to replace mine due to cosmetic damage but if its as hard as you said the A pillar was then i wont bother.
Diamond Works SI-DRIVE Covers - Subaru Liberty/Legacy MY07 to MY09
https://www.facebook...aruDiamondWorks
subaru.diamondworks@gmail.com
https://www.facebook...aruDiamondWorks
subaru.diamondworks@gmail.com
-

peadya100 - -stickered-
- Posts: 2243
- Joined: Wed Dec 08, 2010 1:21 pm
- Location: Norah Head, Central Coast
- Car: 2007 Liberty GT-B Wagon
- Real name: Adam
- Profile URL: viewtopic.php?f=10&t=21072
Re: Wagon sunroof fixed!
![]() by bigBADbenny » Tue Apr 02, 2013 10:25 am
by bigBADbenny » Tue Apr 02, 2013 10:25 am
It's not hard if you read the manual and release the A pillar catch the correct way.
If you don't do it the right way its next to impossible.
Screwdriver pointing down the pillar pushing the clip downwards...
From memory it clicks, then yank off the trim.
The trims are pretty hardy and can be bent heaps.
Same same for the B pillar trim: I cannot remember removing it so maybe its even easier.
-
bigBADbenny - Posts: 10421
- Joined: Tue Oct 04, 2011 6:36 pm
- Location: Collingwood, Melbourne
- Car: MY07 GT-B 6MT OBP Wagon
- Real name: Ben Richards
- Profile URL: http://tinyurl.com/agvbzop
Re: Wagon sunroof fixed!
![]() by peadya100 » Tue Apr 02, 2013 11:00 am
by peadya100 » Tue Apr 02, 2013 11:00 am
bigBADbenny wrote:It's not hard if you read the manual and release the A pillar catch the correct way.
If you don't do it the right way its next to impossible.
Screwdriver pointing down the pillar pushing the clip downwards...
From memory it clicks, then yank off the trim.
The trims are pretty hardy and can be bent heaps.
Same same for the B pillar trim: I cannot remember removing it so maybe its even easier.
I guess if im replacing mine im not too worried about damaging it.. its whether or not the wrecker can get it off for me without damaging it.
I think ill give it a try.. theres no risk for me if the wrecker damages their own part, thats his problem
Diamond Works SI-DRIVE Covers - Subaru Liberty/Legacy MY07 to MY09
https://www.facebook...aruDiamondWorks
subaru.diamondworks@gmail.com
https://www.facebook...aruDiamondWorks
subaru.diamondworks@gmail.com
-
peadya100 - -stickered-
- Posts: 2243
- Joined: Wed Dec 08, 2010 1:21 pm
- Location: Norah Head, Central Coast
- Car: 2007 Liberty GT-B Wagon
- Real name: Adam
- Profile URL: viewtopic.php?f=10&t=21072
Re: Wagon sunroof fixed!
![]() by jay.ritchie » Tue Apr 02, 2013 2:01 pm
by jay.ritchie » Tue Apr 02, 2013 2:01 pm
The B pillar is held in by screws not clips like the a pillars.
Unclip the airbag logo cover thing, then you have easy access to the screw or bolt that holds the pillar in.
You'll figure out how to remove the bottom of the b pillar once you open it up easily enough.
Unclip the airbag logo cover thing, then you have easy access to the screw or bolt that holds the pillar in.
You'll figure out how to remove the bottom of the b pillar once you open it up easily enough.
-

jay.ritchie - Posts: 1224
- Joined: Sun Dec 18, 2011 6:50 pm
- Location: Melbourne
- Car: MY12 VW Golf R
- Real name: Jay
- Profile URL: viewtopic.php?f=10&t=21040
Re: Wagon sunroof fixed!
![]() by peadya100 » Tue Apr 02, 2013 2:09 pm
by peadya100 » Tue Apr 02, 2013 2:09 pm
jay.ritchie wrote:The B pillar is held in by screws not clips like the a pillars.
Unclip the airbag logo cover thing, then you have easy access to the screw or bolt that holds the pillar in.
You'll figure out how to remove the bottom of the b pillar once you open it up easily enough.
Brilliant!
I forgot that you did this recently Jay.
Thanks for the tip
Diamond Works SI-DRIVE Covers - Subaru Liberty/Legacy MY07 to MY09
https://www.facebook...aruDiamondWorks
subaru.diamondworks@gmail.com
https://www.facebook...aruDiamondWorks
subaru.diamondworks@gmail.com
-
peadya100 - -stickered-
- Posts: 2243
- Joined: Wed Dec 08, 2010 1:21 pm
- Location: Norah Head, Central Coast
- Car: 2007 Liberty GT-B Wagon
- Real name: Adam
- Profile URL: viewtopic.php?f=10&t=21072
Re: Wagon sunroof fixed!
![]() by jay.ritchie » Tue Apr 02, 2013 2:31 pm
by jay.ritchie » Tue Apr 02, 2013 2:31 pm
peadya100 wrote:jay.ritchie wrote:The B pillar is held in by screws not clips like the a pillars.
Unclip the airbag logo cover thing, then you have easy access to the screw or bolt that holds the pillar in.
You'll figure out how to remove the bottom of the b pillar once you open it up easily enough.
Brilliant!
I forgot that you did this recently Jay.
Thanks for the tip
No worries.
-
jay.ritchie - Posts: 1224
- Joined: Sun Dec 18, 2011 6:50 pm
- Location: Melbourne
- Car: MY12 VW Golf R
- Real name: Jay
- Profile URL: viewtopic.php?f=10&t=21040
Re: Wagon sunroof fixed!
![]() by tds » Wed Feb 18, 2015 2:50 pm
by tds » Wed Feb 18, 2015 2:50 pm
Has anyone removed and reinstalled the sunroof motor from Liberty wagon 06, service manual states that the front glass must be fully opened before installing the motor, bit confusing as it states glass must be closed before removing the motor, I have just installed new brushes in the motor and not sure if I should be following the service manual as the instructions are not that clear.
WAGON MODEL
Check that the wedge of glass lid (front) bracket part is contacting in the direction of vehicle front.
At this time, the lid is at fully open position.
1) Install the motor assembly.
2) After the installation of motor assembly, check again that the wedge of glass lid (front) bracket part is contacting
in the direction of vehicle front.
3) Connect the harness connector of motor assembly, and then connect the battery ground cable to battery.
4) Perform the initialize operation of motor.
• When replacing the motor with a new one, fully close the glass once and perform the initialization of position,
because the movement of glass lid shifts to brink operation.
• When reusing the motor, operate the auto-reverse function five times in a row to shifts brink operation, and
then perform the initialization of position.
5) Check the operation of sunroof with following table
- tds
- Posts: 1
- Joined: Wed Feb 18, 2015 2:37 pm
Re: Wagon sunroof fixed!
![]() by bigBADbenny » Wed Feb 18, 2015 4:05 pm
by bigBADbenny » Wed Feb 18, 2015 4:05 pm
The glass needs to be closed so the sunshade can be pushed all the way forward, so it doesn't cover up the motor.
The job is very easy to do, let me know if you run into any issues at all.
I haven't bothered following that procedure resulting in the roof can taking a while to recalibrate itself, with multiple "close" clicks of the button required.
I'd say that once you've reinstalled the motor, manually cranking the roof closed with an allen key, then actuating the switch would be the way to go, eg: as per that description
Where did you source the brushes from? I Might need some for my spare motor
-
bigBADbenny - Posts: 10421
- Joined: Tue Oct 04, 2011 6:36 pm
- Location: Collingwood, Melbourne
- Car: MY07 GT-B 6MT OBP Wagon
- Real name: Ben Richards
- Profile URL: http://tinyurl.com/agvbzop
Re: Wagon sunroof fixed!
![]() by Haydo » Mon Sep 12, 2016 1:06 pm
by Haydo » Mon Sep 12, 2016 1:06 pm
Does anyone know if the Outback sunroof is the same as the Liberty Wagon Sunroof? Looking to replace my broken one and there seem to be more Outback sunroofs around than Liberty.
- Haydo
- Posts: 3
- Joined: Fri Sep 09, 2016 10:51 am
Re: Wagon sunroof fixed!
![]() by bigBADbenny » Wed Sep 21, 2016 11:01 pm
by bigBADbenny » Wed Sep 21, 2016 11:01 pm
You'd have to check the part numbers eg on the opposed forces link in my sig...
No, wait, I just did...
http://opposedforces.com/parts/legacy/e ... /sun_roof/
Go to illustration 2 scroll down to sun roof assembly and click the link to see useage info.
It suggests the cartridge assy is the same but you may want to check sealing etc...
No, wait, I just did...
http://opposedforces.com/parts/legacy/e ... /sun_roof/
Go to illustration 2 scroll down to sun roof assembly and click the link to see useage info.
It suggests the cartridge assy is the same but you may want to check sealing etc...
-
bigBADbenny - Posts: 10421
- Joined: Tue Oct 04, 2011 6:36 pm
- Location: Collingwood, Melbourne
- Car: MY07 GT-B 6MT OBP Wagon
- Real name: Ben Richards
- Profile URL: http://tinyurl.com/agvbzop
Re: Wagon sunroof motor fixed!
![]() by bigBADbenny » Sat May 05, 2018 11:43 am
by bigBADbenny » Sat May 05, 2018 11:43 am
So despite having replaced my sunroof motor with one from a 60K klm wreck, that failed too, leaving me without the wag's best feature for all of last summer. Lets say I've been very busy just working hard and relaxing harder
I finally bit the bullet and visited my local auto elec:
General Auto Electrics
Address: 347 Johnston St, Abbotsford VIC 3067
Phone: (03) 9416 0761
And asked politely if I could peep what brushes they had in their well-organised racks...
No, nothing that will fit... Ok but I can shave the brushes down... Ah, well this one is the same thickness... Here's a tenner, mate!
BINGO!
FSM info on removing the sunroof motor is is at the end of this post VVV...
Having done the process multiple times, I just remove the D pillar trims and gently yank down the rear upper gate trim, push the blind forward and get to it, 3 nuts, 2 bolts on the sunroof motor, all 8mm.
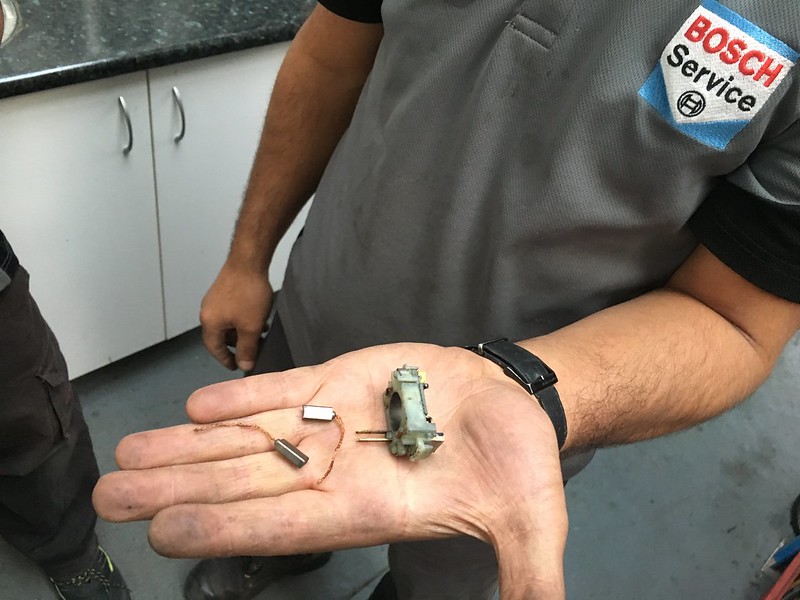
Random brushes with tails pictured with the brush basket.
Dont do what I did: find brushes with tails that exit perpendicularly to the brush, mine exit from the end which is less than ideal as regards clearance for the brush springs...
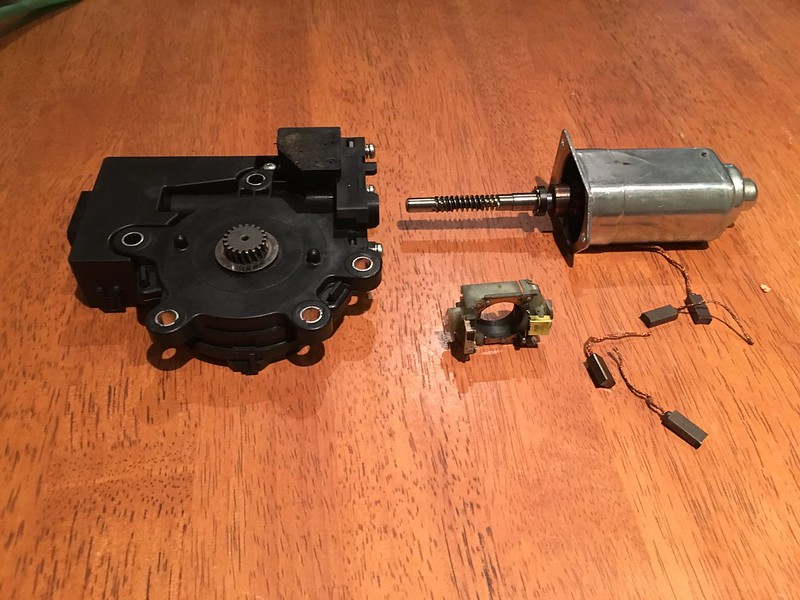
Three ph screws and the motor cover comes off revealing this.
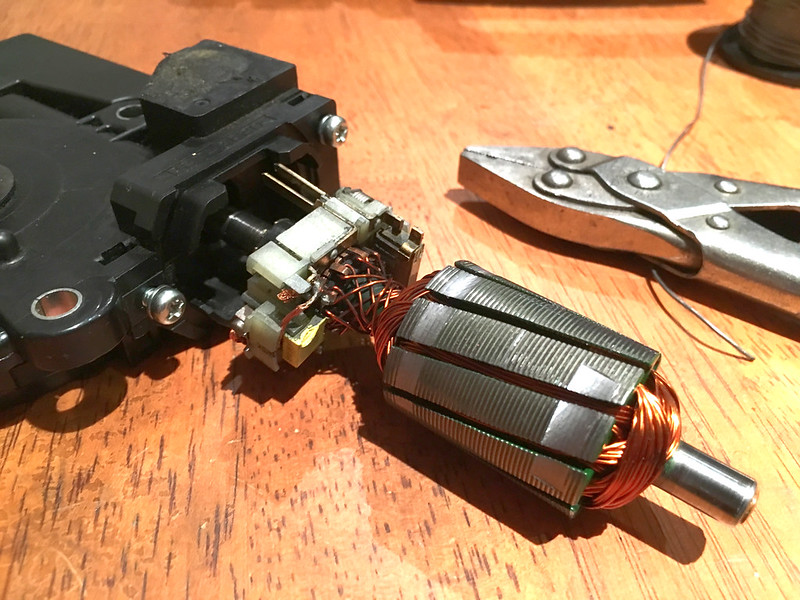
Here's the brush basket removed from the sunroof motor housing assy, just use a flathead screwdriver, twisted to pop the basket out, but note the long contacts and on what side of the housing they are...
Nextup I got cracking with shaving down the brushes, now I should have found a workshop with a static grinder, or used my 125mm grinder held in a vice... or even just some sandpaper or emory cloth...
but I was impatient and just used a cutoff wheel on my dremel!
Note, I used the flat face of the wheel, not the cutting edge...
And I should have used verniers to make accurate measurements... But I winged it more or less.
What worked well were my lovely Bernard parallel pliers, to hold the brushes against the wheel for shaving, without cracking the brush.
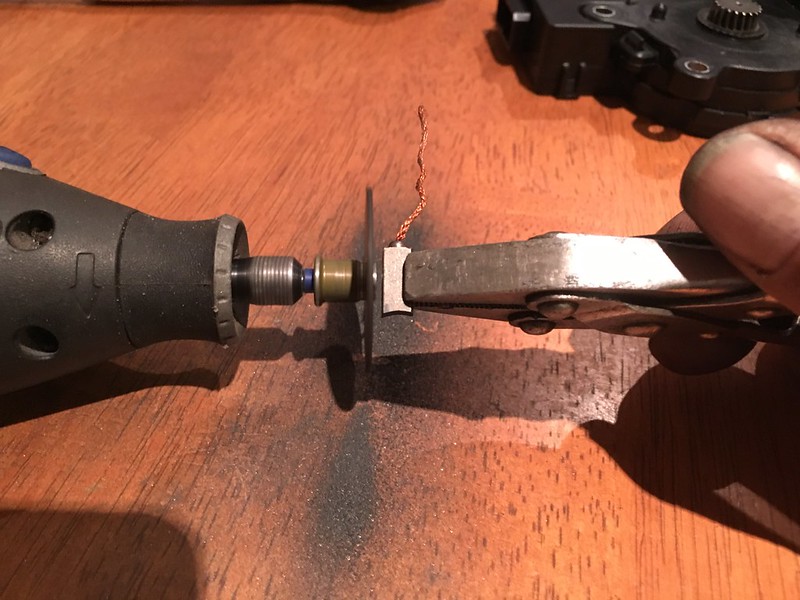
Shaving the thicker side of the brush... And yes, I got into trouble for not putting newspaper down.
Remember to wear safety glasses! You only have two eyes and no spares!!!
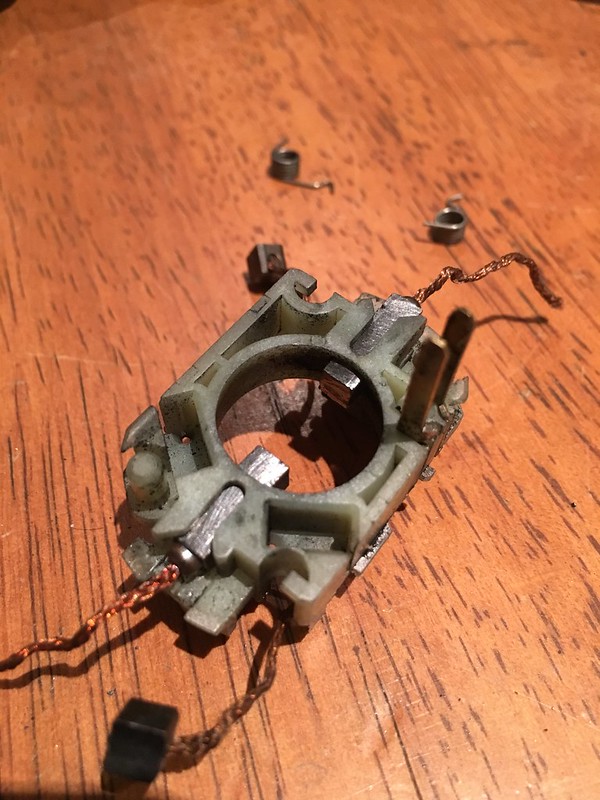
They fit! New brushes in the brush basket alongside the old worn out brushes.
The brush springs can be seen in the upper part of the photo: dont let these spring out!
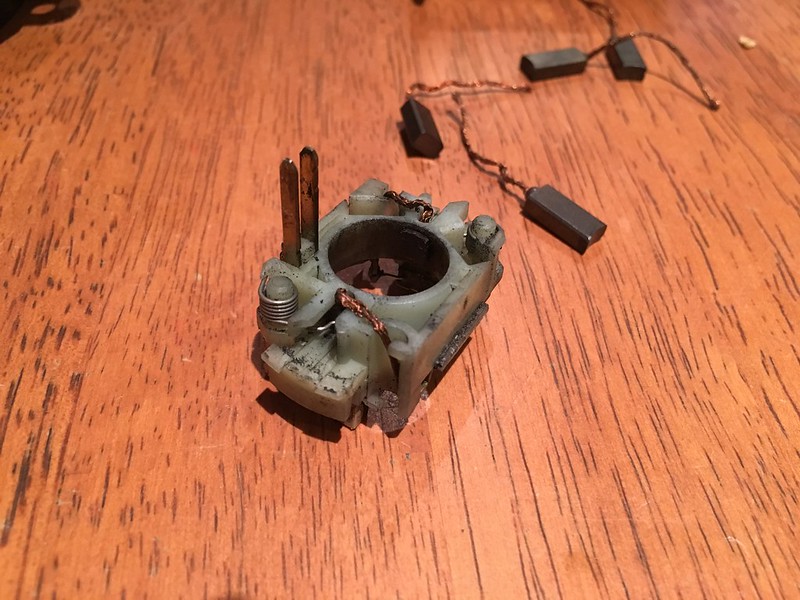
Here's the springs in place, just use a fingernail or blade to pop the short end away from the basket and the spring will slide off.
Pic also shows how the tails are tucked into the basket, allowing the brusj to slide under spring pressure but without fouling against the motor cover... Take note!
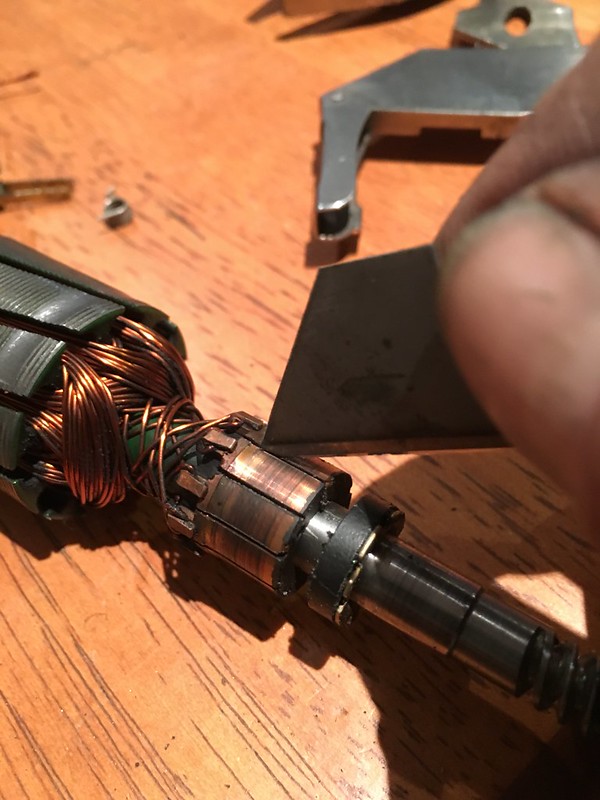
Taking a moment to clean out the commutator, I followed up with some stiff paper sawed along the grooves...
Thats it for the pics!
You'll also need to shave the brush so that its less than 10mm in length, as the brush must fit between the commutator and ultimately, the motor housing.
Then break out your soldering iron, trim your carefully routed tails to the contacts where you have cut off the old tails, and solder on the new tails...
So put a tiny dab of grease on each end of the motor axle, place the axle in the motor cover, walk the brush box onto the commutator (check the orientation is correct re the contact pins vs the 3x screws on the housing) and seat it in the cover, place the rubber gasket on the sunroof motor housing assy, and carefully mate the two pieces whilst guiding in the contact pins.
Before reinstalling the motor, turn it with an allen key through the service port in the housing.
I didn't test my motor with a 12V power supply before installing but thats a very good idea given the snaffles that can occur during the repair and reasssembly.
Reinstall the motor, test it and then reinitialise the sunroof assy, using the guide in the FSM.
If your sunroof has bee inoperative for an extended period, as was mine, I'd recommend first cracking it open and shut again, using an allen key via the service port. This is because the seals on the glass will stick somewhat due to inactivity... Mine made a rather a large pop when it finally budged. Be gentle!
Liberty / Legacy Gen4 sunroof reset reinitialisation procedure:
SUNROOF/T-TOP/CONVERTIBLE TOP (SUNROOF) > Sunroof Control System
INSPECTION
Symptom
Inspection order
Water leakage
(1) Check roof panel and glass lid for improper or poor sealing.
(2) Check drain tube for clogging.
(3) Check sunroof frame seal and body for improper fit.
Booming noise, wind noise and other noise
(1) Check glass lid and roof panel for improper clearance.
(2) Check sunshade and roof trim for improper clearance.
Abnormal motor noise
(1) Check installing part of motor for looseness.
(2) Check gears and bearings for wear.
(3) Check cable for wear.
(4) Check cable pipe for deformities.
Failure of sunroof
(Motor operates properly.)
(1) Check guide rail for foreign particles.
(2) Check guide rail for improper installation.
(3) Check parts for mutual interference.
(4) Check cable slider for improper clinching.
(5) Check cable for improper installation.
Motor does not rotate or rotate improperly.
(1) Check fuse for blown out.
(2) Check switch for improper function.
(3) Check motor for incorrect terminal voltage.
(4) Check the relay for improper operation.
(5) Check poor grounding system.
(6) Check harness for open or short and terminals for poor connections.
Failure turn of glass lid
Check guide rail for foreign particles.
• Failure turn of glass lid while driving rough road.
Glass lid has auto-reverse function. When specified or more force is applied to the glass lid, the lid turns back and stops. When operating the glass lid (open or close) while driving the rough road, the lid judges vibration as a force and may causes failure turns. When the failure turn is occurred, need to perform the initialize operation with following procedure.
1. INITIALIZE OPERATION (SEDAN MODEL)
1. Tilt up the glass lid.
2. Release the switch once, and press the tilt up switch again for 15 seconds.
3. When the glass lid is raised a little and returned to tilt up position, release the switch for the moment. (Initialization of position detecting function)
4. Keep pressing the tilt up switch within 5 seconds from releasing the switch. The glass lid will tilt down → slides open → slides close automatically. (When more than 5 seconds pass, the position detecting function is cancelled.)
5. Initialize operation is completed.
2. INITIALIZE OPERATION (WAGON MODEL)
1. Apply force to the glass lid in the opening direction while the glass lid (rear) is closing, and make it reverse five times in a row.
However, in the following situation, the initialize operation is canceled.
• When the lid is fully closed once during one of the auto-reverse operations five times in a row.
• When the interval between the auto-reverse operations was 30 seconds or more even once.
2. When the operation of glass lid shifts to inching operation*, fully close the lid by switch operation.
3. Initialize operation is completed.
* Inching operation: A condition where the glass lid operates for only at the moment when the switch is pressed, even when the switch is held down.
As it is in the FSM...
Here's the motor removal info from the FSM.
That's it! Enjoy your working sunroof
I finally bit the bullet and visited my local auto elec:
General Auto Electrics
Address: 347 Johnston St, Abbotsford VIC 3067
Phone: (03) 9416 0761
And asked politely if I could peep what brushes they had in their well-organised racks...
No, nothing that will fit... Ok but I can shave the brushes down... Ah, well this one is the same thickness... Here's a tenner, mate!
BINGO!
FSM info on removing the sunroof motor is is at the end of this post VVV...
Having done the process multiple times, I just remove the D pillar trims and gently yank down the rear upper gate trim, push the blind forward and get to it, 3 nuts, 2 bolts on the sunroof motor, all 8mm.
Random brushes with tails pictured with the brush basket.
Dont do what I did: find brushes with tails that exit perpendicularly to the brush, mine exit from the end which is less than ideal as regards clearance for the brush springs...
Three ph screws and the motor cover comes off revealing this.
Here's the brush basket removed from the sunroof motor housing assy, just use a flathead screwdriver, twisted to pop the basket out, but note the long contacts and on what side of the housing they are...
Nextup I got cracking with shaving down the brushes, now I should have found a workshop with a static grinder, or used my 125mm grinder held in a vice... or even just some sandpaper or emory cloth...
but I was impatient and just used a cutoff wheel on my dremel!
Note, I used the flat face of the wheel, not the cutting edge...
And I should have used verniers to make accurate measurements... But I winged it more or less.
What worked well were my lovely Bernard parallel pliers, to hold the brushes against the wheel for shaving, without cracking the brush.
Shaving the thicker side of the brush... And yes, I got into trouble for not putting newspaper down.
Remember to wear safety glasses! You only have two eyes and no spares!!!
They fit! New brushes in the brush basket alongside the old worn out brushes.
The brush springs can be seen in the upper part of the photo: dont let these spring out!
Here's the springs in place, just use a fingernail or blade to pop the short end away from the basket and the spring will slide off.
Pic also shows how the tails are tucked into the basket, allowing the brusj to slide under spring pressure but without fouling against the motor cover... Take note!
Taking a moment to clean out the commutator, I followed up with some stiff paper sawed along the grooves...
Thats it for the pics!
You'll also need to shave the brush so that its less than 10mm in length, as the brush must fit between the commutator and ultimately, the motor housing.
Then break out your soldering iron, trim your carefully routed tails to the contacts where you have cut off the old tails, and solder on the new tails...
So put a tiny dab of grease on each end of the motor axle, place the axle in the motor cover, walk the brush box onto the commutator (check the orientation is correct re the contact pins vs the 3x screws on the housing) and seat it in the cover, place the rubber gasket on the sunroof motor housing assy, and carefully mate the two pieces whilst guiding in the contact pins.
Before reinstalling the motor, turn it with an allen key through the service port in the housing.
I didn't test my motor with a 12V power supply before installing but thats a very good idea given the snaffles that can occur during the repair and reasssembly.
Reinstall the motor, test it and then reinitialise the sunroof assy, using the guide in the FSM.
If your sunroof has bee inoperative for an extended period, as was mine, I'd recommend first cracking it open and shut again, using an allen key via the service port. This is because the seals on the glass will stick somewhat due to inactivity... Mine made a rather a large pop when it finally budged. Be gentle!
Liberty / Legacy Gen4 sunroof reset reinitialisation procedure:
SUNROOF/T-TOP/CONVERTIBLE TOP (SUNROOF) > Sunroof Control System
INSPECTION
Symptom
Inspection order
Water leakage
(1) Check roof panel and glass lid for improper or poor sealing.
(2) Check drain tube for clogging.
(3) Check sunroof frame seal and body for improper fit.
Booming noise, wind noise and other noise
(1) Check glass lid and roof panel for improper clearance.
(2) Check sunshade and roof trim for improper clearance.
Abnormal motor noise
(1) Check installing part of motor for looseness.
(2) Check gears and bearings for wear.
(3) Check cable for wear.
(4) Check cable pipe for deformities.
Failure of sunroof
(Motor operates properly.)
(1) Check guide rail for foreign particles.
(2) Check guide rail for improper installation.
(3) Check parts for mutual interference.
(4) Check cable slider for improper clinching.
(5) Check cable for improper installation.
Motor does not rotate or rotate improperly.
(1) Check fuse for blown out.
(2) Check switch for improper function.
(3) Check motor for incorrect terminal voltage.
(4) Check the relay for improper operation.
(5) Check poor grounding system.
(6) Check harness for open or short and terminals for poor connections.
Failure turn of glass lid
Check guide rail for foreign particles.
• Failure turn of glass lid while driving rough road.
Glass lid has auto-reverse function. When specified or more force is applied to the glass lid, the lid turns back and stops. When operating the glass lid (open or close) while driving the rough road, the lid judges vibration as a force and may causes failure turns. When the failure turn is occurred, need to perform the initialize operation with following procedure.
1. INITIALIZE OPERATION (SEDAN MODEL)
1. Tilt up the glass lid.
2. Release the switch once, and press the tilt up switch again for 15 seconds.
3. When the glass lid is raised a little and returned to tilt up position, release the switch for the moment. (Initialization of position detecting function)
4. Keep pressing the tilt up switch within 5 seconds from releasing the switch. The glass lid will tilt down → slides open → slides close automatically. (When more than 5 seconds pass, the position detecting function is cancelled.)
5. Initialize operation is completed.
2. INITIALIZE OPERATION (WAGON MODEL)
1. Apply force to the glass lid in the opening direction while the glass lid (rear) is closing, and make it reverse five times in a row.
However, in the following situation, the initialize operation is canceled.
• When the lid is fully closed once during one of the auto-reverse operations five times in a row.
• When the interval between the auto-reverse operations was 30 seconds or more even once.
2. When the operation of glass lid shifts to inching operation*, fully close the lid by switch operation.
3. Initialize operation is completed.
* Inching operation: A condition where the glass lid operates for only at the moment when the switch is pressed, even when the switch is held down.
- Screen Shot 2018-05-05 at 12.53.42.jpg (179.64 KiB) Viewed 5403 times
As it is in the FSM...
- Screen Shot 2018-05-05 at 12.47.51.jpg (93.16 KiB) Viewed 5404 times
Here's the motor removal info from the FSM.
That's it! Enjoy your working sunroof
Last edited by bigBADbenny on Tue May 08, 2018 9:02 pm, edited 1 time in total.
-
bigBADbenny - Posts: 10421
- Joined: Tue Oct 04, 2011 6:36 pm
- Location: Collingwood, Melbourne
- Car: MY07 GT-B 6MT OBP Wagon
- Real name: Ben Richards
- Profile URL: http://tinyurl.com/agvbzop
-

gtbsti - Posts: 142
- Joined: Thu Oct 04, 2012 7:21 pm
- Car: MY08 GT Spec.B Tuned By STi Wagon
- Profile URL: JDM Wagonist
31 posts
• Page 2 of 3 • 1, 2, 3
Who is online
Users browsing this forum: No registered users and 19 guests