Going all USB A male/females type Y adapter might work, plus eg a male/male adapter or similar.
Can always make a custom cable if eg jaycar don’t have something suitable in stock.

Australian Liberty Owners Club
OBD2 spec?
39 posts
• Page 3 of 3 • 1, 2, 3
Re: OBD2 spec?
![]() by bigBADbenny » Sun Nov 29, 2020 6:01 pm
by bigBADbenny » Sun Nov 29, 2020 6:01 pm
-

bigBADbenny - Posts: 10421
- Joined: Tue Oct 04, 2011 6:36 pm
- Location: Collingwood, Melbourne
- Car: MY07 GT-B 6MT OBP Wagon
- Real name: Ben Richards
- Profile URL: http://tinyurl.com/agvbzop
Re: OBD2 spec?
![]() by Kimmo » Mon Dec 28, 2020 11:23 am
by Kimmo » Mon Dec 28, 2020 11:23 am
I'd love to just solder up a custom cable, but the difficulty is that I can't probe the damn tiny contacts in the USB C plugs, and OTG uses a pin that isn't connected to one of the normal four wires you get in a standard USB cable...
I think if I was gonna do it, I'd need an old USB C jack cut out of something (it's a bit soon for me to have any dead USB C stuff lying around), and I'd probably need to hack up the plug to get access to the frikken tiny contact, and probably need to use a surface mount resistor (so I don't have something relatively huge hanging off something tiny), and dig up some epoxy or something to make it robust... (In case you weren't aware, the OTG standard uses a couple of different resistor values between a certain pin and ground to tell the phone or tablet whether it's the power source or if it should take power. And it changed from Micro USB to USB C, and that certain pin wouldn't get a pass through anyway, so a physical adapter alone won't cut it.)
So hopefully the USB C OTG hub that'll turn up soon will do it. Bloody hard to find specifics about what happens with power on this stuff.
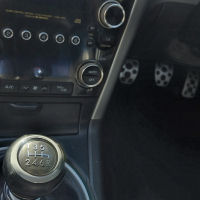
Anyway, got a 90° USB C adapter which got some dremel love, and the phone is nicely mounted now. At least now I can plug it in via a plain OTG adapter and it stays connected without intermittently dropping out like it was doing before it was mounted. Got the power side half sorted; I cut up ciggie lighter adapter (which had QC3 USB A and 3.4A USB C and USB A), removed the 3.4A USB A jack and hung it off a bit of wire, leaving the other two jacks available inside the centre console. There's a USB lead running along under the console up to the phone, ready to provide power, with the other end of it ziptied to the loom next to the connector for the console wiring. It's pretty neat now.
The missus' hot glue gun was indispensable! That rubbery plastic the little blanking plate is made out of just told super glue to fuck right off, and there was no other way to hold the circuit board that wasn't going to be a massive hassle, but this was a piece of piss! Took a bit of head-scratching to get access to this spot, though...
MINI HOW-TO FOR REMOVING CENTRE CONSOLE:
I think if I was gonna do it, I'd need an old USB C jack cut out of something (it's a bit soon for me to have any dead USB C stuff lying around), and I'd probably need to hack up the plug to get access to the frikken tiny contact, and probably need to use a surface mount resistor (so I don't have something relatively huge hanging off something tiny), and dig up some epoxy or something to make it robust... (In case you weren't aware, the OTG standard uses a couple of different resistor values between a certain pin and ground to tell the phone or tablet whether it's the power source or if it should take power. And it changed from Micro USB to USB C, and that certain pin wouldn't get a pass through anyway, so a physical adapter alone won't cut it.)
So hopefully the USB C OTG hub that'll turn up soon will do it. Bloody hard to find specifics about what happens with power on this stuff.
Anyway, got a 90° USB C adapter which got some dremel love, and the phone is nicely mounted now. At least now I can plug it in via a plain OTG adapter and it stays connected without intermittently dropping out like it was doing before it was mounted. Got the power side half sorted; I cut up ciggie lighter adapter (which had QC3 USB A and 3.4A USB C and USB A), removed the 3.4A USB A jack and hung it off a bit of wire, leaving the other two jacks available inside the centre console. There's a USB lead running along under the console up to the phone, ready to provide power, with the other end of it ziptied to the loom next to the connector for the console wiring. It's pretty neat now.
- Image2.jpg (88.27 KiB) Viewed 4679 times
- image3.jpg (98.47 KiB) Viewed 4679 times
The missus' hot glue gun was indispensable! That rubbery plastic the little blanking plate is made out of just told super glue to fuck right off, and there was no other way to hold the circuit board that wasn't going to be a massive hassle, but this was a piece of piss! Took a bit of head-scratching to get access to this spot, though...
MINI HOW-TO FOR REMOVING CENTRE CONSOLE:
- * On a manual, pop up the gear lever surround. Not sure what you do on an auto.
* Grab the front of the handbrake boot cover, pull it up and unclip along its length, then pull the boot off over the lever.
* There are four screws: two just behind the gear lever, and one on each side at the back of the console under some little covers, you'll need to move the seats forward to access them.
* Once the screws are out, there are just two clips behind the gear lever holding it in. You need to use a fair bit of force on these, just pull upwards.
* Then you just tip it back, after finagling it over the handbrake, and unplug the loom from the back.
* To get the bin out, first remove the lid. There are three screws on the hinge, then it takes a bit of manipulation to unhook the hinge.
* This reveals a couple of clips. Between that spot and the cupholder on the back, there's a little blanking plate, looks like it should be an ashtray but it's not. pop that out and remove the screw underneath, then the back section comes off when you undo the clips.
* Under the console, there are four screws holding the bin in, up around the top, you'll need a decent length screwdriver.
-
Kimmo - Posts: 181
- Joined: Sun Oct 25, 2020 8:26 am
- Location: 3028
- Car: 07 GT-B
Re: OBD2 spec?
![]() by Kimmo » Mon Dec 28, 2020 12:14 pm
by Kimmo » Mon Dec 28, 2020 12:14 pm
Oh yeah, after trying to figure out the charging situation for a while, I reckon I've finally found a much better solution than a manual switch: https://chargie.org/
Dammit, the thing is thirty bucks, which is fine, but shipping is thirty-five! For something the size of a memory stick! Fucken pants.
Anyone else want one, so we can split the shipping? They're on backorder; they don't start shipping till 8/1/21 so I've gotta wait till then anyway...
Dammit, the thing is thirty bucks, which is fine, but shipping is thirty-five! For something the size of a memory stick! Fucken pants.
Anyone else want one, so we can split the shipping? They're on backorder; they don't start shipping till 8/1/21 so I've gotta wait till then anyway...
-
Kimmo - Posts: 181
- Joined: Sun Oct 25, 2020 8:26 am
- Location: 3028
- Car: 07 GT-B
Re: OBD2 spec?
![]() by bigBADbenny » Mon Dec 28, 2020 3:13 pm
by bigBADbenny » Mon Dec 28, 2020 3:13 pm
This is why I went with a tv box...
No power switch, no dramas.
Personally I’d just use Btssm app and Tasker to handle power management, but you’d need root which is another hassle
No power switch, no dramas.
Personally I’d just use Btssm app and Tasker to handle power management, but you’d need root which is another hassle
-
bigBADbenny - Posts: 10421
- Joined: Tue Oct 04, 2011 6:36 pm
- Location: Collingwood, Melbourne
- Car: MY07 GT-B 6MT OBP Wagon
- Real name: Ben Richards
- Profile URL: http://tinyurl.com/agvbzop
Re: OBD2 spec?
![]() by Kimmo » Mon Dec 28, 2020 5:14 pm
by Kimmo » Mon Dec 28, 2020 5:14 pm
I rooted this phone before, it was an absolute bastard. Did a shitload of root-enabled tweaks, took bloody ages. Then after a year or so, something happened and I tried to flash an old backup or whatever and the shit hit the fan. Long story short, somehow lost root, and there's no way I can be arsed getting it back since even just getting the phone to work again was touch and go.
The nifty thing about Chargie is that not only can you tell it to just charge up to x% and start charging at y% (say, keeping it between 30-80% while minimising charge cycles), it'll also factor in temperature which is handy in a car. It should go a long way to maximising the life of the cell, beyond just preventing it from going bang, which I doubt is much of a risk... unlike the certainty of the cell being thrashed by constantly being topped up to 100%, in whatever temperature.
I reckon I should probably make a little visor, into which I can integrate extensions for the buttons, which should keep the phone a bit cooler as well as reducing reflections...
-
Kimmo - Posts: 181
- Joined: Sun Oct 25, 2020 8:26 am
- Location: 3028
- Car: 07 GT-B
Re: OBD2 spec?
![]() by bigBADbenny » Wed Dec 30, 2020 4:30 am
by bigBADbenny » Wed Dec 30, 2020 4:30 am
If you’re doing button extensions, power mgmt is obviously less of an issue.
Are you coming to the health check day, NYE arvo in Collingwood?
Deets here!
viewtopic.php?f=34&t=36661#p449873
Are you coming to the health check day, NYE arvo in Collingwood?
Deets here!
viewtopic.php?f=34&t=36661#p449873
-
bigBADbenny - Posts: 10421
- Joined: Tue Oct 04, 2011 6:36 pm
- Location: Collingwood, Melbourne
- Car: MY07 GT-B 6MT OBP Wagon
- Real name: Ben Richards
- Profile URL: http://tinyurl.com/agvbzop
Re: OBD2 spec?
![]() by Kimmo » Wed Dec 30, 2020 8:59 am
by Kimmo » Wed Dec 30, 2020 8:59 am
I was gonna do a visor out of aluminium, which would've made it easy to do the button extensions, but while I was digging around for a bit to use, I thought, way to knock a couple of stars off the crash rating.
Made one instead from a bit of plastic from a binder cover, but it's a bit shit - the shape doesn't hold so well, and although its shadow is about right the phone still gets bloody hot under it... Maybe I should have a look around for something with an OLED screen that fills the space, without regard for any other features except OTG and GPS, and rip the battery out of it... making it a permanent install would solve a couple of problems. Although then, I should probably go to the trouble of getting another input for the Grom and have it manage audio too... maybe with a DAB+ dongle... Oh, and of course I'd want to fuck around down a rabbit hole for two weeks rooting and tweaking, yeesh.
But I need there to be something like that PC BIOS setting to resume previous state after power loss... trying to find a way to get an Android device to wake up and go to sleep based on what's happening with an OTG peripheral doesn't seem that doable, particularly without root. Hmm, maybe I could keep the battery for standby (I don't want the thing booting every time), but away from the heat, with a little bespoke circuit (a mate is an electronic engineer) to manage the battery level and minimise charge cycles, and to wake and sleep the thing with the ECU. Probably still need root to bugger off screen unlock...
What a hassle. Hang on, there must be car-specific Android devices! Better have a look before going further.
-
Kimmo - Posts: 181
- Joined: Sun Oct 25, 2020 8:26 am
- Location: 3028
- Car: 07 GT-B
Re: OBD2 spec?
![]() by Kimmo » Wed Dec 30, 2020 9:01 am
by Kimmo » Wed Dec 30, 2020 9:01 am
bigBADbenny wrote:Are you coming to the health check day, NYE arvo in Collingwood?
Deets here!
viewtopic.php?f=34&t=36661#p449873
Oh hey, missed that. I reckon I will, cheers
-
Kimmo - Posts: 181
- Joined: Sun Oct 25, 2020 8:26 am
- Location: 3028
- Car: 07 GT-B
Re: OBD2 spec?
![]() by Kimmo » Wed Dec 30, 2020 11:24 am
by Kimmo » Wed Dec 30, 2020 11:24 am
Fuck it - the more I look into this power problem, the more it looks like an epic hassle; if I'm gonna bother with this, I might as well get the double din fascia and an Android stereo, not to mention integrate the reverse camera... So, the solution is to stick with the purity of the 'utilising a spare phone' concept - I've ditched the double sided tape and instead I'll just use a small block of foam to hold it in place, and just take it out to charge as needed.
I'll see how that small constant hassle stacks up against the epic hassle of reconsidering the whole entertainment system and whatever.
I'll see how that small constant hassle stacks up against the epic hassle of reconsidering the whole entertainment system and whatever.
-
Kimmo - Posts: 181
- Joined: Sun Oct 25, 2020 8:26 am
- Location: 3028
- Car: 07 GT-B
39 posts
• Page 3 of 3 • 1, 2, 3
Who is online
Users browsing this forum: No registered users and 15 guests