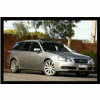
Here is a before and after photo of the head unit change.
- one.jpg (212.34 KiB) Viewed 42375 times

The things you are going to need for this install:
- A new headunit with front/rear/sub rca output (I chose a Kenwood DDX7017BT)
- AV panel fascia kit with HVAC controls
- RCA leads (only the male end matters)
- A few metres of wire
- Soldering iron, heat shrink tubing, wire strippers, electrical tape, electrical connectors, etc.
- Multimeter
- Basic screwdrivers
- Panel poppers
- Good lighting and a torch
Before we begin, I should note that this is the story of what I did and you are following my instructions at your own risk. I am not responsible for any parts you order incorrectly, damage or the money you lose. Additionally, I would recommend reading the whole post at least once before beginning your own install rather than following it from the start without knowing the next step.
Once you have all the required parts, the first step is obviously to remove the factory McIntosh Head unit. Start by lifting up the silver ring around the gear selector, it has 4 clips holding it down and it can easily be removed with a panel popper or a flat head screw driver with a rag around it would work, just be very careful not to scratch your plastics.
- two.jpg (212.75 KiB) Viewed 42375 times
The next step is to pop off the silver trim on each side of the head unit, just like the gear selector ring, it has a few clips and just needs to be gently lifted off.
- three.jpg (217.14 KiB) Viewed 42375 times
Next is to remove the little storage compartment below the radio. It lifts from the bottom near the gear selector and is a little fiddly to get out.
- four.jpg (228.09 KiB) Viewed 42375 times
At this point (or at the start) you will want to start the car, put it in Drive, then turn the car off as the gear selector in Park will block the radio from sliding out. Keep your handbrake on, have the car on level ground and don’t let your car roll away. You will also want to disconnect your battery to save any electronics from being damaged.
There is 6 screw holding your head unit in 2 at the bottom, 2 in the middle and 2 at the back. Remove them and it should slide out and you can disconnect the plugs at the back. Having a small flat head screw driver handy may help you with that.
- five.jpg (229.78 KiB) Viewed 42375 times
With the McIntosh head unit out, I chose to power up my new kenwood head unit to make sure it worked. I chose to do this now as I had not messed with anything and it would be easier to diagnose a problem rather than at the end of the installation. Another reason I did this was I once bought a faulty head unit, after I finished the install it wouldn’t turn on and I lost several hours before discovering it was not a problem with my wiring. A head unit (usually) only needs three wires connected to power on: Ground, Constant Power and Accessory power. So I cut those wires on the factory 14 pin harness and soldered them to the Kenwood harness. Thankfully, the head unit worked.
- six.jpg (175.15 KiB) Viewed 42375 times
- seven.jpg (188.21 KiB) Viewed 42375 times
The wire colours for the Factory harness are:
Violet……………………………………………Illumination (+)
Green…………………………………………..Bright mode
Violet/White stripe………………………Satellite/Remote
Blue/Red stripe……………………………12v (+) Constant
Black/white stripe………………………..Illumination negative via dimmer
Orange/White stripe……………………Satellite/Remote
Yellow/Red stripe………………………..12v (+) Accessory
Black……………………………………………Ground
Yellow/Black stripe………………………Remote antenna power
Note with the factory harness that the Satellite wires will not work for setting up steering wheel controls on an aftermarket head unit and I will explain how to make the steering wheel controls work later on.
For illumination, the Violet (illumination +) wire is the one you want to connect to your head unit. The dimmer and bright mode wires are not compatible with aftermarket head units.
With that sorted, the last wire of concern from the 14 pin harness is the antenna power wire. This is required for the antenna booster to work. Normally you would connect this to the P.Cont/Antenna power wire on your head unit harness (generally a Blue/White stripe wire) but this wire is needed to turn on the amp. You could probably splice the wire and connect it to both but the antenna booster apparently doesn’t run well with less than 12V and the McIntosh amp is a mystery so I chose to not to do that. What I did was splice the Antenna power wire into the 12V accessory wire running to the head unit that I had already soldered in. This gives the antenna booster the 12V it needs and the head unit only uses this wire as a signal to turn on, the 12V constant wire is the main power provider to the head unit.
- eight.jpg (190.69 KiB) Viewed 42375 times
With those wires connected I shrunk the heat shrink and taped off the ends of the unused wires so they didn’t accidentally short.
Moving on, the next part of the process is the Din cable running from the McIntosh head unit to the amp. The McIntosh system uses one thick Din cable with a 21 pin J101 connector on each end rather than running RCA cables between the head unit and amp like you would see in a conventional setup.
Seeing as you can’t buy a J101 connector anywhere, you are going to have to cut up the Din cable and wire it into male RCA plugs that can connect to your new head unit.
What I did was bought 3 Sony 1 female to 2 male splitters. I chose these as you they are reasonably cheap and give you 2 male rca plugs with around 150mm-200mm of wire already soldered to them which turned out to be the perfect length.
Before cutting them up
- nine.jpg (105.43 KiB) Viewed 42375 times
This shows how that they work simply by connecting the positive wires (red and white) and the negative wires (blue and green)
- ten.jpg (112.65 KiB) Viewed 42375 times
The complete set

At this point I would recommend getting out a multimeter and checking for continuity between the ends of the wires and the male plug.
The pin in the middle of the plug is connected to the positive wire and the ring on the outside is connected to the negative wire.
The next step can be performed in a few different ways but I chose this specific way as I have no intention of ever installing the McIntosh head unit again. The black cable coming out of the back of the head unit (pictured below) is the Din cable to the amp. For those who don’t know, there is the short length of Din cable that comes out the head unit with a connector on the end and then there is another longer din cable that continues on down to the amp. I’m not sure why that was the design choice over just another connector in the back of the head unit but it meant that I could do most of this extremely fiddley soldering on a bench rather than in the car.
I cut the din cable about half way down the wire so that it could be wired back together in the future if I desperately needed to. I also found that this gave me a nice amount of wire to work with.

This is what you will be presented with inside the Din cable. There is an outer shield with three bundles of wires and a light blue wire by itself which is the amp remote signal wire.

Inside the bundled wires you will find 4 thin wires twisted together inside a copper shield that is wrapped around them. I twisted the copper shields up into a long strand so there wasn’t just a bunch of copper floating around.

All of these wires are either a positive or negative for a speaker in the car, with the exception of the antenna remote wire.
This is what needs to be understood:
Your new head unit has 6 RCA outputs; FR, FL, RR, RL, SWR, SWL. So basically an output for each door and two subwoofer outputs
The McIntosh system has FR, FL, RR, RL, SW, CNR. So you have each door, one sub and a centre speaker.
Yes, you can make the centre speak work. No, do not connect the centre speaker to one of the subwoofer outputs.
You want to splice the centre speaker wires into the FR+ and FL+ wires and this will give you the difference between the FL and FR outputs. So you would wire the FL+ RCA output wire to the FL+ Din cable wire AND the CNR+ Din wire, then the FR+ RCA wire to the FR+ and CNR- Din cable wires. The FR- and FL- RCA wires are just connected to the din cable wires as normal
As for the subwoofer, you should be able to connect the SWR (or SWL) output to the to the subwoofer cables in the din and just forget about the opposite side subwoofer output on your head unit as subwoofer signals are somewhat omnidirectional and it shouldn’t make a huge difference.
However, I wasn’t comfortable with “somewhat omnidirectional” so I took a different approach. I took the SWR+ and SWL+ and connected them both to the SW+ din wire then connected the SWR- and SWL- to the SW- din wire. This gives you the effect of having a 2 into 1 splitter (yes, I’m aware of the irony in cutting up the splitters in the beginning to join them together again) and I have had no issues with this system.
That’s all the boring details, congratulations if you managed to read it all without getting falling asleep.
Here is the colour codes for the wiring in the din cable:
CNR (-)………………Brown
CNR (+)……………..Grey
FR (-)…………………Lt Green
FR (+)………………..Orange
FL (-)………………….Black
FL (+)…………………White
RR (-)…………………Purple/Violet
RR (+)………………..Pink
RL (-)…………………Red
RL (+)………………..Yellow
SW (-)……………….Dk Green
SW (+)………………Dk Blue
Amp Remote…….Lt Blue
After a long time of soldering, this was the outcome
EDIT: There is 6 RCA connectors in this photo, although it looks like 5 because one is hiding underneath the middle one.

This shows how thin those wires in the Din cable really are. Rather than using wire strippers on them I stripped their plastic casing off with a very small scalpel I had, even then it was difficult because you don’t want to cut the wire inside the plastic.
The wire with the spade connector is to be connected to the Blue/White Amp remote wire on the Kenwood harness that I discussed earlier. I used a connector rather than soldering it to the harness as now the Din cable harness and Kenwood harness can be separated, otherwise I would be left with a large and unmanageable ball of wires
The longer wire with no connector on the end is the three copper shields twisted together and made into one wire (it was only long as I did not know how much length I would need at the time). What I did with the wire was grounded it to the factory chassis ground (not the ground wire in the 14 pin harness) that is a spade connector with a black plastic cover that was originally connected to the back of the McIntosh head unit.
The AV panel fascia kit comes with a chassis ground wire that is just a ring terminal on one end (to connect to the head unit chassis) and a spade connector on the other end to go to the factory chassis ground wire I just described. As I needed to ground more things I made this:

It is essentially the same thing with two extra terminals on it for grounding other components. One of the spade connector grounds goes to the copper din cable shields and the other is a ground for the handbrake sensor in the head unit.
High end head units with large touch screens are great distractions when driving so there is a law that some features (e.g. watching movies) can only be accessed when the handbrake is applied. This can be bypassed in most systems by just grounding the sensor wire coming out the head unit. I don’t intend to watch movies on the go but I just like having the option to haha.
The final part of the install is the steering wheel controls. Like every other part of the system, the steering wheel controls just couldn’t be simple either. My new head unit has self-learning steering wheel controls, so you don’t need an adapter like a Metra axxess system. Steering wheel controls work with two wires. A positive and a negative/ground. The swc buttons have different levels of resistance and the head unit measures the resistance so it knows which button you are pressing. The Liberty’s buttons work the same but they go into a LAN module which converts the resistance signal into a digital signal and passes it on to the McIntosh head unit via the two swc wires in the 14 pin connector that I said at the start cannot be used as aftermarket head units can’t read the digital signal. So what you need to do is cut into the swc wires before they go through the LAN module. I found a connector that is easily accessed in the steering column that contains these wires.

The white connector is the one you want. Do not touch the yellow connector. DO NOT TOUCH IT. Anything yellow is for your airbag system and you do not want to mess with it.
Anyway, in the white connector you want the orange/white stripe wire and the violet/white stripe wire. Cut those and solder on a length of wire long enough to reach the head unit. Make sure the wires don’t interfere with moving parts down there and you have full mobility of the steering column. I made my wires so they followed the factory loom to the head unit space.

Note that you want to cut the wires, don’t splice into them or the LAN module will give strange feedback.
With the wires now fed through, you want to solder the swc harness on. If, like me, both the wires to used are the same colour, use a multimeter to check continuity between the plug on the steering column and the ends of the wires in the head unit space so you can tell which wire is which ‘colour’. You want to connect the harness ground to the orange/white stripe wire and the ‘input 1’ wire to the violet/white stripe wire. You don’t need the ‘input 2’ wire for this vehicle.

With that completed, you are done with the wiring.
Assemble the AV fascia kit via the instructions that come with it. The instructions are in Japanese but they have diagrams and it’s pretty straight forward. If you’ve made it this far then the fascia kit is easy to assemble. Don’t forget to connect the antenna adapter that comes with the kit.
When it comes to actually installing the headunit/HVAC/fascia kit, it will be a lot easier to do with a friend helping because it requires more than two hands to hold the head unit away from scratching your panels and plug in all the wires in the back. Don’t forget to connect the chassis ground with the ring terminal you made earlier either.
With your car back in one piece it is time to reconnect the battery and turn the head unit on. Program your steering wheel controls by following the head unit manual.
================================================================================================================================
Overall I’m really happy with the outcome of this upgrade. The Kenwood DDX7017BT is a great head unit and I wouldn’t change a thing about it.
It took a bit of fine tuning but now the system sounds great. I cut the wires to the centre speak after 3 days because it was overpowering and I found it terrible to listen to. I do not miss it at all now that it is gone. Initially the front speakers were quite loud but I just faded in the rears more and now it’s great. I also was mostly guessing when I decided to ground the three copper shields in the din cable but the audio sounds clean and has no static so I’m happy.
For those wondering, the screen in the head unit flips down horizontally to insert discs and it clears the gear selector with plenty of space even when in Park.
I’m not sure what part of the system produces the beeps when using the SI-Drive but they still work which is a nice touch.
The only complaint I have is that the new head unit has really shown the limitations of the rest of the system, that I was originally pretty happy with, and now I will likely end up upgrading the rest of the system in time.
The next thing I am likely to do is add a reverse camera into the system and I will post about it whenever I do it.
I tried to make this as informative as possible but I apologise if it was a bit long and boring.
I should give credit to the users of this forum as most of this information was sourced from them. A major contributor was gfennessy who made a post on his install that I would highly recommend checking out.
I’m happy to try and answer any questions that you may have.