This guide is mainly for the post facelift 2.0R and 2.5i with the six stacker CD headunit. The wiring should be the same for the pre-facelift, however taking the centre console apart may be a bit different due to the gear shifter and cup holders being different.
Wiring up an amp isnt difficult, just take your time and don't rush. If you do not feel confident with taking your car apart and wiring things properly, then do not continue, take it to a professional installer. Finally, I take no responsibility for any problems you may encounter after you install. This is the method that i followed and it worked for me. Once again, if you do not feel up to it, do not continue!
Amp Wiring
There are two options that can be taken:
1. Use a Line Out Converter to convert the speaker wires leaving the headunit to RCA outputs and run these to the RCA inputs on an amp of your choosing
2. Buy an amp with speaker level inputs and then run speaker wires directly to the amp.
The amp i chose had speaker level inputs, so I chose option 2.
I ended up buying a wiring kit, as it had everything needed. My amp only needed 8 gauge to run, however I chose 4 gauge just incase i needed anything in the future, i could split it in the car using a power distribution without having to run the cable all the way from the engine bay again.
Amp Mounting
When mounting the amp, you have to identify where you would like it.
There are three main options to choose:
1. Under the drivers seat
2. Under the passenger seat
3. In the boot
I chose to put mine under the drivers seat as this is where the amp would be most protected from back seat passengers (my seat will always be covering the amp 100% unless my Mum is driving).
BEFORE YOU START ANYTHING, MAKE SURE THAT ANY BATTERY BACKUP ALARM SYSTEMS ARE TURNED OFF AND THAT YOU DISCONNECT THE BATTERY, NEGATIVE FIRST, POSITIVE SECOND
Preparation
1. Position your fuse where you would like it in the engine bay and measure the length of cable required from the positive terminal to the fuse. (I put my fuse on the side of the fuse box, cable tied it down)
2. Go to a good working area and cut the cable where you marked it. Then wire it into the fuse holder, crimp a terminal on the other end of the short cable.
3. Wire the remaining cable to the other side of the fuse holder.
4. Get your 1m/1.5m ground cable and crimp the grounding terminal to one end and the fork terminal to the other end.
Trim Removal
Now we are going to go into the front passenger footwell and start moving things out of the way to make room for the power cable.
1. Remove the cover under the glove box. This has 3 pop-in clips on the front face, just under the glove box. Remove these 3 clips and then slide the cover out. From here you should be able to see the A/C fan (big white thing) behind the glove box. This will stay in place, as the wire will come through the firewall behind this.
2. Remove the inside scuff plate. Start at the very front, unclip it from the front left kick panel. Then go to the center piller and unclip it there. From there, it will require some force, however this thing is quite flexible. There are about 3 clips evenly spaced holding it down.
3. Remove the front left kick panel. This has 1 screw-in clip thing. It has a flat face, however just by using your fingers, you can apply counter-clockwise torque and it will just come off.
4. Remove the screw clip that is holding the carpet down. This is located next to the screw-pop clip that holds the front left kick panel. Just unscrew it counter-clockwise. From here the carpet can be lifted up slightly. This should be plenty for you to run the cable under the silver metal plate.
5. The following 8 steps are optional if you are going to mount the amp under the drivers seat or passenger seat. Otherwise move on to step 6.
Remove the front seat.
a. Start by removing your headrests and slide the seat all the way back.
b. Remove the two front bolts and slide the seat all the way forward
c. Remove the two bolt covers at the back of the seat rails
d. Remove the back two bolts
e. Lean the seat forward and disconnect the connectors underneath. (The white one has a clip, just push it in and pull the connector out. The yellow one is a double lock type thing. Push the yellow
clip in and while holding it in, slide the green slider down. This should release the yellow connector)
f. Remove the seat from the car.
g. Repeat steps 5.a to 5.f for drivers seat (only if mounting under drivers seat).
h. Remove Centre Console (The power will come from under the passenger seat, through the center console and then under the drivers seat, also the RCA's or Speaker Level Input cables will be run
through here
i. Start at the handbrake and remove the leather handbrake boot. This is just clipped in. Just pull up with adequate force and it should come loose.

ii. Remove the shifter boot/surround. For manual, twist the silver plastic ring to the right a little bit and then pull up. For auto, remove the silver ring. It pops straight up with clips located
at about 1:30, 4:30, 8:30 and 10:30 positions.

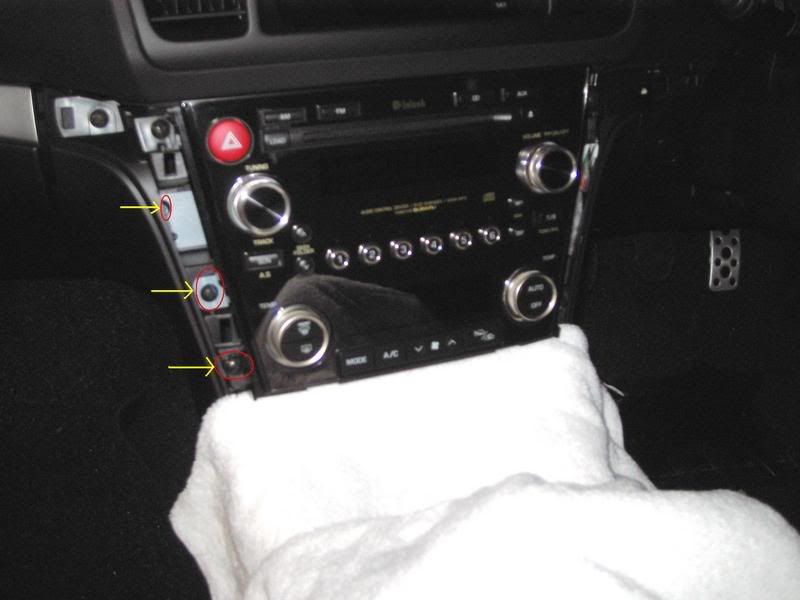
iii. Pull up with some force on the front of the center console. Start where you removed the handbrake boot. There are two pop clips that comes straight up (yellow circles). Then just to the
left of the shifter, there is a plastic clip that you have to unclip and pull up(red circle).

iv. Step into the back, there should be two covers on either side of the center console. Get a small flat head screw driver and pop these covers off. Under you will find a screw on each
side, remove the screw. From here the center console will come straight up. You can choose to remove it or just have it sitting upwards. I just had it sitting upwards against the back seat.

6. Remove the door seal on the bottom of the door to access the cable management along the bottom of the door.
7. Pull up on the cable management to get more access to it and give you better access to the under carpet area.
8. The following 4 steps are for those choosing to mount the amp in the boot. Otherwise move on to step 9.
a. Pull up on the back seat bench. It is clipped in at two points.
b. Remove the back seat scuff plate. This is held down by 1 screw clip and then 2 clips like the scuff plate on the front door.
c. Unbolt the 4 bolts holding the back seat down. Two are located at either end of the back seat, and two are located directly under the ski hole.
d. Once the bolts are undone, open up the ski hole (if you don't open the ski hole the back seat wont pop upwards) and then with a little force push the back bench upwards. It should pop off.
9. Time to remove the headunit. For this i started by removing the little compartment where the cigarette lighter thing is. This just pops forward and then can be removed. Make sure to unplug the back of the cigarette lighter.
10. Remove the silver things on either side of the headunit. These are held in by 3 or 4 clips. Just pull straight out.
11. The headunit is held in by 3 screws on either side. If you have a look, there are 4 on the left and 4 on the right. The top one on both sides stays. Only the bottom 3 on either side get removed. Two are almost level with the dash, and 1 is deeper in the dash.
12. Slowly pull out the headunit, unplug the Hazards button, then slowly pull the rest out and unplug the rest of the cables.
Wiring
Now that everything is removed we can begin the wiring.
1. Get all your pre-worked wires.
2. Go to the engine bay and position your fuse holder
3. Find the grommet on the passenger side going through the firewall
4. Slowly, remove this grommet. This can be done by providing force on the top of the grommet and slowly working your way around to half way down on either side. The bottom half of the grommet has a lip that makes it harder to get out. However once the top half is out, the bottom half can just be slid out.
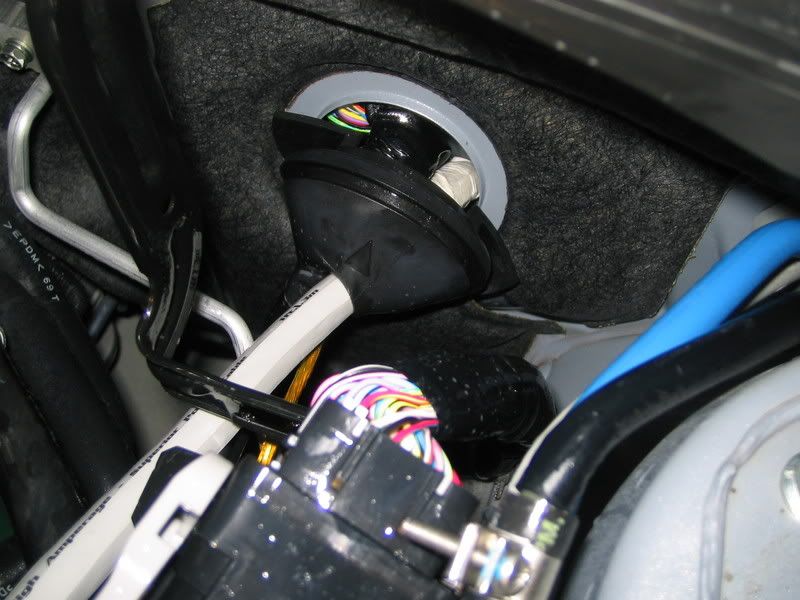
5. Get any cutting tool and carefully cut split in the rubber just under the triangle arrow pointing up (this is the softest point of the rubber). Make the cut just big enough for the cable to go through. This will ensure that the grommet will still serve its purpose.
6. Run your cable through the hole in the grommet and then through the firewall.
7. Once you have run your cable through the firewall, head into the cabin and start running it down along the metal foot plate to the bottom of the door. From there run it through the cable management either to the center pillar or to the back of the car (depending on where you choose to put your amp).

8. a. If running the cable to the boot, then just follow the other cables going into the boot.
b. If running the cable to the drivers seat, then go under the carpet at the center pillar and go under the carpet, to the center console and then under the carpet to the drivers seat.

9. Cut any excess power cable.
10. Crimp your fork terminal to the wire and wire it to the Positive terminal of the amp.
11. Get your ground cable and wire the end with the fork connector to the Negative terminal of the amp.
12. a. If wiring in the boot, find any bolt connected to the chassis and wire the ground to that.
b. If wiring under the drivers seat, then find a bolt thats connected to the chassis. This could be either the bolt holding the seat down, or any bolt inside the center console. I chose one of the bolts holding the handbrake lever to the chassis inside the center console.

13. Get your blue remote turn on wire and connect it to the 'Remote on' terminal of your amp.
14. Run the wire back the way you came with your power cables, and connect it to a 12V Switched source. This can be found inside the center console where the cigarette lighter is. (12V is the yellow cable with silver markings)
15. If using a LOC, then solder the LOC to the respective speaker wires. And then run RCA's to the amp down the center console to your chosen position. Try and avoid using the same route as power as interference can be inducted into the speaker wires. Otherwise run the speaker level input cable from the headunit to the amp down the center console.
- Code: Select all
+-----------------+--------------------------+
|   Cable         |      Colour              |
+=================+==========================+
|Front Left +     | Brown w/ White Stripe    |
+-----------------+--------------------------+
|Front Left -     | Green                    |
+-----------------+--------------------------+
|Front Right +    | Red w/ Yellow Stripe     |
+-----------------+--------------------------+
|Front Right -    | White w/ Black Stripe    |
+-----------------+--------------------------+
|Back Left +      | White w/ Red Stripe      |
+-----------------+--------------------------+
|Back Left -      | Red w/ Black Stripe      |
+-----------------+--------------------------+
|Back Right +     | Blue w/ Yellow Stripe    |
+-----------------+--------------------------+
|Back Right -     | Red w/ White Stripe      |
+-----------------+--------------------------+
16. Run wires to the speakers/subwoofers that you will be powering and wire them accordingly.
Re-assembly
1. Re-assemble everything following the reverse of the above steps. Making sure that all connectors that you unplugged are plugged back in.
2. Connect the amp power cable to the positive terminal wire.
3. Connect the positive power terminal to the battery
4. Connect the negative power terminal to the battery
5. Turn on any battery backup alarm sirens you may have.
Test
1. Go into the car and turn the key to "On".
2. Make sure you have power to everything inside the cabin.
3. If you have power to everything inside the cabin, then go to the amp and check to see if you have power to the amp.
4. If everything is working fine (which it should be) then you can go to the amp tune stage.
Amp Tune
To tune the amp, I followed a guide on Mobile Electronics Australia. The link is below.
http://www.mobileelectronics.com.au/forums/index.php?/topic/35875-tutorial-amplifier-gain-crossover-adjustment/
ENJOY!
If you followed the above steps correctly, you should now have a fully working amp!
Enjoy your music from the stock HU.
Thanks go to Mo_GT for his "How do I...? (offer to show /explain)." write up (http://forum.liberty.asn.au/viewtopic.php?f=6&t=1459&p=81287&hilit=+offer#p81287)
And to Hobber for his "DIY: OEM style Illuminated Cupholders – Walkthrough" write up (http://forum.liberty.asn.au/viewtopic.php?f=12&t=4032)
Used some of the pics plus their info from their write-ups and some of my own pics.
Ric, please move to Reference material & Walkthroughs.