I managed to get a couple of sets of HIDs as well as some LED parkers from Tangcla yesterday and due to the bad weather, thought i'd stay inside and put them on my car.
My car is a MY06 3.0RB so your install may vary slightly, however most of it should be fairly similar i assume.
While I was looking around finding out how best to do this, I noticed that we didn't have a walkthrough for the process so I thought that while I was installing mine, i'd put one together to help other people out. I'd also like to see where other people have mounted their ballasts. I've got 'normal' sized ones but next time the slim ballasts would be great as it will give a few more options for places to install them.
Anyways, lets start the walkthrough.
Note: The photos may switch between passenger and drivers side but i'll try to note where there are noticable differences.

These are the tools that I used for the job.
Tools used were:
3M tape, Electrical Tape, Flathead screwdrivers (cloth to lever out bits without marking them), phillips head screwdrivers, 10mm socket & socket wrench with small/mid extension, 10mm spanner, 1" holesaw or drill bit, electrical drill & assorted cableties.
Now lets take a look at the headlights

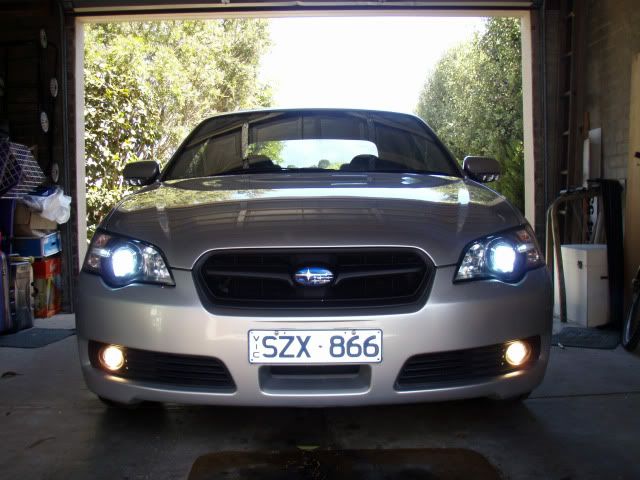
This is the passenger side light. From right to left, the bulbs in there are hi-beams, low-beam, parkers (horizontal bit) & turn signal. We will be changing the middle two, the low beam (HIDs) and the parkers (LEDs).

Drivers Side

Passenger Side
This is the stock engine bay positions. For the drivers side we need to remove the air intake bit by undoing the front two screws and lifting it out.
For the Passenger side, we need to move the wiper filler tube and we can tuck that away. This is done by undoing the screw and pulling it out.


This is the stock wiring (after the grey cover has been screwed off. You can see the connection to the H7 bulb and in the second picture, the parker assembly has been removed and pointed out. To undo this you need to reach in and unscrew anticlockwise. You may need smaller hands to do this. You can then replace this parker with the new LED. Results are as below.

Looks good in comparison to the other one doesn't it. Lets get started on the HID low beams.

This is the headlight cover. We need to make a hole in this so that the HID wiring can fit through.

Here's one i prepared earlier. This was taken out using the holesaw. The HID wiring has a grommet that will fit in this hole to keep water out.


After putting in the HID globe being very careful not to touch the actual globe (hold the plastic base bit)
Here is how we do the wiring. On my car, the headlight wiring was red (orange) and green. We need to put the HID wiring into the original connector.
Put the red pin into the original connector socket on the side with red wire. Then put the black pin into the original connector socket on the side with the green wire.
Once this is done, it's best to tape up the wires so that they don't come out and secondly don't touch each other.


Tape each individually, and then tape both together.
Now is a good time to test to see if we have it right.

Hook up the ballast to the wiring kit. This should be fairly straightforward however watch out that you get the connection to the ballast correct.

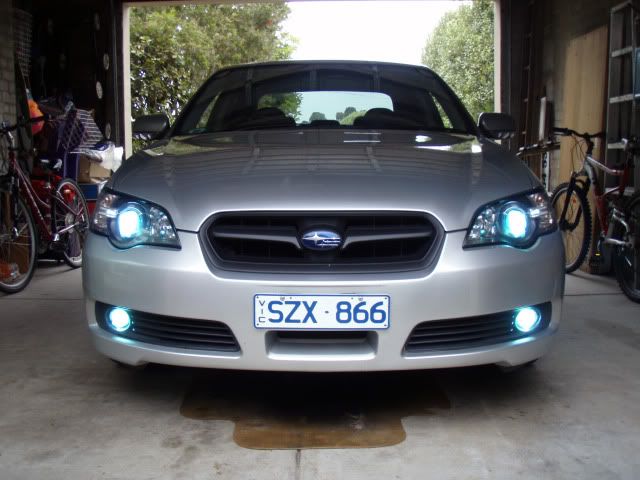
tada! looks like it works.....and it looks good!!!! Especially compared to that yucky yellow halogen. bleergh!
Now we need to find a safe place to put the ballasts


I put mine here. THe first is the Drivers side and the second is the passenger side. I stuck this to the chasis under the guards using the 3M tape.
I couldn't find a way to cable tie them in this spot but it seemed to hold enough and felt cool enough that it should be alright.
Almost there with this one. Now put the headlight cover back on using the hole that we made with the holesaw and let the wires hang out

Tuck your wires so that they are out of the way and hook it up to the ballast Also cable tie your wires so they don't come out. Now your HID is in!
Do the other side in pretty much exactly the same way except you can note the positioning of the ballast is different.
On the drivers side, you may need to remover the air box. This will make it much easier to install anyway. On the passenger side, you can
remove the battery, but this may make it annoying to test if you've got your wiring right. You should be able to fit your hand in to do what you need
to do. Also wiring can be put to the side of the stock battery so it's out of the way.
Onto the Fog Lights!
Here is the foglight grille. Put a cloth on a screwdriver and pry this out in the marked locations

Now we can't remove the foglight yet. We need to get under the car.

There is a cover just underneath where the foglights should be. This can be removed by undoing the two expanding screw clamp thingies as circled (this is the passenger side and is if you were looking underneath with your head to the rear of the car.) Undoing these two will not remove this cover completely, however ast his is a flexible thin plastic cover, it can be pulled down and bent a bit so it is out of the way enough for you to work.

Now that the cover is out of the way, we see these two bolts here which hold the foglight in place. Use the 10mm socket to remove these.

Once these are out, you can remove your fogs. To remove the connector, press down on the circled clip and pull it away from the foglight cover.
Now that it's out, lets take a look at the foglight housing.

Outside

Inside
With the inside, you can see where the H3 bulb is connected to the foglight cover through two pins. and two wires. Remove the stock globe and pull out the white wire. Pull out the grey wire connection as well. We will need to use this grey wire/connection but in a slightly different way. We will need to put a hole in this cover so remove it to make sure it doesn't get damaged.

Here is my drivers side cover with a hole. I did this using the flat drill bit which makes holes. This is smaller than the one for the headlight cover, but large enough to put the H3 globe through. The grommet will still work with this.


We need to make an alteration to the H3 bulbs. I wouldn't ordinarily do this but my cover wouldn't fit back on unless i did. As seen in the circled part, I removed the additional rubber wire housing in order to allow the wires to bend slightly earlier. If you can get away without doing this, then it would be better, otherwise make sure you don't cut anything important and just cut the rubber surround.

Here is the fog cover with the H3 globe pushed through. As you can see, the grommet will still prevent water from getting in.

Here is how to wire the foglight
The top section is the foglight. The H3 globe has been put inside to protect it. (don't touch the glass!)
The red wire goes directly into where the white wire went before. This is the positive wire. (on the bottom of the picture)
The black wire goes into the grey connector. (this is on the right of the picture)
Make sure you tape up the black wire to the grey connector. This is to make sure it doesn't come out.

Pull wires through the grommet as required and fit the fog cover back onto the housing. Wiring is done. Now we should test it.

Awesome.
Now that that is done, we need to put the foglight back, wire up the ballast and find a safe place to put it.


I have cable tied this to the blank plastic section next to where we unbolted the fogs, pretty much directly under where the fogs are sitting.
the cabletie had to go around a pretty big area so i needed to put two together to finish up. You can also see where i've tidied up some of the wires with
smaller cableties.
Other side is pretty much exactly the same. Even the under covers are the same.
Now you're all done!

Looks cool.
Anyway, hope that this helps people in the future.
Thanks to Clarence for getting me these HIDs and parkers (great guy, even replaced one of my non working parkers!)