You'll need:
1x Fibreglass repair kit, or equivalent materials. Make sure you have gloves, fibreglass is not nice to skin.
Aluminium foil
Cooking spray
Masking tape
Body filler
Various grades of wet & dry sandpaper - I used 180, 400 & 1200
Sanding block
Dremel or similar
Primer & colour matched spray paint for your car, plus clear coat
Saftey glasses, thicker gloves, dust mask.
Lightly spray the headlight with the cooking oil spray. Overspray is fine. This will ensure you get a perfectly masked layer.
Mask the headlight and surrounding area with one sheet of foil. Use a cloth to smooth out the foil, following the contours of the headlight. You need to be able to see the shape and edges clearly. The oil makes the foil perfectly flush with the surface underneath.
Spray over the foil again, and add another layer, smoothing down again. The foil is to protect the headlight from the fibreglass resin, as it can heat up when setting and damage plastics.
I put masking tape down over the rough area I wanted my eyelids. I probably wouldn't do this if I made them again, as I couldn't get the tape off properly later on. Also it's a good idea (if you are leaving the headlights on the car) to mask off all the surrounding areas, like engine bay, and bumper. The last thing you'd want is this resin on your paint.
Grab a permanent marker and draw along the top edge of the light, and across the front, in the general shape you want the eyelids. Accuracy is not important now, but make sure you are giving yourself loads of room for adjustment, sanding and shaping, by making the initial lines quite a bit bigger than you want the final product. A quick spray with oil again will help the eyelid release, and the foil come off.

Cut your fibreglass matting to size, allowing more overhang again. I had to cut triangles off the end of my strips, and use those offcuts to fill in the opposite end, as they were a bit too short. It depends what kit you buy, I think mine covered .25m2, so it was 25cm x 1m, (from memory!) You will want 3 layers of matting per eyelid.

Mix the catalyst into the resin as per product directions. Ensure you have gloves on! With the paintbrush you'll want to moisten the area you've drawn. Watch for any runs and mop them up with the brush.
Lay down you first layer, and in a poking fashion, get the matting well covered by resin. This is the part that will turn into "plastic", any dry matting will remain the same. Again watch out for excess resin drips or runs.
Continue until you've got 3 layers on each light. You might have to mix a second batch of resin, as it dries pretty quickly. Try not to make more than you can use in about 20 mins.

I had to use a heat gun as the night was cold, it took a while for the resin to harden. When it has set, remove from the car and leave to cure, preferably overnight.
Now that's the easy bit done!

When grinding it's obviously a good idea to have glasses and gloves on. Dust mask recommended as the amount of dust is unreal.
With the dremel and a grinding disc, cut out the rough shape of the eyelid. I was pretty cautious and left quite a lot, but better safe than sorry. Remember you can always take more off, you can't put it back!

Now check the fitment. I don't have photo's of this process, but all I did was sand and shape, check fitment, sand some more, etc etc. 180grit dry on a sanding block makes nice straight edges, the corners I did with the dremel. Definitely a lot safer to do 90% with sandpaper, also this way you can make smaller adjustments more accurately. Just takes time.
When they are shaped the way you want, and both are even (I found a ruler worked well to compare width, as they are mirrored- you can't lay one on top of the other to check they are the same) take your body filler or blade putty and give the surface a good coat. You'll probably end up doing 2 or more coats so don't worry about thickness. Try and avoid air bubbles, as I found out later on. **Edit: Prime before putty/body filler ***

When it's dry, give it a good sanding with dry 180g. You might have several sections that need more filler for whatever reason, mine were covered in divots from air bubbles in the first layer of putty… I've never used it before so I was learning on the go. Hopefully 2 coats of putty will do it. Prime it again, before the second layer of putty.

Give it a good sanding with 400g, wet. Make sure it's smooth, shaped etc. Any imperfections will still be just as visible after painting, so fix them now.
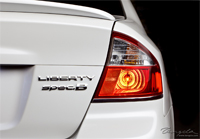
When it's dry, prime with an acrylic primer. Then paint your car's colour. 3 or 4 coats of clear, and you're done! Attach with double sided tape.


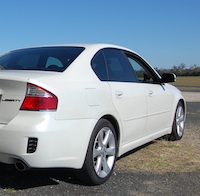
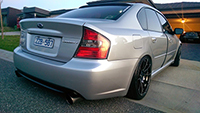
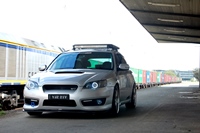
Took me a while to make, but pretty happy with them. A lot of it comes down to the fact I've never used fibreglass, a dremel, or body filler before so next time it'd be a lot faster. Fun project anyway. I like to always have something to do in my spare time so I need another idea now!