Re: the mild oil consumption, did you ever get to verifying the efficiency of your aos/cc setup, by monitoring crankcase pressure eg via the oil cap to a boost vacuum gauge?
Re: the HG fail, did you get to the specific failure mode, eg failed radiator, incomplete bleed etc?
Were you using the two oem radiator/header tank caps?

Australian Liberty Owners Club
Member Profile - Yowie's SH Forester XT
Re: Member Profile - Yowie's SH Forester XT
![]() by bigBADbenny » Tue Oct 25, 2022 7:16 am
by bigBADbenny » Tue Oct 25, 2022 7:16 am
-

bigBADbenny - Posts: 10421
- Joined: Tue Oct 04, 2011 6:36 pm
- Location: Collingwood, Melbourne
- Car: MY07 GT-B 6MT OBP Wagon
- Real name: Ben Richards
- Profile URL: http://tinyurl.com/agvbzop
Re: Member Profile - Yowie's SH Forester XT
![]() by Yowie » Tue Oct 25, 2022 2:51 pm
by Yowie » Tue Oct 25, 2022 2:51 pm
1. never ran a boost gauge on the crank pressure.
2. After a dirt track day, a bunch of coolant had been pushed out via the overflow (not drawn back in on cooling). a small trickle of bubbles came up through the coolant with a cap-off idle test. The car still drove ok after top-up, but not a long term solution. On engine disassembly, it was clear from the look of things where the head gaskets had blown out (driver's side, both cylinders).
As mentioned earlier, I suspect the head gasket had been sub-optimal for a little while noting the scum in the overflow bottle, but this particular dirt track day seemed to push things into "can't ignore it" mode.
3. Factory radiator & header tank caps. "faulty cap/s" was ruled-out by the bubbles at idle.
---
In other news, the dressed engine is back in the car, but with everything except the gearbox and engine mounts to connect up this coming Saturday. Hopefully we end up starting it and doing the coolant by Saturday afternoon.
The sheer amount of hoses and sh!t on top of a Subi engine is really something. The retired Italian-born mechanic who is helping us out had words to the effect of "I have worked on lot of engines [long list follows]...but nothing like this."
In hindsight I'm considering whether I should have been more ruthless about removing non-critical systems (i.e TVG and secondary air pump). Oh well.
Last edited by Yowie on Wed Sep 13, 2023 3:13 pm, edited 1 time in total.
-

Yowie - Posts: 578
- Joined: Tue Jul 21, 2015 10:05 pm
- Location: Brisbane
- Car: SH Forester XT
Re: Member Profile - Yowie's SH Forester XT
![]() by bigBADbenny » Wed Oct 26, 2022 6:08 am
by bigBADbenny » Wed Oct 26, 2022 6:08 am
How much of the rubber hoses and other soft bits were you able to re-use?
-
bigBADbenny - Posts: 10421
- Joined: Tue Oct 04, 2011 6:36 pm
- Location: Collingwood, Melbourne
- Car: MY07 GT-B 6MT OBP Wagon
- Real name: Ben Richards
- Profile URL: http://tinyurl.com/agvbzop
Re: Member Profile - Yowie's SH Forester XT
![]() by Yowie » Wed Oct 26, 2022 10:54 am
by Yowie » Wed Oct 26, 2022 10:54 am
Good question.
I did a bit of a stocktake and decided to keep about a third of the factory rubber (etc) for reasons of acceptable condition/softness.
I ordered the other two-thirds but had mixed success getting the right stuff or getting it in time. The "solution" was a combination of:
(a) re-using some hoses;
(b) replacing straight and slightly-bent fuel hose with Repco Gates-brand ethanol-friendly fuel hose in the correct diameter;
(c) replacing one factory bent hose in the fuel evap control system with a piece of 5mm or 6mm ID silicone vacuum hose (keep a collection of different sized silicone vacuum hoses kids - it is SOOOO useful in many situations);
(d) replacing the factory "rear position" crank breather hose with the 19mm-to-13mm right angle silicone reducer as discussed earlier;
(e) I also tidied up my 19mm heater hose line (from valve cover breathers T to front catch can) by using a short 19mm piece then a 19-13 brass barbed adapter (internally smoothed) then 13mm fuel hose - that should be longer lasting and make for neater packaging.
Regarding the rear crank gas return to the pre-turbo Perrin air inlet hose. I tried to replace the factory bent hose unsuccessfully so ended up re-using what I had. I was creeping up on the idea of just using 13mm straight fuel hose since there seems to be room and the need for the downward bend near the gearbox is eliminated when running the rear catch can. Ultimately the need to not get in the way of engine re-dressing and dropping into the car put that experiment on ice.
I suspect that the bits of silicone hose I've added are not technically impermeable to vapours, but there isn't much of it, I'm not manufacturing 100,000 cars that way and those two hoses are reasonable accessible for replacement if needed.
-
Yowie - Posts: 578
- Joined: Tue Jul 21, 2015 10:05 pm
- Location: Brisbane
- Car: SH Forester XT
Re: Member Profile - Yowie's SH Forester XT
![]() by bigBADbenny » Sat Oct 29, 2022 8:24 am
by bigBADbenny » Sat Oct 29, 2022 8:24 am
Love it, a comprehensive list!
That means mostly new coolant hoses?
I also need a solution for the pcv return to just in front of the turbo compressor, not confident about getting enough flow under boost using a brass 90' elbow in that spot, so a lower profile nylon butt joiner and the stock inverted W shape hose might be better.
I also found I needed Norna clamps on all the smaller returns on the Perrin inlet to ensure a 100% seal.
There's the fuel purge return hose thats a little folded, its going to get an internal spring reinforcement so I don't need to trim or replace it to fit.
-
bigBADbenny - Posts: 10421
- Joined: Tue Oct 04, 2011 6:36 pm
- Location: Collingwood, Melbourne
- Car: MY07 GT-B 6MT OBP Wagon
- Real name: Ben Richards
- Profile URL: http://tinyurl.com/agvbzop
Re: Member Profile - Yowie's SH Forester XT
![]() by Yowie » Sat Nov 05, 2022 9:49 pm
by Yowie » Sat Nov 05, 2022 9:49 pm
Rebuilt engine - First Oil Change (34km) and general running-in notes
After a bit of a scare* the car is running with the new engine and has now clocked-up its first 100kms.
(*knocking sound on starter turnover turned out to be body-to-drivetrain contact thanks to sad engine mounts - solved with 3mm shims for now.)
The first oil fill was Penrite 15w-40 "Running In Oil".
While the valvetrain is refreshed (incl. new exhaust valves), it is not "new". This means we could skip the 20 mins 2000-3000rpm valve wear-in process.
Accordingly, with the coolant in, we took the car down the road for a few deliberate 3rd gear 60-100kph accelerations to about 4000rpm (then engine vacuum decelerations) to get the rings bedded-in.
I had to drive the car home across town (34km), then changed the oil.

The "Running In Oil" is a bit cloudy to begin with, but it seems to have gotten more opaque - presumably with the remnants of assembly lube and definitely with wear-in metal particles (note the "glitter").
The oil filter had caught some metal particles, but the majority was suspended in the oil.

After the first oil change I put another 70kms on the car through mountain/country roads - often accelerating in 3rd 60-80, 60-100 etc. (with engine braking on deceleration).
I'll continue to do run-in on country roads to get the km up (and keep varying the load/revs) over the next week or two. I'll change the oil and filter again at about 200kms then again at 800-1000kms and again at increasing intervals. Guidance differs, but at about 5,000 kms seems to be a good time to switch to synthetic oil. Until then I'll use up my running-in oil and either get more or switch to a quality mineral oil.
Catch Cans
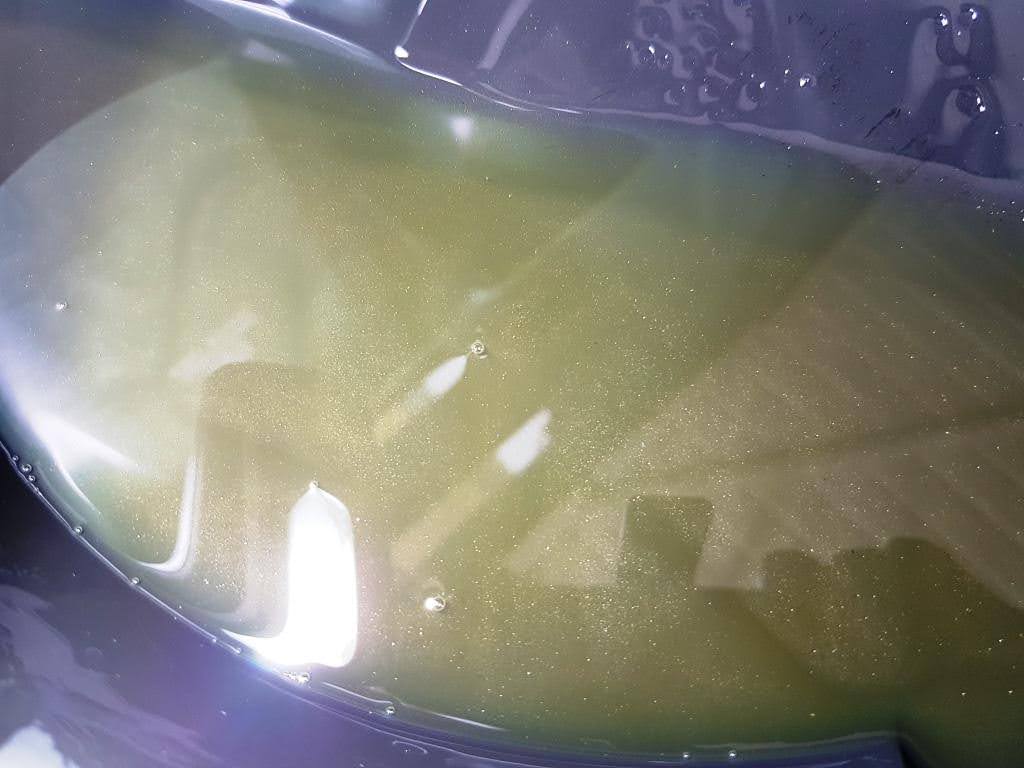
The first drain of the catch cans looks like this:

It's a bit early to talk about a trend, but so far it's just water and a very small amount of oil. None of that buttery foam. This could be because it's a different oil from normal and/or because the new engine has less blowby.
Oil pressure & temperature with 11mm oil pump (so far)
With the new 11mm oil pump (cf. the previous 10mm standard pump) oil pressure and temperature seemed to be higher in normal driving conditions (eg. 20+ psi at warm idle rather than 16+, with oil temperatures at about 100 degrees Celsius rather than mid-90s). Both the "Running In Oil" and my regular synthetic oil are 40-grade, however synthetic is known to lubricate a lot better, so I'll need to wait until the car is fully run-in before any trend can be commented upon.
State of tune for run-in
The proper tune is due mid November.
For the moment I'm running my old-block VF46 tune with the new VF52 running minimum boost* - which turns out to be 7-8psi.
(*as a temporary measure I have a piece of vacuum hose going straight from the compressor housing to the wastegate diaphragm with no bleed-off - so the wastegate is opening as early as it possibly can. The boost controller is plugged in electrically but the vacuum hoses go to atmosphere at the moment.)
There is a very low risk of knock with the lower static compression ratio (new STI block), E85 fuel and the bigger turbo (not allowed to do its top-end thing or 3-port rapid onset boost for now).
The car drives alright for run-in purposes, but is a bit dopey for the reasons above. Trying to push the car beyond about 4000 revs (which is probably not a great idea anyway during run-in) seems to confuse the ECU - running very rich and starting to stumble. Actual fuel delivery peaked at about 800cc/min (through 4x 1000cc injectors). Perhaps the ECU is trying to run an open-loop map that expects a lot more boost under those conditions?
I am impressed that the VF52 seems to come to "atmospheric or thereabouts" manifold pressure easily enough for "normal driving when you need torque" (rich or stoich). That puts to bed one of my concerns about the bigger turbo.
Thanks for reading.
After a bit of a scare* the car is running with the new engine and has now clocked-up its first 100kms.
(*knocking sound on starter turnover turned out to be body-to-drivetrain contact thanks to sad engine mounts - solved with 3mm shims for now.)
The first oil fill was Penrite 15w-40 "Running In Oil".
While the valvetrain is refreshed (incl. new exhaust valves), it is not "new". This means we could skip the 20 mins 2000-3000rpm valve wear-in process.
Accordingly, with the coolant in, we took the car down the road for a few deliberate 3rd gear 60-100kph accelerations to about 4000rpm (then engine vacuum decelerations) to get the rings bedded-in.
I had to drive the car home across town (34km), then changed the oil.
The "Running In Oil" is a bit cloudy to begin with, but it seems to have gotten more opaque - presumably with the remnants of assembly lube and definitely with wear-in metal particles (note the "glitter").
The oil filter had caught some metal particles, but the majority was suspended in the oil.
After the first oil change I put another 70kms on the car through mountain/country roads - often accelerating in 3rd 60-80, 60-100 etc. (with engine braking on deceleration).
I'll continue to do run-in on country roads to get the km up (and keep varying the load/revs) over the next week or two. I'll change the oil and filter again at about 200kms then again at 800-1000kms and again at increasing intervals. Guidance differs, but at about 5,000 kms seems to be a good time to switch to synthetic oil. Until then I'll use up my running-in oil and either get more or switch to a quality mineral oil.
Catch Cans
The first drain of the catch cans looks like this:
It's a bit early to talk about a trend, but so far it's just water and a very small amount of oil. None of that buttery foam. This could be because it's a different oil from normal and/or because the new engine has less blowby.
Oil pressure & temperature with 11mm oil pump (so far)
With the new 11mm oil pump (cf. the previous 10mm standard pump) oil pressure and temperature seemed to be higher in normal driving conditions (eg. 20+ psi at warm idle rather than 16+, with oil temperatures at about 100 degrees Celsius rather than mid-90s). Both the "Running In Oil" and my regular synthetic oil are 40-grade, however synthetic is known to lubricate a lot better, so I'll need to wait until the car is fully run-in before any trend can be commented upon.
State of tune for run-in
The proper tune is due mid November.
For the moment I'm running my old-block VF46 tune with the new VF52 running minimum boost* - which turns out to be 7-8psi.
(*as a temporary measure I have a piece of vacuum hose going straight from the compressor housing to the wastegate diaphragm with no bleed-off - so the wastegate is opening as early as it possibly can. The boost controller is plugged in electrically but the vacuum hoses go to atmosphere at the moment.)
There is a very low risk of knock with the lower static compression ratio (new STI block), E85 fuel and the bigger turbo (not allowed to do its top-end thing or 3-port rapid onset boost for now).
The car drives alright for run-in purposes, but is a bit dopey for the reasons above. Trying to push the car beyond about 4000 revs (which is probably not a great idea anyway during run-in) seems to confuse the ECU - running very rich and starting to stumble. Actual fuel delivery peaked at about 800cc/min (through 4x 1000cc injectors). Perhaps the ECU is trying to run an open-loop map that expects a lot more boost under those conditions?
I am impressed that the VF52 seems to come to "atmospheric or thereabouts" manifold pressure easily enough for "normal driving when you need torque" (rich or stoich). That puts to bed one of my concerns about the bigger turbo.
Thanks for reading.
-
Yowie - Posts: 578
- Joined: Tue Jul 21, 2015 10:05 pm
- Location: Brisbane
- Car: SH Forester XT
Re: Member Profile - Yowie's SH Forester XT
![]() by Stifull » Sun Nov 06, 2022 9:48 pm
by Stifull » Sun Nov 06, 2022 9:48 pm
Mate I am so excited for you . After all your hard work to be out in the back roads enjoying the fruits of your labour must feel really good.. If you are planning on doing any mid week drives let me know and I will keep you company. I don't do the weekend processions. I'd rather stay home and have the roads to myself on weekdays...
Current Subarus
07 Liberty GT (mine) 180kwt on 16lb
98 WRX Club Spes 2 with 2.5ltr upgrade(mine) sub 14 sec
99 Ver 6 Sti also with 2.5ltr upgrade (son) sub 14 sec
02 WRX Bugeye Hatch lots of goodies(wife)
09 Non Turbo Impreza(daughter#4)
Previous
98 GC8 WRX Hatch(daughter#1)
02 Bugeye WRX (daughter#2)
07 Liberty GT (mine) 180kwt on 16lb
98 WRX Club Spes 2 with 2.5ltr upgrade(mine) sub 14 sec
99 Ver 6 Sti also with 2.5ltr upgrade (son) sub 14 sec
02 WRX Bugeye Hatch lots of goodies(wife)
09 Non Turbo Impreza(daughter#4)
Previous
98 GC8 WRX Hatch(daughter#1)
02 Bugeye WRX (daughter#2)
-

Stifull - Posts: 413
- Joined: Sun Nov 18, 2018 11:30 pm
- Location: Brisbane
- Car: '07 Liberty GT '98 WRX CS2 2.5ltr
Re: Member Profile - Yowie's SH Forester XT
![]() by bigBADbenny » Mon Nov 07, 2022 5:43 am
by bigBADbenny » Mon Nov 07, 2022 5:43 am
So good!
In addition to mechanical wastegate pressure, you’re using i-mode as well?
Wouldn’t a basic run in tune be somewhat safer, since you’ve changed up the turbo, short block and…
If you’re making datalogs, can you share some here for comment?
How to:
viewtopic.php?f=6&t=36932
In addition to mechanical wastegate pressure, you’re using i-mode as well?
Wouldn’t a basic run in tune be somewhat safer, since you’ve changed up the turbo, short block and…
If you’re making datalogs, can you share some here for comment?
How to:
viewtopic.php?f=6&t=36932
-
bigBADbenny - Posts: 10421
- Joined: Tue Oct 04, 2011 6:36 pm
- Location: Collingwood, Melbourne
- Car: MY07 GT-B 6MT OBP Wagon
- Real name: Ben Richards
- Profile URL: http://tinyurl.com/agvbzop
Re: Member Profile - Yowie's SH Forester XT
![]() by Yowie » Mon Nov 07, 2022 11:41 am
by Yowie » Mon Nov 07, 2022 11:41 am
Cheers Ben.
No "i mode" on a Forester. That's just for fancy-pants Liberties and STIs :p
Although, interestingly, the tuner claims they can (with Ecutec) have a "high boost" and a "low boost" map that is switchable via demister switch plus a stab at the throttle.
The tuner was going to send a run-in tune, but on further reflection concluded that existing tune + mechanical wastegate pressure will do the job for run-in. Apart from things getting rich and unstuck at 4000+ revs (and at the 7-8psi mechanical boost limit) the car is running well. This makes sense to me. The air is still being measured on the way in and existing closed & open-loop mapping seems to be getting the car around alright below 4k.
Plenty of knock-safety in lower compression, E85 and bigger turbo with its shoelaces tied together.
--
I don't think I have the technology or brains to make a datalog. I agree it would be interesting.
------------
Stifull - I'm interested to see the Tuner's comments on whether I need to deliberately add more country miles pre-tune or just commute normally. Either way, I'll probably deliberately sneak in some mountain runs either on weekends (which was surprisingly reasonable traffic-wise) or on weekday evenings. I'll send you a text message in advance of heading out. Come along or don't as it suits you each time.
--------
In other news, the 200km oil change was much less remarkable (hardly any metal in the oil, still some in the filter). I might put up pictures regardless of whether photos of oil & filters with not much happening is of interest as a reference.
As a minor lesson, the first oil change is probably worth doing well before 34kms by the state of it. Circumstances prevented an oil change right after start up and "up the road & back", but worth doing next time by the look of things.
Catch can contents after 200kms (2 more starts) remained a small amount of water & a tiny amount of oil. Good early signs Re "low blow-by".
No "i mode" on a Forester. That's just for fancy-pants Liberties and STIs :p
Although, interestingly, the tuner claims they can (with Ecutec) have a "high boost" and a "low boost" map that is switchable via demister switch plus a stab at the throttle.
Wouldn’t a basic run in tune be somewhat safer, since you’ve changed up the turbo, short block and…
The tuner was going to send a run-in tune, but on further reflection concluded that existing tune + mechanical wastegate pressure will do the job for run-in. Apart from things getting rich and unstuck at 4000+ revs (and at the 7-8psi mechanical boost limit) the car is running well. This makes sense to me. The air is still being measured on the way in and existing closed & open-loop mapping seems to be getting the car around alright below 4k.
Plenty of knock-safety in lower compression, E85 and bigger turbo with its shoelaces tied together.
--
I don't think I have the technology or brains to make a datalog. I agree it would be interesting.
------------
Stifull - I'm interested to see the Tuner's comments on whether I need to deliberately add more country miles pre-tune or just commute normally. Either way, I'll probably deliberately sneak in some mountain runs either on weekends (which was surprisingly reasonable traffic-wise) or on weekday evenings. I'll send you a text message in advance of heading out. Come along or don't as it suits you each time.
--------
In other news, the 200km oil change was much less remarkable (hardly any metal in the oil, still some in the filter). I might put up pictures regardless of whether photos of oil & filters with not much happening is of interest as a reference.
As a minor lesson, the first oil change is probably worth doing well before 34kms by the state of it. Circumstances prevented an oil change right after start up and "up the road & back", but worth doing next time by the look of things.
Catch can contents after 200kms (2 more starts) remained a small amount of water & a tiny amount of oil. Good early signs Re "low blow-by".
-
Yowie - Posts: 578
- Joined: Tue Jul 21, 2015 10:05 pm
- Location: Brisbane
- Car: SH Forester XT
Re: Member Profile - Yowie's SH Forester XT
![]() by Stifull » Mon Nov 07, 2022 8:27 pm
by Stifull » Mon Nov 07, 2022 8:27 pm
Be careful up there on weekdays evenings. Lots of wildlife running around..
Current Subarus
07 Liberty GT (mine) 180kwt on 16lb
98 WRX Club Spes 2 with 2.5ltr upgrade(mine) sub 14 sec
99 Ver 6 Sti also with 2.5ltr upgrade (son) sub 14 sec
02 WRX Bugeye Hatch lots of goodies(wife)
09 Non Turbo Impreza(daughter#4)
Previous
98 GC8 WRX Hatch(daughter#1)
02 Bugeye WRX (daughter#2)
07 Liberty GT (mine) 180kwt on 16lb
98 WRX Club Spes 2 with 2.5ltr upgrade(mine) sub 14 sec
99 Ver 6 Sti also with 2.5ltr upgrade (son) sub 14 sec
02 WRX Bugeye Hatch lots of goodies(wife)
09 Non Turbo Impreza(daughter#4)
Previous
98 GC8 WRX Hatch(daughter#1)
02 Bugeye WRX (daughter#2)
-
Stifull - Posts: 413
- Joined: Sun Nov 18, 2018 11:30 pm
- Location: Brisbane
- Car: '07 Liberty GT '98 WRX CS2 2.5ltr
Re: Member Profile - Yowie's SH Forester XT
![]() by Yowie » Mon Jan 09, 2023 10:17 pm
by Yowie » Mon Jan 09, 2023 10:17 pm
Tune
Scheduled for this Saturday.
Engine Mounts
Back in November, on first cranking for the new engine, we heard a terrifying "thump thump thump" noise. To our great relief, this was eventually determined to be sad stock engine mounts allowing some part of the drivetrain to contact the chassis. Presumably being removed then reinstalled had allowed whatever cracks/weaknesses in the 14-year-old rubber to advance.
As a temporary solution, some 5mm thick alloy shims were fabricated and inserted. Problem solved for the time being, but not a permanent solution.
With the delay before the tune, I ordered some "Hardrace" brand engine mounts - decribed as harder than stock, but still suitable for street use.

The stock mounts seem to be some kind of plastic (with a rubber core), while the Hardrace mounts are cast aluminium (with rubber core).
[In the words of Ash from Evil Dead: "...your primitive intellect wouldn't understand things with alloys and compositions and things with... molecular structures."]
The more common Subaru mounts seem to be "matchbox shaped" rubber rather than these Forester large round rubber mounts, if you're reading this post hopefully you still get something out of it. Time and zero R&D tolerance sent me to replacement Forester mounts, but I am curious as to how readily "matchbox shaped" WRX & STI mounts work on a Forester (and with what hardware/modifications).
Speaking of modification, spot the difference:

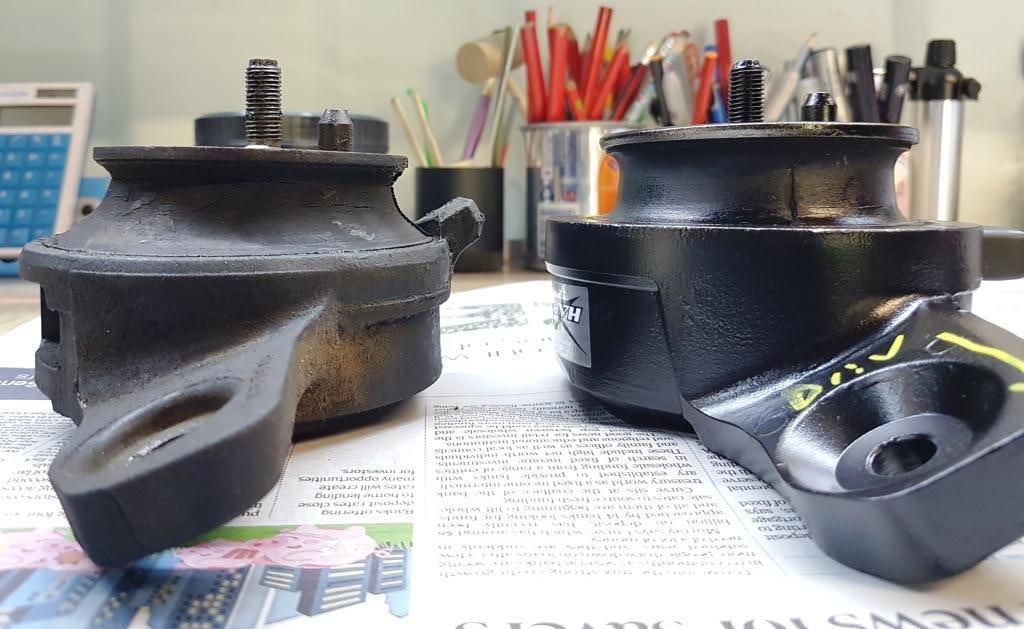
That's right, the tab is diagonal on the stock mounts but straight on the Hardrace aftermarket mounts.
This makes it hard/impossible for the stock metal piece (heat shield?) to fit over the Hardrace mounts. Heat shield shown at bottom of image below. Apologies for poor focus:

Being cast aluminium, it was easy to modify the shape of the tab. I used an angle grinder with a coarse flap disk (then cleaned up with a hand file and sandpaper).

Elongating the holes in the heat shield (?) also helped with assembly:


Replacing engine mounts at home
There are plenty of Youtube and other resources on replacing Subaru engine mounts at home, so my brief notes are as follows:
1. Position the car on ramps (or spare pavers or whatever) to give reasonable working clearance within the lifting range of your trolley jack (with wooden block/s added). Raising the vehicle 100mm was good for me.
2. Remove engine cover, intercooler, one pitch-stop mount bolt and the MAF hose so the engine can raise about 50mm.
3. Remove under-tray, bracing plate and front swaybar. Despite American Youtube advice, I saw no need to remove any exhaust components.
4. Remove the single nut on the under side of each existing engine mount.
5. Loosen (but don't remove) as many bolts as you can get at between the current mounts and the engine block. I got to both passenger side bolts and one driver's side bolt.
6. Position your trolley jack under the sump. I used a piece of hardwood (for strength) with a piece of pine (for softness/conformity) on top where it touches the sump.
7. Carefully raise the engine via the sump with the trolley jack. Enough to clear the threads of the existing mounts plus the minimum extra working room you need. Remember that you are straining radiator hoses and other things here, so don't go crazy lifting the engine until something breaks.
[SAFETY NOTE - relying on a hydraulic jack to hold a heavy object for a long time is inherently dangerous. I reduced (but did not eliminate) my risk by:
(a) keeping my hands out from between engine and chassis as much as possible;
(b) otherwise being mentally prepared to get my hands out of danger at any time the trolley jack started quitting - which never happened thankfully;
(c) for longer breaks, putting some unbolted engine mounts back in and lowering the jack so the engine rested on mounts and the chassis rail.]
8. Remove both mount-to-block bolts on the passenger/easy side and remove the current mount. Test fit the new mount. I suggest leaving the mount-to-block bolts slightly loose until you have test-lowered the engine again and are 100% sure the down-pointing thread is coming through the slot in the chassis rail. You can then tighten those mount-to-block bolts.
9. The rear mount-to-block bolt on the driver's side (Aussie right-hand-drive vehicle) is a pr!ck. You can barely see it. With the engine raised you can at least get access to it with a 14mm ring spanner. I recommend a brass hammer (or similar) to impart a sharp blow on the spanner to loosen this bolt. Post-violence, a 14mm ratchetting spanner is handy to remove this one once it is loosened.
10. Install the new driver's side mount with a similar "loose til it's confirmed to be lined up" policy. The engine is going up and coming down a few times through this process.
I found that rear driver's side bolt such a pr!ck to locate then start in its hole that I ended up grinding a chamfer onto it:

As with the passenger side, when you are 100% sure the down-pointing thread is coming through the slot in the chassis rail you can then tighten those mount-to-block bolts.
11. Lower the engine a final time and replace/tighten the nuts on the down-pointing threads and chassis rail.
11.5 At this point I pulled the fuel pump fuse and cranked the engine just to confirm no "thump thump thump" noise. Your reasons for replacing engine mounts may vary.
12. Re-install the pitch-stop mount bolt BEFORE you put your intercooler back on or you'll be taking the intercooler off again when you realise. A bit of pure speculation there on the type of stuff-up someone less clever than me might fall victim to....
13. Put all the other stuff back. If your aftermarket swaybar mounts need grease, this would be a good time for that.
Thanks for reading.
Scheduled for this Saturday.
Engine Mounts
Back in November, on first cranking for the new engine, we heard a terrifying "thump thump thump" noise. To our great relief, this was eventually determined to be sad stock engine mounts allowing some part of the drivetrain to contact the chassis. Presumably being removed then reinstalled had allowed whatever cracks/weaknesses in the 14-year-old rubber to advance.
As a temporary solution, some 5mm thick alloy shims were fabricated and inserted. Problem solved for the time being, but not a permanent solution.
With the delay before the tune, I ordered some "Hardrace" brand engine mounts - decribed as harder than stock, but still suitable for street use.
The stock mounts seem to be some kind of plastic (with a rubber core), while the Hardrace mounts are cast aluminium (with rubber core).
[In the words of Ash from Evil Dead: "...your primitive intellect wouldn't understand things with alloys and compositions and things with... molecular structures."]
The more common Subaru mounts seem to be "matchbox shaped" rubber rather than these Forester large round rubber mounts, if you're reading this post hopefully you still get something out of it. Time and zero R&D tolerance sent me to replacement Forester mounts, but I am curious as to how readily "matchbox shaped" WRX & STI mounts work on a Forester (and with what hardware/modifications).
Speaking of modification, spot the difference:
That's right, the tab is diagonal on the stock mounts but straight on the Hardrace aftermarket mounts.
This makes it hard/impossible for the stock metal piece (heat shield?) to fit over the Hardrace mounts. Heat shield shown at bottom of image below. Apologies for poor focus:
Being cast aluminium, it was easy to modify the shape of the tab. I used an angle grinder with a coarse flap disk (then cleaned up with a hand file and sandpaper).
Elongating the holes in the heat shield (?) also helped with assembly:
Replacing engine mounts at home
There are plenty of Youtube and other resources on replacing Subaru engine mounts at home, so my brief notes are as follows:
1. Position the car on ramps (or spare pavers or whatever) to give reasonable working clearance within the lifting range of your trolley jack (with wooden block/s added). Raising the vehicle 100mm was good for me.
2. Remove engine cover, intercooler, one pitch-stop mount bolt and the MAF hose so the engine can raise about 50mm.
3. Remove under-tray, bracing plate and front swaybar. Despite American Youtube advice, I saw no need to remove any exhaust components.
4. Remove the single nut on the under side of each existing engine mount.
5. Loosen (but don't remove) as many bolts as you can get at between the current mounts and the engine block. I got to both passenger side bolts and one driver's side bolt.
6. Position your trolley jack under the sump. I used a piece of hardwood (for strength) with a piece of pine (for softness/conformity) on top where it touches the sump.
7. Carefully raise the engine via the sump with the trolley jack. Enough to clear the threads of the existing mounts plus the minimum extra working room you need. Remember that you are straining radiator hoses and other things here, so don't go crazy lifting the engine until something breaks.
[SAFETY NOTE - relying on a hydraulic jack to hold a heavy object for a long time is inherently dangerous. I reduced (but did not eliminate) my risk by:
(a) keeping my hands out from between engine and chassis as much as possible;
(b) otherwise being mentally prepared to get my hands out of danger at any time the trolley jack started quitting - which never happened thankfully;
(c) for longer breaks, putting some unbolted engine mounts back in and lowering the jack so the engine rested on mounts and the chassis rail.]
8. Remove both mount-to-block bolts on the passenger/easy side and remove the current mount. Test fit the new mount. I suggest leaving the mount-to-block bolts slightly loose until you have test-lowered the engine again and are 100% sure the down-pointing thread is coming through the slot in the chassis rail. You can then tighten those mount-to-block bolts.
9. The rear mount-to-block bolt on the driver's side (Aussie right-hand-drive vehicle) is a pr!ck. You can barely see it. With the engine raised you can at least get access to it with a 14mm ring spanner. I recommend a brass hammer (or similar) to impart a sharp blow on the spanner to loosen this bolt. Post-violence, a 14mm ratchetting spanner is handy to remove this one once it is loosened.
10. Install the new driver's side mount with a similar "loose til it's confirmed to be lined up" policy. The engine is going up and coming down a few times through this process.
I found that rear driver's side bolt such a pr!ck to locate then start in its hole that I ended up grinding a chamfer onto it:
As with the passenger side, when you are 100% sure the down-pointing thread is coming through the slot in the chassis rail you can then tighten those mount-to-block bolts.
11. Lower the engine a final time and replace/tighten the nuts on the down-pointing threads and chassis rail.
11.5 At this point I pulled the fuel pump fuse and cranked the engine just to confirm no "thump thump thump" noise. Your reasons for replacing engine mounts may vary.
12. Re-install the pitch-stop mount bolt BEFORE you put your intercooler back on or you'll be taking the intercooler off again when you realise. A bit of pure speculation there on the type of stuff-up someone less clever than me might fall victim to....
13. Put all the other stuff back. If your aftermarket swaybar mounts need grease, this would be a good time for that.
Thanks for reading.
-
Yowie - Posts: 578
- Joined: Tue Jul 21, 2015 10:05 pm
- Location: Brisbane
- Car: SH Forester XT
Re: Member Profile - Yowie's SH Forester XT
![]() by Yowie » Sat Jan 14, 2023 7:53 pm
by Yowie » Sat Jan 14, 2023 7:53 pm
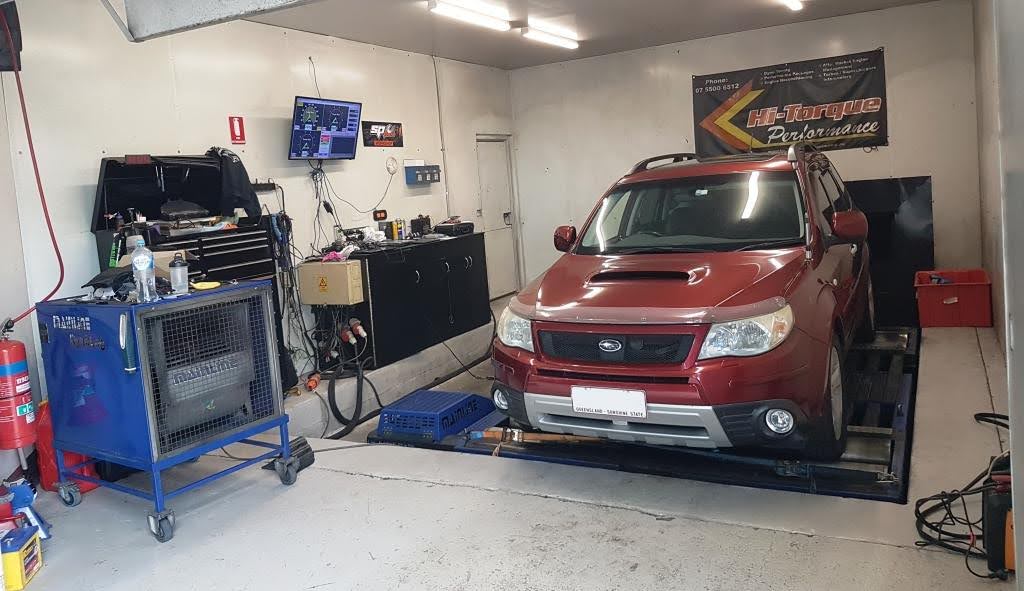

Tune done.
214.6 kilowatts (288hp) on the 16psi "high boost" tune.
186.1kw (250hp) on the 13psi "low boost" tune.
Printed air-fuel ratios are not representative. See notes in post below.
Last edited by Yowie on Mon Jan 23, 2023 10:49 pm, edited 1 time in total.
-
Yowie - Posts: 578
- Joined: Tue Jul 21, 2015 10:05 pm
- Location: Brisbane
- Car: SH Forester XT
Re: Member Profile - Yowie's SH Forester XT
![]() by Stifull » Sat Jan 14, 2023 8:43 pm
by Stifull » Sat Jan 14, 2023 8:43 pm
That's a great number of 16LB of boost. You would have to be very happy with that.. It must feel soo much quicker than it ever has.
Current Subarus
07 Liberty GT (mine) 180kwt on 16lb
98 WRX Club Spes 2 with 2.5ltr upgrade(mine) sub 14 sec
99 Ver 6 Sti also with 2.5ltr upgrade (son) sub 14 sec
02 WRX Bugeye Hatch lots of goodies(wife)
09 Non Turbo Impreza(daughter#4)
Previous
98 GC8 WRX Hatch(daughter#1)
02 Bugeye WRX (daughter#2)
07 Liberty GT (mine) 180kwt on 16lb
98 WRX Club Spes 2 with 2.5ltr upgrade(mine) sub 14 sec
99 Ver 6 Sti also with 2.5ltr upgrade (son) sub 14 sec
02 WRX Bugeye Hatch lots of goodies(wife)
09 Non Turbo Impreza(daughter#4)
Previous
98 GC8 WRX Hatch(daughter#1)
02 Bugeye WRX (daughter#2)
-
Stifull - Posts: 413
- Joined: Sun Nov 18, 2018 11:30 pm
- Location: Brisbane
- Car: '07 Liberty GT '98 WRX CS2 2.5ltr
Re: Member Profile - Yowie's SH Forester XT
![]() by Yowie » Sat Jan 14, 2023 9:21 pm
by Yowie » Sat Jan 14, 2023 9:21 pm
Cheers Stifull
Oddly enough, no. I've only driven it home on the freeway then back out to the Hammer Barn so far, but the throttle "pedal position to torque" mapping on the new tune is significantly less aggressive than the previous tune (even less twitchy than "previous tune with new turbo and 7psi boost limit"). As such, it feels slower so far but will come into its own when I have a chance to open it up a bit.
I don't actually mind the more dopey commuting throttle response. It was too twitchy and agro before - eg dropping from "stoich" to "rich" at the drop of a hat while I was trying to drive around like a non P-plater. Should save fuel and licence points this way.
It must feel soo much quicker than it ever has.
Oddly enough, no. I've only driven it home on the freeway then back out to the Hammer Barn so far, but the throttle "pedal position to torque" mapping on the new tune is significantly less aggressive than the previous tune (even less twitchy than "previous tune with new turbo and 7psi boost limit"). As such, it feels slower so far but will come into its own when I have a chance to open it up a bit.
I don't actually mind the more dopey commuting throttle response. It was too twitchy and agro before - eg dropping from "stoich" to "rich" at the drop of a hat while I was trying to drive around like a non P-plater. Should save fuel and licence points this way.
-
Yowie - Posts: 578
- Joined: Tue Jul 21, 2015 10:05 pm
- Location: Brisbane
- Car: SH Forester XT
Re: Member Profile - Yowie's SH Forester XT
![]() by Yowie » Mon Jan 23, 2023 8:43 pm
by Yowie » Mon Jan 23, 2023 8:43 pm
Tune Notes
Engine, turbo, etc.
After my "180kw" old engine (on E85 with VF46 turbo) blew a driver's side head gasket, we rebuilt it with a new factory bottom-end, VF52, some mild porting (heads & OEM exhaust manifolds) and other reliability modifications. The rebuilt engine was about 2,300kms old at the time of the tune.
My exhaust has a 3" dump pipe followed by a custom rear section for less noise than most aftermarket offerings. Sean said that at this "approx 200kw" power level the rear section would not present any meaningful restriction compared to a "full noise" cat-back exhaust.
I have also done some de-burring around the MAF sensor and removed "clean side" ribs in the stock airbox. The multiplier we ended up using during the tune was "1.0", indicating that the MAF was not rendered materially out of calibration by these modifications.
Ecutek "XC" tune
I took the car to the Gold Coast to be dyno tuned by Sean Day of S&J Automotive (flying in from South Australia for a round of Qld tunes) using Ecutek software.
Sean says he has done many VF52-equipped 4-speed automatic foresters. They describe this service as their "XC" tune.
Part of the standard service is to switch off the secondary air pump feature as a future-proofing reliability measure. I can remove & blank off the relevant parts at my leisure.
Sean considered that the Mainline chassis dyno at Hi-Torque Performance (Gold Coast) was pretty honest - perhaps 5kw generous compared to his home dyno in the power range we're dealing with here.
I was very fortunate to have been allowed to sit in the passenger seat during the tune. To an enthusiast this is like being in the coach's box on grand final day. I strongly suspect that demonstrating an ability early on to "be quiet while the tuner is working" assisted my promotion from "wait outside".
Tune switching
The Ecutek software allows switching between two tunes by fully depressing the accelerator pedal then pressing the demister switch (with the ignition set to "on" - usually not running but see how you go)
The Check Engine Light (CEL) will flashes slowly to indicate the "slow" tune and flash rapidly to indicate the fast tune. Don't forget to switch off the rear demister.
The car will stay in the set tune, however after a flash or reset (battery disconnect) it will revert to the slow tune.
I ended up selecting a 13psi boost setting for the slow tune (rather than a very soft valet tune or something).
Sean did the 13psi low-power tune on the dyno first (lower stakes), then turned up certain parameters to do the 16psi fast tune.
Low Boost Tune
13psi & 186.1kw - as you can see in the dyno chart above (on E85 fuel).
It is interesting that the 13psi tune makes about the same peak power at less boost than the VF46 turbo at full fire & brimstone. Presumably this is the result of a less restrictive exhaust housing.
See below Re air-fuel ratios (AFRs). What is reported on the dyno sheet for the low-boost tune is not the final story.
High Boost Tune
16psi & 214.6kw - as you can see in the dyno chart above (on E85 fuel).
According to Sean, 16psi is the “happy place” for a VF52 and the stock intercooler. He will tune a VF52 to 17psi if a Process West Verticooler is fitted.
I could see pre & post intake temps on my in-cabin gauge (see thermocouple intercooler project on page 4). My unreliable memory is 60 degrees Celsius max "cold side" intake temp, but I'll try to get more data from "full noise" bursts on track.
I haven't done a photoshop overlay, but the high boost power curve seems to support my observation that the VF46 and VF52 have a near-identical midrange, but one starts earlier and the other finishes later.
EDIT - with an auto gearbox (with torque converter slip) and the dyno estimating engine revs, It's probably not an apples-to-apples comparison to compare data that mentions engine revs between two different dynos.
Air-fuel Ratios (AFRs)
Sean said that, based on his experience, 0.95 lambda (as opposed to the usual target lambda of "1.0") is ideal for E85 in closed-loop. In other words, for idling and cruising, "slightly rich" works better for E85.
There are too many variables to comment with any authority, but post-tune the car seems quite happy to stay in closed-loop even under moderate load. This in turn is saving me fuel since the car isn't always trying to switch to a rich performance map.
After the "low boost" tune and during the "high boost" tune I asked if 0.75 (as shown on my in-cabin wideband gauge with sensor right after the turbo) was the target lambda. Sean responded that the back-of-exhaust wideband was sniffing a leaner mixture, but that the catalytic converter was probably affecting that.
Sean proceeded to "split the difference" between the gauge AFR and the back-of-exhaust reading. The trims are global (high boost & low boost tuned) but we didn't do an extra low-boost power-run just to print updated low-boost AFRs.
On email, Sean explained further:
" I believe that the dyno’s AFR tool is reading 0.5 AFR too rich therefore your true AFR’s are 0.5 AFR leaner than your run two AFR reflects, this information is based upon watching your SFR too live and the records from the EcuTek logs which are gathered from the factory front 02 sensor (the A/F sensor) which is a wideband of sorts."
As such, read the "red line" AFR only then subtract 0.5 (petrol AFR presumably) to get an approximation of actual target AFR. I calculate this to be 0.85 Lambda / 12.5:1 petrol AFR and 8.30:1 "real" E85 AFR. I'll gather more data by watching the cabin wideband gauge at full noise and update this post if needed.
Also, this episode seems to have shown a surprising usefulness of a "cabin bling" wideband gauge.
As a quick guide, the following Lambda, petrol AFR and E85 AFR "cheat sheet" is pasted below from internet information:
Lambda-----petrol AFR -----E85 AFR
0.75---------11.03:1---------7.32:1
0.78---------11.47:1---------7.61:1
0.80---------11.76:1---------7.81:1
0.82---------12.05:1---------8.00:1
0.85---------12.50:1---------8.30:1
0.90---------13.23:1---------8.78:1
0.95---------13.97:1---------9.27:1
1.00---------14.70:1---------9.76:1
Faulty Knock Sensor
On the first "high boost" dyno power run the knock sensor threw the toys out of the cot and pulled 11.5 degrees (max) timing. Among other things, this set off my 100 degrees coolant temp alarm as a load of still-burning mixture exited the heads via the poor brand-new exhaust valves.
Sean said that Subaru knock sensors 200,000km+ vehicles are known for their unreliability. The problem can be hidden in turbo cars, but is very obvious in naturally aspirated 4 cylinder cars with limited power to begin with.
This description is consistent with my experience driving the car. Any medium-grade long uphill section requires a shift from 4th to 3rd gear or the car would "spit the dummy".
To get through the tuning session, the slow/hard dyno ramp rate was changed to something more gentle and the maximum scope of timing correction was changed from 11.5 degrees to 4 degrees - plenty according to the tuner.
For the vanity printout power run we temporarily switched it to 0.5 degrees.
I have since purchased replacement new knock sensors for both household Subarus and will install soon.
Body Control Module
No luck. Apparently it is not possible to current aftermarket skill & technology to remove the annoying seatbelt ding or (for STIs) the double-click needed to unlock all doors.
Driving the car post-tune
As noted in the post immediately above, the car is a lot less twitchy post-tune. Now you need to consciously decide to give it some beans as opposed to a twitchy throttle map (etc) tipping into a rich/power map unintentionally or with only mild accelerator pedal movement. This is demonstrably saving me fuel and will probably save a few license points.
The fact that the car was still twitchy & hyper-responsive with the old tune and the VF52 (limited to 4000rpm and 7psi boost) indicates to me that this is a tune factor rather than a "bigger turbo" factor.
When deliberately giving it some, the car now pulls hard to the redline (as reported by many VF52 veterans) rather than suffering the VF46 high revs die-off. The car also has good responsiveness.
"Mid power" conditions (eg a windy mountain climb on mid-level boost) are also very satisfactory.
Thanks for reading.
Last edited by Yowie on Thu Jun 29, 2023 4:59 pm, edited 4 times in total.
-
Yowie - Posts: 578
- Joined: Tue Jul 21, 2015 10:05 pm
- Location: Brisbane
- Car: SH Forester XT
Who is online
Users browsing this forum: No registered users and 28 guests