

Australian Liberty Owners Club
DIY Refurbishing stock 3.0RB Wheels (Pic Heavy)
46 posts
• Page 3 of 4 • 1, 2, 3, 4
Re: DIY Refurbishing stock 3.0RB Wheels (Pic Heavy)
![]() by McDoof » Thu Mar 26, 2015 6:14 am
by McDoof » Thu Mar 26, 2015 6:14 am
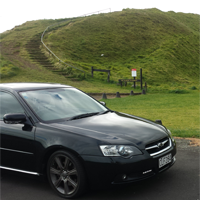
Finally I have 2 painted wheels on the same side of the car
-
McDoof - Posts: 492
- Joined: Tue Apr 08, 2014 7:58 pm
- Location: Auckland, NZ
- Car: MY05 3.0R SpecB 6MT
- Real name: Nikolai
- Profile URL: viewtopic.php?f=10&t=26449
Re: DIY Refurbishing stock 3.0RB Wheels (Pic Heavy)
![]() by shav » Thu Mar 26, 2015 9:39 am
by shav » Thu Mar 26, 2015 9:39 am
Looks as good as new
Cheers
Shav
MY07 Subaru Liberty GT Premium Sedan | HKS Panel filter | Pierburg 3 port | Whiteline adj sways F&R | Cusco HD mounts | Whiteline HD front sway links | Anycarlink AL-1080B | Ultrex s/s 3" CBE | Ultrex PU lip spoiler | Invidia s/s dump pipe and 100cel cat | KiDo tuned | DBA T2 rotors | Intima SS brake pads | Mishimoto TMIC | Koya ISR7 wheels | 265L Kobe fuel pump | Diamond Works SI Drive dial | Bilsteins
COSMETIC MODS ON THE WAY
My other toys:
2012 Focus Cayo 2.0 road bike
2015 Cervelo S5 VWD road bike
-
shav - Posts: 3609
- Joined: Tue Jun 26, 2012 12:01 pm
- Location: Adelaide, Southern Suburbs
- Car: MY07 Subaru Liberty GT Premium
- Real name: Shav
- Profile URL: viewtopic.php?f=10&t=18915&start=480
Re: DIY Refurbishing stock 3.0RB Wheels (Pic Heavy)
![]() by McDoof » Mon Apr 20, 2015 12:01 pm
by McDoof » Mon Apr 20, 2015 12:01 pm
The 3rd wheel has just about broken my spirit.
Sanding took ages due to the clearcoat being made of ROCK!!
Anyway, I got it done. Then I painted it as per the other wheels. Then applied the clearcoat as per the other wheels. At this point I managed to put my thumb on it. A nice big fat thumbprint right there in the paint.
So I figured I could just sand back the bit of clear that I had touched. But that just left a slightly lighter spot on the wheel even after a new coat of clear.
So I painted a bit of the main paint over the spot with not good results. It split and looked like an old lady's face, it sort of melted off.
OK I was getting a bit frustrated at this point and decided to sand the whole surface of the mostly immaculate wheel and spray over it again.
It looked OK during the spray but when I came back to put on another coat it had gone back to looking like saggy skin. So it looks like it needs a full strip again.
So long story short. I have dropped the wheel into the local acid dipping place and I am going to get it back as bare metal at some point so I can start again. I just couldn't face having to sand it all back again.
The lesson here is that there are no easy fixes with this stuff. If you make a little bit of a mess of it then you have to start again and do it right.
-
McDoof - Posts: 492
- Joined: Tue Apr 08, 2014 7:58 pm
- Location: Auckland, NZ
- Car: MY05 3.0R SpecB 6MT
- Real name: Nikolai
- Profile URL: viewtopic.php?f=10&t=26449
Re: DIY Refurbishing stock 3.0RB Wheels (Pic Heavy)
![]() by shav » Mon Apr 20, 2015 2:56 pm
by shav » Mon Apr 20, 2015 2:56 pm
McDoof wrote:The 3rd wheel has just about broken my spirit.
Sanding took ages due to the clearcoat being made of ROCK!!
Anyway, I got it done. Then I painted it as per the other wheels. Then applied the clearcoat as per the other wheels. At this point I managed to put my thumb on it. A nice big fat thumbprint right there in the paint.
So I figured I could just sand back the bit of clear that I had touched. But that just left a slightly lighter spot on the wheel even after a new coat of clear.
So I painted a bit of the main paint over the spot with not good results. It split and looked like an old lady's face, it sort of melted off.
OK I was getting a bit frustrated at this point and decided to sand the whole surface of the mostly immaculate wheel and spray over it again.
It looked OK during the spray but when I came back to put on another coat it had gone back to looking like saggy skin. So it looks like it needs a full strip again.
So long story short. I have dropped the wheel into the local acid dipping place and I am going to get it back as bare metal at some point so I can start again. I just couldn't face having to sand it all back again.
The lesson here is that there are no easy fixes with this stuff. If you make a little bit of a mess of it then you have to start again and do it right.
Dam, sorry to hear Nikolai. Hope it gets rectified soon.
Cheers
Shav
MY07 Subaru Liberty GT Premium Sedan | HKS Panel filter | Pierburg 3 port | Whiteline adj sways F&R | Cusco HD mounts | Whiteline HD front sway links | Anycarlink AL-1080B | Ultrex s/s 3" CBE | Ultrex PU lip spoiler | Invidia s/s dump pipe and 100cel cat | KiDo tuned | DBA T2 rotors | Intima SS brake pads | Mishimoto TMIC | Koya ISR7 wheels | 265L Kobe fuel pump | Diamond Works SI Drive dial | Bilsteins
COSMETIC MODS ON THE WAY
My other toys:
2012 Focus Cayo 2.0 road bike
2015 Cervelo S5 VWD road bike
Shav
MY07 Subaru Liberty GT Premium Sedan | HKS Panel filter | Pierburg 3 port | Whiteline adj sways F&R | Cusco HD mounts | Whiteline HD front sway links | Anycarlink AL-1080B | Ultrex s/s 3" CBE | Ultrex PU lip spoiler | Invidia s/s dump pipe and 100cel cat | KiDo tuned | DBA T2 rotors | Intima SS brake pads | Mishimoto TMIC | Koya ISR7 wheels | 265L Kobe fuel pump | Diamond Works SI Drive dial | Bilsteins
COSMETIC MODS ON THE WAY
My other toys:
2012 Focus Cayo 2.0 road bike
2015 Cervelo S5 VWD road bike
-
shav - Posts: 3609
- Joined: Tue Jun 26, 2012 12:01 pm
- Location: Adelaide, Southern Suburbs
- Car: MY07 Subaru Liberty GT Premium
- Real name: Shav
- Profile URL: viewtopic.php?f=10&t=18915&start=480
Re: DIY Refurbishing stock 3.0RB Wheels (Pic Heavy)
![]() by EVL20T » Mon Apr 20, 2015 6:31 pm
by EVL20T » Mon Apr 20, 2015 6:31 pm
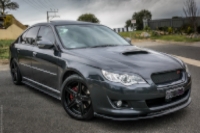
First 2 attempts looked great 
But i would have just taken them to get blasted then powdercoated, i had my old OZ RACING wheels done for less than $300 for all 4 and much stronger than paint
But i would have just taken them to get blasted then powdercoated, i had my old OZ RACING wheels done for less than $300 for all 4 and much stronger than paint
- Attachments
-
- IMG_0100.jpg (65.12 KiB) Viewed 3607 times
- EVL20T
- Posts: 45
- Joined: Tue Mar 31, 2015 12:59 am
- Location: Newcastle, NSW
- Car: Liberty
- Real name: Mikey
Re: DIY Refurbishing stock 3.0RB Wheels (Pic Heavy)
![]() by McDoof » Tue Apr 21, 2015 6:59 am
by McDoof » Tue Apr 21, 2015 6:59 am
That does look pretty good. If I ever decide to do this again I think I will have a look into that as an option. It will be interesting to see what the wheels look like when I have had them dipped. Should mean a nice easy spray job at least.
-
McDoof - Posts: 492
- Joined: Tue Apr 08, 2014 7:58 pm
- Location: Auckland, NZ
- Car: MY05 3.0R SpecB 6MT
- Real name: Nikolai
- Profile URL: viewtopic.php?f=10&t=26449
Re: DIY Refurbishing stock 3.0RB Wheels (Pic Heavy)
![]() by McDoof » Fri Apr 24, 2015 7:46 am
by McDoof » Fri Apr 24, 2015 7:46 am
Anyway, moving on, I got my wheel back from the acid dipping and it looks pretty good. It appears that these are sand cast wheels. I imagine the finish on this will be amazing due to not having any sanding to do on it.
Just have to decide if it is worth almost $60 a wheel to have them dipped.
I'll be painting this over the weekend.


Just have to decide if it is worth almost $60 a wheel to have them dipped.
I'll be painting this over the weekend.
-
McDoof - Posts: 492
- Joined: Tue Apr 08, 2014 7:58 pm
- Location: Auckland, NZ
- Car: MY05 3.0R SpecB 6MT
- Real name: Nikolai
- Profile URL: viewtopic.php?f=10&t=26449
Re: DIY Refurbishing stock 3.0RB Wheels (Pic Heavy)
![]() by McDoof » Sun Jun 07, 2015 3:16 pm
by McDoof » Sun Jun 07, 2015 3:16 pm
Been a little while since I updated this post.
Been a crazy few months. I am finally getting to the pointy end of getting this job done
I got a bit lazy on the pics of the 3rd wheel but it looks pretty decent after getting acid dipped. I had to use a truck load of primer to get them smooth. I think a bit more of a filler primer for the initial coats would help.
So on to the 4th wheel
While I liked the ease of having the wheel dipped, I am on a tight budget so I forged ahead at home. I have light duty compressor at home and a simple sandblasting gun and some garnet that I had left over from a bit of a previous de-rusting job I did on my old car. So in order to avoid the frustration of sanding all the little grooves I used the sandblaster to clean these out. I tried giving the whole wheel a go, but its still slow going and I was running out of blasting garnet.
This is what we get


I then carried on as usual with a 300ish grit wet paper to sand the rest down. (again a bit lazy on the pics but it looks the same as the wheel one and 2 after sanding it down)
After all of the previous work I have figured out the perfect way to apply the primer now.
One thin coat to start it all off. Making sure that all parts get a least some primer on them. Then do 3 coats of primer that are a bit thicker waiting at least 2 hours in between. Then let the primer dry overnight and sand it lightly with 1000 grit wet paper so that it is completely smooth

While I was at it. I primed the centre caps. I gave them a really good clean in really hot soapy water (dish soap) Then gave them the same treatment. One thin coat and then just 2 thicker coats of primer
The other thing I have learned is to find a suitable work surface when sanding and cleaning. I seems a bit odd, but I find the top of a 240l wheelie bin very good. Its at a great height for not hurting your back and it holds the wheel in place nicely

Then washed everything down with hot soapy water again. I will get the paint done on these tomorrow once I am 100% sure that they are dry.
Been a crazy few months. I am finally getting to the pointy end of getting this job done
I got a bit lazy on the pics of the 3rd wheel but it looks pretty decent after getting acid dipped. I had to use a truck load of primer to get them smooth. I think a bit more of a filler primer for the initial coats would help.
So on to the 4th wheel
While I liked the ease of having the wheel dipped, I am on a tight budget so I forged ahead at home. I have light duty compressor at home and a simple sandblasting gun and some garnet that I had left over from a bit of a previous de-rusting job I did on my old car. So in order to avoid the frustration of sanding all the little grooves I used the sandblaster to clean these out. I tried giving the whole wheel a go, but its still slow going and I was running out of blasting garnet.
This is what we get
I then carried on as usual with a 300ish grit wet paper to sand the rest down. (again a bit lazy on the pics but it looks the same as the wheel one and 2 after sanding it down)
After all of the previous work I have figured out the perfect way to apply the primer now.
One thin coat to start it all off. Making sure that all parts get a least some primer on them. Then do 3 coats of primer that are a bit thicker waiting at least 2 hours in between. Then let the primer dry overnight and sand it lightly with 1000 grit wet paper so that it is completely smooth
While I was at it. I primed the centre caps. I gave them a really good clean in really hot soapy water (dish soap) Then gave them the same treatment. One thin coat and then just 2 thicker coats of primer
The other thing I have learned is to find a suitable work surface when sanding and cleaning. I seems a bit odd, but I find the top of a 240l wheelie bin very good. Its at a great height for not hurting your back and it holds the wheel in place nicely
Then washed everything down with hot soapy water again. I will get the paint done on these tomorrow once I am 100% sure that they are dry.
-
McDoof - Posts: 492
- Joined: Tue Apr 08, 2014 7:58 pm
- Location: Auckland, NZ
- Car: MY05 3.0R SpecB 6MT
- Real name: Nikolai
- Profile URL: viewtopic.php?f=10&t=26449
Re: DIY Refurbishing stock 3.0RB Wheels (Pic Heavy)
![]() by Brunsy3.0 » Sun Jun 07, 2015 5:05 pm
by Brunsy3.0 » Sun Jun 07, 2015 5:05 pm
A long road with a big effort. Hope the end result is up to your own standard.
....THE WHITEWASH....
-
Brunsy3.0 - Posts: 1027
- Joined: Tue Aug 30, 2011 7:01 pm
- Location: Katherine, NT
- Car: 07 3.0 Liberty Spec. B pearl white
- Real name: Daniel
- Profile URL: viewtopic.php?f=10&t=21059
Re: DIY Refurbishing stock 3.0RB Wheels (Pic Heavy)
![]() by McDoof » Sun Jun 07, 2015 6:54 pm
by McDoof » Sun Jun 07, 2015 6:54 pm
Really happy with the look so far. Gives the whole car a bit of a shadowy look. Just need a JDM GT-B mesh grille and light tint on the rear lights to finish it off.
-
McDoof - Posts: 492
- Joined: Tue Apr 08, 2014 7:58 pm
- Location: Auckland, NZ
- Car: MY05 3.0R SpecB 6MT
- Real name: Nikolai
- Profile URL: viewtopic.php?f=10&t=26449
Re: DIY Refurbishing stock 3.0RB Wheels (Pic Heavy)
![]() by Bugalugs » Sun Jun 07, 2015 8:43 pm
by Bugalugs » Sun Jun 07, 2015 8:43 pm
Awesome work mate - inspirational! Good tip on the wheelie bin work station too! Two thumbs up, can't wait to see it all done
Phat Dump I TCP Quads I Kido Tune I HIDs I ...and loads of Plasti-dip
-
Bugalugs - Posts: 92
- Joined: Fri Apr 17, 2015 8:03 pm
- Location: Mosman, Sydney
- Car: 05 Liberty GT Wagon
- Real name: Dan
Re: DIY Refurbishing stock 3.0RB Wheels (Pic Heavy)
![]() by McDoof » Tue Jun 09, 2015 8:12 am
by McDoof » Tue Jun 09, 2015 8:12 am
Centre caps are painted and on the one side. The last wheel is busy curing a bit before I get the tyre back on it for the other side of the car. I really should move those wheelie bins when I take photos
 [/url]
[/url]-
McDoof - Posts: 492
- Joined: Tue Apr 08, 2014 7:58 pm
- Location: Auckland, NZ
- Car: MY05 3.0R SpecB 6MT
- Real name: Nikolai
- Profile URL: viewtopic.php?f=10&t=26449
Re: DIY Refurbishing stock 3.0RB Wheels (Pic Heavy)
![]() by McDoof » Tue Jun 23, 2015 12:06 pm
by McDoof » Tue Jun 23, 2015 12:06 pm
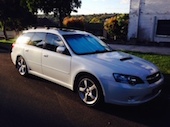
Just a pic of the other side

-
McDoof - Posts: 492
- Joined: Tue Apr 08, 2014 7:58 pm
- Location: Auckland, NZ
- Car: MY05 3.0R SpecB 6MT
- Real name: Nikolai
- Profile URL: viewtopic.php?f=10&t=26449
Re: DIY Refurbishing stock 3.0RB Wheels (Pic Heavy)
![]() by McDoof » Thu Aug 27, 2015 12:19 pm
by McDoof » Thu Aug 27, 2015 12:19 pm
Added a summary to first post
-
McDoof - Posts: 492
- Joined: Tue Apr 08, 2014 7:58 pm
- Location: Auckland, NZ
- Car: MY05 3.0R SpecB 6MT
- Real name: Nikolai
- Profile URL: viewtopic.php?f=10&t=26449
Re: DIY Refurbishing stock 3.0RB Wheels (Pic Heavy)
![]() by mrjafer » Fri Jan 06, 2017 8:40 pm
by mrjafer » Fri Jan 06, 2017 8:40 pm
Heyyy, love the colour of the rims,
what are they, i want to get mine done the same way.
thanks !!!
what are they, i want to get mine done the same way.
thanks !!!
shav wrote:Looks as good as new
- mrjafer
- Posts: 1
- Joined: Fri Jan 06, 2017 8:30 pm
- Car: Subaru
46 posts
• Page 3 of 4 • 1, 2, 3, 4
Who is online
Users browsing this forum: Google [Bot] and 34 guests