So my wheels are looking a bit average these days. The previous owner had the refurbished at some point, but the job looks a bit sub standard. The clearcoat and paint is peeling off and there are a few curb marks on some of the wheels.
I have decided to undertake a DIY refurbishment. I am taking 1 wheel at a time. Having the tyre removed and then sanding them down, prep and repaint.
I ordered some custom paint from Colourworks in Auckland (yes I am in NZ) who have made me up 4 cans of paint, 4 cans of Clearcoat and I have added 2 cans of primer. This should cover the 5 wheels.
Watch this space for progress.
EDIT: After completion and living with the work done for a few months
I thought I would do a quick summary of my experience of the DIY wheel refurb with a self directed Q&A
1. Am I happy with the result. The answer is a resounding yes, they look bloody awesome.
2. Would I do it again. That answer: Not a chance, not the same way anyhow. If it was a wheel with flat surfaces I would happily take it on, but any wheel that has grooves and corners is just too much hard work on the prep side. I lost my fingerprints for a while from all the sanding. The painting part is easy, it's the prep work that takes so much time.
3. How would I do it if I had it to do over again? Most likely would be getting someone to media blast them for me as I found the acid dip was a bit too destructive on the wheel. Then either find someone that does good powder coating or go through the painting process myself after that.
4. Any other words of wisdom? If you are going to do this kind of thing yourself, just take your time, any rushing will cause mistakes.
I also tried a different painting method for each wheel to see which gave the best results. Strangely enough it was the first wheel that worked the best.
First things first. Do this in summer when it is hot. The last wheel took much longer to cure because it was colder by the time I got to it.
1. Wash the wheel with hot soapy water and rinse it well. Make sure it is 100% dry before any paint gets near it.
2. Apply about 5 thinner coats of primer, then sand back with a 1000 or 1200 grit paper. Prime again if there any impurities in the finish. Then sand again. This is where your final finish is decided.
3. Wash the wheel with hot soapy water again. Make sure it's dry. Then about 4 or 5 thinner coats of paint, making sure that you let them dry enough between coats otherwise you will get runs. Let the last coat of paint dry for a day then wash and dry the wheel to get rid of any loose particles.
4. Apply 2 or 3 coats of clearcoat. Leaving time to dry in-between to get it to set properly. These need to be slightly thicker coats to get the paint to gloss over. If you apply too little paint you won't get the smooth finish

Australian Liberty Owners Club
DIY Refurbishing stock 3.0RB Wheels (Pic Heavy)
46 posts
• Page 1 of 4 • 1, 2, 3, 4
DIY Refurbishing stock 3.0RB Wheels (Pic Heavy)
![]() by McDoof » Fri Feb 27, 2015 10:42 am
by McDoof » Fri Feb 27, 2015 10:42 am
Last edited by McDoof on Thu Aug 27, 2015 12:21 pm, edited 2 times in total.
-
McDoof - Posts: 492
- Joined: Tue Apr 08, 2014 7:58 pm
- Location: Auckland, NZ
- Car: MY05 3.0R SpecB 6MT
- Real name: Nikolai
- Profile URL: viewtopic.php?f=10&t=26449
Re: DIY Refurbishing stock 3.0RB Wheels
![]() by McDoof » Fri Feb 27, 2015 10:48 am
by McDoof » Fri Feb 27, 2015 10:48 am
Wheel No1 is the spare. It looks to be in fairly good condition but needs to match the rest. Sort of the test wheel I guess
The wheel before the refurb. Only a few minor marks on the wheel. No curbing. Should be easy right?

Sanding back
After sanding it back

It seems even this wheel has been repainted a few times. I count around 8 layers of paint and primer. Black, grey, silver, repeat.
It took me about 2 hours of hand sanding using a 350 grit wet paper. I have done the inside a bit too so that this wheel should look almost new when I am done.
Even in person this sanded paint job looks trippy

Priming
So after sanding the wheel back a bit to get rid of any imperfections in the paint etc I washed it with very hot soapy water to get rid of all of the remaining dirt on the wheel
I created a bit of a makeshift spray booth in my garage using some cardboard boxes.
The the priming begins
The first coat I put on was just a very thin coat to get it to bind to the sanded surface

After 2 more coats you can see that the primer has a bit of fuzzy finish. I think this is in part due to the consistency of the primer, but I think I also was a bit far away from the surface when I sprayed

I ended up doing a total of 4 coats of primer. Then I sanded it back a bit with 1000 grit wet paper. As I sanded it I just ran my fingers around the bits I had sanded to find any more rough areas. The end result is a nice smooth primed surface.

Ready for some paint

Painting
I was really looking forward to seeing what the colour would come out like.
Again the first coat I did was quite thin in order to get it to set quickly and bind to the primer. Thin coats = no paint runs. Still got pretty good coverage

After a few more coats you can again see a bit of a fuzzy finish on the paint here. in this case it was just some of the paint dust that had settled on the surface and it pretty much all rubbed off with a dry cloth after the 4th or 5th coat had dried.

Here we have the paint part completed. If I was going for a bit of a matte finish, then this would be the end of the wheel

Just a bit of a close up of the painted finish

Seeing as I was going for a bit more of a stock looking finish, I carried on and did about 4 or 5 coats of clearcoat to get that really shiny look
All I can say I'm glad I did. The wheel looks amazing. I can't wait to get this on the car and get the other 4 done. I will get a picture of this next to an old wheel so you can see the colour change at some point.


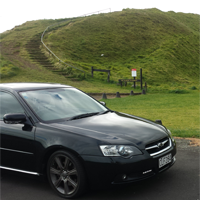
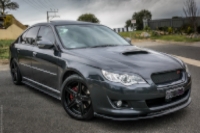
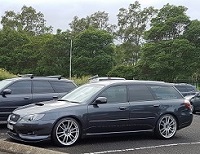
The finished first wheel fitted to the car. You can see how much darker than stock it really is

So the lessons learned from this first wheel are:
1. Get the primer right. I found it a bit rough and needed a more consistent finish. Maybe it needs to be thicker to begin with. I'll see how to sort this on the next one
2. Remember to wash and rinse the wheel after any sanding. There must be no dirt, dust or oil on the wheel before any paint goes on
3. Preparation is everything. The finish on this wheel is almost perfect, but it took some hard work. The rest should be even better
The wheel before the refurb. Only a few minor marks on the wheel. No curbing. Should be easy right?
Sanding back
After sanding it back
It seems even this wheel has been repainted a few times. I count around 8 layers of paint and primer. Black, grey, silver, repeat.
It took me about 2 hours of hand sanding using a 350 grit wet paper. I have done the inside a bit too so that this wheel should look almost new when I am done.
Even in person this sanded paint job looks trippy
Priming
So after sanding the wheel back a bit to get rid of any imperfections in the paint etc I washed it with very hot soapy water to get rid of all of the remaining dirt on the wheel
I created a bit of a makeshift spray booth in my garage using some cardboard boxes.
The the priming begins
The first coat I put on was just a very thin coat to get it to bind to the sanded surface
After 2 more coats you can see that the primer has a bit of fuzzy finish. I think this is in part due to the consistency of the primer, but I think I also was a bit far away from the surface when I sprayed
I ended up doing a total of 4 coats of primer. Then I sanded it back a bit with 1000 grit wet paper. As I sanded it I just ran my fingers around the bits I had sanded to find any more rough areas. The end result is a nice smooth primed surface.
Ready for some paint
Painting
I was really looking forward to seeing what the colour would come out like.
Again the first coat I did was quite thin in order to get it to set quickly and bind to the primer. Thin coats = no paint runs. Still got pretty good coverage
After a few more coats you can again see a bit of a fuzzy finish on the paint here. in this case it was just some of the paint dust that had settled on the surface and it pretty much all rubbed off with a dry cloth after the 4th or 5th coat had dried.
Here we have the paint part completed. If I was going for a bit of a matte finish, then this would be the end of the wheel
Just a bit of a close up of the painted finish
Seeing as I was going for a bit more of a stock looking finish, I carried on and did about 4 or 5 coats of clearcoat to get that really shiny look
All I can say I'm glad I did. The wheel looks amazing. I can't wait to get this on the car and get the other 4 done. I will get a picture of this next to an old wheel so you can see the colour change at some point.
The finished first wheel fitted to the car. You can see how much darker than stock it really is
So the lessons learned from this first wheel are:
1. Get the primer right. I found it a bit rough and needed a more consistent finish. Maybe it needs to be thicker to begin with. I'll see how to sort this on the next one
2. Remember to wash and rinse the wheel after any sanding. There must be no dirt, dust or oil on the wheel before any paint goes on
3. Preparation is everything. The finish on this wheel is almost perfect, but it took some hard work. The rest should be even better
Last edited by McDoof on Thu Mar 05, 2015 9:41 am, edited 6 times in total.
-
McDoof - Posts: 492
- Joined: Tue Apr 08, 2014 7:58 pm
- Location: Auckland, NZ
- Car: MY05 3.0R SpecB 6MT
- Real name: Nikolai
- Profile URL: viewtopic.php?f=10&t=26449
Re: DIY Refurbishing stock 3.0RB Wheels
![]() by GONEWALKABOUT » Fri Feb 27, 2015 8:27 pm
by GONEWALKABOUT » Fri Feb 27, 2015 8:27 pm
subbed for sure! Thats some mad sandpaper you got there, holden drivers would love that chrome look! 
-

GONEWALKABOUT - Posts: 652
- Joined: Tue Apr 29, 2014 9:02 pm
- Location: Hobart, Tasmania
Re: DIY Refurbishing stock 3.0RB Wheels
![]() by shav » Fri Feb 27, 2015 9:21 pm
by shav » Fri Feb 27, 2015 9:21 pm
*subscribed* Thats a lot of work but no doubt the preparation involved will make the wheels look killer once painted.
Cheers
Shav
MY07 Subaru Liberty GT Premium Sedan | HKS Panel filter | Pierburg 3 port | Whiteline adj sways F&R | Cusco HD mounts | Whiteline HD front sway links | Anycarlink AL-1080B | Ultrex s/s 3" CBE | Ultrex PU lip spoiler | Invidia s/s dump pipe and 100cel cat | KiDo tuned | DBA T2 rotors | Intima SS brake pads | Mishimoto TMIC | Koya ISR7 wheels | 265L Kobe fuel pump | Diamond Works SI Drive dial | Bilsteins
COSMETIC MODS ON THE WAY
My other toys:
2012 Focus Cayo 2.0 road bike
2015 Cervelo S5 VWD road bike
-
shav - Posts: 3609
- Joined: Tue Jun 26, 2012 12:01 pm
- Location: Adelaide, Southern Suburbs
- Car: MY07 Subaru Liberty GT Premium
- Real name: Shav
- Profile URL: viewtopic.php?f=10&t=18915&start=480
Re: DIY Refurbishing stock 3.0RB Wheels
![]() by peadya100 » Fri Feb 27, 2015 9:44 pm
by peadya100 » Fri Feb 27, 2015 9:44 pm
Impressed that you're doing this!
Can't wait to see how it goes.
Can't wait to see how it goes.
Diamond Works SI-DRIVE Covers - Subaru Liberty/Legacy MY07 to MY09
https://www.facebook...aruDiamondWorks
subaru.diamondworks@gmail.com
https://www.facebook...aruDiamondWorks
subaru.diamondworks@gmail.com
-
peadya100 - -stickered-
- Posts: 2243
- Joined: Wed Dec 08, 2010 1:21 pm
- Location: Norah Head, Central Coast
- Car: 2007 Liberty GT-B Wagon
- Real name: Adam
- Profile URL: viewtopic.php?f=10&t=21072
Re: DIY Refurbishing stock 3.0RB Wheels
![]() by McDoof » Sun Mar 01, 2015 5:51 pm
by McDoof » Sun Mar 01, 2015 5:51 pm
Updated the original post with the completed first wheel. 
-
McDoof - Posts: 492
- Joined: Tue Apr 08, 2014 7:58 pm
- Location: Auckland, NZ
- Car: MY05 3.0R SpecB 6MT
- Real name: Nikolai
- Profile URL: viewtopic.php?f=10&t=26449
Re: DIY Refurbishing stock 3.0RB Wheels (Pic Heavy)
![]() by GONEWALKABOUT » Sun Mar 01, 2015 6:41 pm
by GONEWALKABOUT » Sun Mar 01, 2015 6:41 pm
great stuff! made it look easy
-
GONEWALKABOUT - Posts: 652
- Joined: Tue Apr 29, 2014 9:02 pm
- Location: Hobart, Tasmania
Re: DIY Refurbishing stock 3.0RB Wheels (Pic Heavy)
![]() by shav » Mon Mar 02, 2015 11:05 am
by shav » Mon Mar 02, 2015 11:05 am
This is incredible work for those wanting to refurbish their stock rims. Love it and well done on an immaculate finish.
Cheers
Shav
MY07 Subaru Liberty GT Premium Sedan | HKS Panel filter | Pierburg 3 port | Whiteline adj sways F&R | Cusco HD mounts | Whiteline HD front sway links | Anycarlink AL-1080B | Ultrex s/s 3" CBE | Ultrex PU lip spoiler | Invidia s/s dump pipe and 100cel cat | KiDo tuned | DBA T2 rotors | Intima SS brake pads | Mishimoto TMIC | Koya ISR7 wheels | 265L Kobe fuel pump | Diamond Works SI Drive dial | Bilsteins
COSMETIC MODS ON THE WAY
My other toys:
2012 Focus Cayo 2.0 road bike
2015 Cervelo S5 VWD road bike
Shav
MY07 Subaru Liberty GT Premium Sedan | HKS Panel filter | Pierburg 3 port | Whiteline adj sways F&R | Cusco HD mounts | Whiteline HD front sway links | Anycarlink AL-1080B | Ultrex s/s 3" CBE | Ultrex PU lip spoiler | Invidia s/s dump pipe and 100cel cat | KiDo tuned | DBA T2 rotors | Intima SS brake pads | Mishimoto TMIC | Koya ISR7 wheels | 265L Kobe fuel pump | Diamond Works SI Drive dial | Bilsteins
COSMETIC MODS ON THE WAY
My other toys:
2012 Focus Cayo 2.0 road bike
2015 Cervelo S5 VWD road bike
-
shav - Posts: 3609
- Joined: Tue Jun 26, 2012 12:01 pm
- Location: Adelaide, Southern Suburbs
- Car: MY07 Subaru Liberty GT Premium
- Real name: Shav
- Profile URL: viewtopic.php?f=10&t=18915&start=480
Re: DIY Refurbishing stock 3.0RB Wheels (Pic Heavy)
![]() by peadya100 » Mon Mar 02, 2015 11:11 am
by peadya100 » Mon Mar 02, 2015 11:11 am
What paint did you use? Is it acrylic or 2 pack?
Diamond Works SI-DRIVE Covers - Subaru Liberty/Legacy MY07 to MY09
https://www.facebook...aruDiamondWorks
subaru.diamondworks@gmail.com
https://www.facebook...aruDiamondWorks
subaru.diamondworks@gmail.com
-
peadya100 - -stickered-
- Posts: 2243
- Joined: Wed Dec 08, 2010 1:21 pm
- Location: Norah Head, Central Coast
- Car: 2007 Liberty GT-B Wagon
- Real name: Adam
- Profile URL: viewtopic.php?f=10&t=21072
Re: DIY Refurbishing stock 3.0RB Wheels (Pic Heavy)
![]() by shav » Mon Mar 02, 2015 11:13 am
by shav » Mon Mar 02, 2015 11:13 am
Also, how much total time did it take from first sand to final clear coat?
Cheers
Shav
MY07 Subaru Liberty GT Premium Sedan | HKS Panel filter | Pierburg 3 port | Whiteline adj sways F&R | Cusco HD mounts | Whiteline HD front sway links | Anycarlink AL-1080B | Ultrex s/s 3" CBE | Ultrex PU lip spoiler | Invidia s/s dump pipe and 100cel cat | KiDo tuned | DBA T2 rotors | Intima SS brake pads | Mishimoto TMIC | Koya ISR7 wheels | 265L Kobe fuel pump | Diamond Works SI Drive dial | Bilsteins
COSMETIC MODS ON THE WAY
My other toys:
2012 Focus Cayo 2.0 road bike
2015 Cervelo S5 VWD road bike
Shav
MY07 Subaru Liberty GT Premium Sedan | HKS Panel filter | Pierburg 3 port | Whiteline adj sways F&R | Cusco HD mounts | Whiteline HD front sway links | Anycarlink AL-1080B | Ultrex s/s 3" CBE | Ultrex PU lip spoiler | Invidia s/s dump pipe and 100cel cat | KiDo tuned | DBA T2 rotors | Intima SS brake pads | Mishimoto TMIC | Koya ISR7 wheels | 265L Kobe fuel pump | Diamond Works SI Drive dial | Bilsteins
COSMETIC MODS ON THE WAY
My other toys:
2012 Focus Cayo 2.0 road bike
2015 Cervelo S5 VWD road bike
-
shav - Posts: 3609
- Joined: Tue Jun 26, 2012 12:01 pm
- Location: Adelaide, Southern Suburbs
- Car: MY07 Subaru Liberty GT Premium
- Real name: Shav
- Profile URL: viewtopic.php?f=10&t=18915&start=480
Re: DIY Refurbishing stock 3.0RB Wheels (Pic Heavy)
![]() by McDoof » Mon Mar 02, 2015 11:37 am
by McDoof » Mon Mar 02, 2015 11:37 am
peadya100 wrote:What paint did you use? Is it acrylic or 2 pack?
The paint is a wheel paint. Acrylic I guess. Just in a can. Custom mixed paint.
-
McDoof - Posts: 492
- Joined: Tue Apr 08, 2014 7:58 pm
- Location: Auckland, NZ
- Car: MY05 3.0R SpecB 6MT
- Real name: Nikolai
- Profile URL: viewtopic.php?f=10&t=26449
Re: DIY Refurbishing stock 3.0RB Wheels (Pic Heavy)
![]() by McDoof » Mon Mar 02, 2015 11:41 am
by McDoof » Mon Mar 02, 2015 11:41 am
shav wrote:Also, how much total time did it take from first sand to final clear coat?
I would have spent about 4 hours in total. 2.5 hours for the initial sanding. Then about 5 mins to wash it down. 5 mins per coat of paint. A bit more time sanding the primer. Could get it done over a weekend.
-
McDoof - Posts: 492
- Joined: Tue Apr 08, 2014 7:58 pm
- Location: Auckland, NZ
- Car: MY05 3.0R SpecB 6MT
- Real name: Nikolai
- Profile URL: viewtopic.php?f=10&t=26449
Re: DIY Refurbishing stock 3.0RB Wheels (Pic Heavy)
![]() by ferret89 » Mon Mar 02, 2015 11:48 am
by ferret89 » Mon Mar 02, 2015 11:48 am
Wow that looks amazing, great job!
-
ferret89 - Posts: 1041
- Joined: Sat Aug 11, 2012 5:23 pm
- Location: Brisbane, QLD
- Car: Liberty MY08 Tuned by STI
- Real name: Daniel
- Profile URL: viewtopic.php?f=10&t=28511
Re: DIY Refurbishing stock 3.0RB Wheels (Pic Heavy)
![]() by shav » Mon Mar 02, 2015 12:08 pm
by shav » Mon Mar 02, 2015 12:08 pm
Yeah fair enough, so basically 2 wheels a day would do the job taking your time etc?
Cheers
Shav
MY07 Subaru Liberty GT Premium Sedan | HKS Panel filter | Pierburg 3 port | Whiteline adj sways F&R | Cusco HD mounts | Whiteline HD front sway links | Anycarlink AL-1080B | Ultrex s/s 3" CBE | Ultrex PU lip spoiler | Invidia s/s dump pipe and 100cel cat | KiDo tuned | DBA T2 rotors | Intima SS brake pads | Mishimoto TMIC | Koya ISR7 wheels | 265L Kobe fuel pump | Diamond Works SI Drive dial | Bilsteins
COSMETIC MODS ON THE WAY
My other toys:
2012 Focus Cayo 2.0 road bike
2015 Cervelo S5 VWD road bike
Shav
MY07 Subaru Liberty GT Premium Sedan | HKS Panel filter | Pierburg 3 port | Whiteline adj sways F&R | Cusco HD mounts | Whiteline HD front sway links | Anycarlink AL-1080B | Ultrex s/s 3" CBE | Ultrex PU lip spoiler | Invidia s/s dump pipe and 100cel cat | KiDo tuned | DBA T2 rotors | Intima SS brake pads | Mishimoto TMIC | Koya ISR7 wheels | 265L Kobe fuel pump | Diamond Works SI Drive dial | Bilsteins
COSMETIC MODS ON THE WAY
My other toys:
2012 Focus Cayo 2.0 road bike
2015 Cervelo S5 VWD road bike
-
shav - Posts: 3609
- Joined: Tue Jun 26, 2012 12:01 pm
- Location: Adelaide, Southern Suburbs
- Car: MY07 Subaru Liberty GT Premium
- Real name: Shav
- Profile URL: viewtopic.php?f=10&t=18915&start=480
Re: DIY Refurbishing stock 3.0RB Wheels (Pic Heavy)
![]() by McDoof » Mon Mar 02, 2015 5:11 pm
by McDoof » Mon Mar 02, 2015 5:11 pm
shav wrote:Yeah fair enough, so basically 2 wheels a day would do the job taking your time etc?
I think if you had all 4 or 5 wheels off at the same time, you could probably do them over a weekend.
The only bit that really takes time is the initial sanding. If you have them all together then you could prime and paint them all at the same time.
I am going to let this wheel cure for a few days before I get the tyre refitted.
-
McDoof - Posts: 492
- Joined: Tue Apr 08, 2014 7:58 pm
- Location: Auckland, NZ
- Car: MY05 3.0R SpecB 6MT
- Real name: Nikolai
- Profile URL: viewtopic.php?f=10&t=26449
46 posts
• Page 1 of 4 • 1, 2, 3, 4
Who is online
Users browsing this forum: Google [Bot] and 28 guests