How to install custom Cold Air Intake
Completed this mod last week and got some interested on the facebook group, so i thought I'd post it up.
First got the idea after performing the resonator removal walkthrough kindly provided by smythie. viewtopic.php?f=12&t=3908
Was looking at a way to get cold air into the resonator chamber as the area gets quite hot. As there is only very small gaps between this chamber and the front grill I needed to vent the air in from another location. A few people have removed their foglights to do this mod but I couldn't justify removing one thing to install another. Long story short, I ended up removing the tow point cover section of the front bumper. NOTE: THIS ONLY APPLIES TO THOSE OF US WHO HAVE A REGULAR NON SPEC-B BUMPER.] Sorry! Saying that, since the spec b is already meshed it may be even easier to do....
These are the tools and equipment I used:
Phillips Screwdriver
Flathead Screwdriver
Ratchet and 10mm Socket with extentions
Stanley Knife
Half round file
Tin snips/ sidecutters
Battery drill
50mm holesaw
Air Compressor
Duct tape
Cable Ties
Killrust epoxy enamel (Black)
Black Sikaflex + Caulk Gun
50mm PVC tube (Clark Rubber)
90/75/50/40mm Reducer (Bunnings)
Electrical Conduit Glue
Metal mesh (Supacheap)
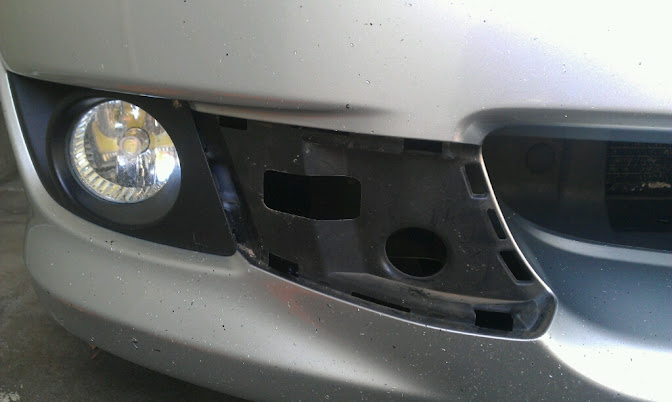
Ok, the first thing you need to do is remove the section of bumper. This comes off with a firm pull, watch you don't rip out the foglight surround with it.
Next thing to do is cut out a piece of mesh, roughly the same size as the removed piece, make sure you leave 1-2 inches overhanging.

Mould the mesh the best you can around the bumper section to give yourself a rough shape to start with.

From then on it's a fairly tricky process of trimming and bending the mesh to get the required shape to fit. I used sidecutters to cut the mesh but if I had tinsnips or could be bothered to get the dremel out, it would have been a bit easier. Leave a lip all the way around and then trim sections off. This will give you some tabs that help align the mesh and slot the tabs into the small slots in the bumper bar. Take your time with this to get a good fit.

As some of the paint got removed when I was shaping the mesh it needed a coat of paint. Standard procedure here, hang your mesh on a coat hanger and apply 2 coats of Killrust epoxy enamel (Black) with dry time in between.
Next step is to remove the airbox. To save me re-writing it, follow the steps outlined in smythie's resonator removal thread. viewtopic.php?f=12&t=3908
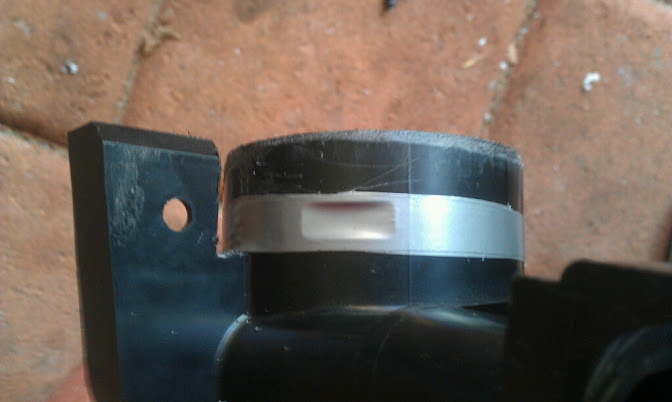
Once the airbox is out, you will need to reduce the 75mm intake hole to fit the 50mm flexible pipe. For this I used a 4 stage reducer I bought from Bunnings. I had to cut the 90mm section off and then ream out/file the lips of both the reducer AND the airbox flange. Afterwards it was a really tight fit so it did not need to be glued. The 40mm base of the reducer sat snugly inside the 50mm pipe without any alteration but this one I glued.

Next you will need to notch out the intake flange on the airbox. This I did with a hacksaw and then filed the edges smooth. The reducer should now fit over the flange nicely. The last step I did here was to put a few strips of duct tape around the small holes in the flange, as the reducer would not cover these when I put it on.


The finished product with pipe attached (used 600mm length of flexible pipe) looked like this-

Next, fix the box back in position and angle the pipe towards the bumper. It is a tight squeeze between the fog light surround and the metal chassis but the 50mm pipe does fit with a bit of persuasion. Once you have it in the general position use a 50mm hole-saw to cut the hole in the plastic beneath the removable cover. I angled the holesaw slightly towards the airbox to allow the pipe to come through on the correct angle. I also made sure the hole was in a spot where it would not interfere with the cover should I want to replace it later on.

Push the pipe through the hole until the slack inside the car is taken up. Once you've got it through a couple of cable ties wouldnt hurt to keep the pipe in position.Trim the excess hanging out of the front with a sharp knife. Due to the ribbing on the pipe this is nearly impossible to do neatly! Once this is done your ready to fix your mesh cover. With the tabs in place it should grab on pretty good but I used some black sikaflex in a few places around the mesh to give a secure fixing. Let it cure, do the resonator removal steps backwards and thats it! your good to drive away. Treat your engine to nice cool air instead of stuffy engine bay air!

Its worth noting that since I wrote this post, I found that the intake noise and BOV was deadened somewhat. I am guessing that the reducer is causing this.I have removed the reducer and the pipe is now cut short just below the airbox intake. I plan to run some 75 pipe that reduces to 50mm near the foglight at a later stage. However the intake pipe is still doing its job. This was tested and proved by blowing compressed air down the pipe and also blowing compressed air at the bumper with only a cutout (no pipe) for ventilation. Massive difference!
First got the idea after performing the resonator removal walkthrough kindly provided by smythie. viewtopic.php?f=12&t=3908
Was looking at a way to get cold air into the resonator chamber as the area gets quite hot. As there is only very small gaps between this chamber and the front grill I needed to vent the air in from another location. A few people have removed their foglights to do this mod but I couldn't justify removing one thing to install another. Long story short, I ended up removing the tow point cover section of the front bumper. NOTE: THIS ONLY APPLIES TO THOSE OF US WHO HAVE A REGULAR NON SPEC-B BUMPER.] Sorry! Saying that, since the spec b is already meshed it may be even easier to do....
These are the tools and equipment I used:
Phillips Screwdriver
Flathead Screwdriver
Ratchet and 10mm Socket with extentions
Stanley Knife
Half round file
Tin snips/ sidecutters
Battery drill
50mm holesaw
Air Compressor
Duct tape
Cable Ties
Killrust epoxy enamel (Black)
Black Sikaflex + Caulk Gun
50mm PVC tube (Clark Rubber)
90/75/50/40mm Reducer (Bunnings)
Electrical Conduit Glue
Metal mesh (Supacheap)
Ok, the first thing you need to do is remove the section of bumper. This comes off with a firm pull, watch you don't rip out the foglight surround with it.
Next thing to do is cut out a piece of mesh, roughly the same size as the removed piece, make sure you leave 1-2 inches overhanging.
Mould the mesh the best you can around the bumper section to give yourself a rough shape to start with.
From then on it's a fairly tricky process of trimming and bending the mesh to get the required shape to fit. I used sidecutters to cut the mesh but if I had tinsnips or could be bothered to get the dremel out, it would have been a bit easier. Leave a lip all the way around and then trim sections off. This will give you some tabs that help align the mesh and slot the tabs into the small slots in the bumper bar. Take your time with this to get a good fit.
As some of the paint got removed when I was shaping the mesh it needed a coat of paint. Standard procedure here, hang your mesh on a coat hanger and apply 2 coats of Killrust epoxy enamel (Black) with dry time in between.
Next step is to remove the airbox. To save me re-writing it, follow the steps outlined in smythie's resonator removal thread. viewtopic.php?f=12&t=3908
Once the airbox is out, you will need to reduce the 75mm intake hole to fit the 50mm flexible pipe. For this I used a 4 stage reducer I bought from Bunnings. I had to cut the 90mm section off and then ream out/file the lips of both the reducer AND the airbox flange. Afterwards it was a really tight fit so it did not need to be glued. The 40mm base of the reducer sat snugly inside the 50mm pipe without any alteration but this one I glued.
Next you will need to notch out the intake flange on the airbox. This I did with a hacksaw and then filed the edges smooth. The reducer should now fit over the flange nicely. The last step I did here was to put a few strips of duct tape around the small holes in the flange, as the reducer would not cover these when I put it on.
The finished product with pipe attached (used 600mm length of flexible pipe) looked like this-
Next, fix the box back in position and angle the pipe towards the bumper. It is a tight squeeze between the fog light surround and the metal chassis but the 50mm pipe does fit with a bit of persuasion. Once you have it in the general position use a 50mm hole-saw to cut the hole in the plastic beneath the removable cover. I angled the holesaw slightly towards the airbox to allow the pipe to come through on the correct angle. I also made sure the hole was in a spot where it would not interfere with the cover should I want to replace it later on.
Push the pipe through the hole until the slack inside the car is taken up. Once you've got it through a couple of cable ties wouldnt hurt to keep the pipe in position.Trim the excess hanging out of the front with a sharp knife. Due to the ribbing on the pipe this is nearly impossible to do neatly! Once this is done your ready to fix your mesh cover. With the tabs in place it should grab on pretty good but I used some black sikaflex in a few places around the mesh to give a secure fixing. Let it cure, do the resonator removal steps backwards and thats it! your good to drive away. Treat your engine to nice cool air instead of stuffy engine bay air!
Its worth noting that since I wrote this post, I found that the intake noise and BOV was deadened somewhat. I am guessing that the reducer is causing this.I have removed the reducer and the pipe is now cut short just below the airbox intake. I plan to run some 75 pipe that reduces to 50mm near the foglight at a later stage. However the intake pipe is still doing its job. This was tested and proved by blowing compressed air down the pipe and also blowing compressed air at the bumper with only a cutout (no pipe) for ventilation. Massive difference!
