
Australian Liberty Owners Club
Member Profile: HyRax
Re: Member Profile: HyRax
![]() by zch91 » Mon Apr 09, 2012 2:44 pm
by zch91 » Mon Apr 09, 2012 2:44 pm
Was that with cruise control? Nice results
-
zch91 - -stickered-
- Posts: 2665
- Joined: Sat Dec 24, 2011 11:12 am
- Location: Darwin, NT
- Car: MY04 GT Premium - Silver 5EAT
- Real name: Zach
- Profile URL: viewtopic.php?f=10&t=15397
Re: Member Profile: HyRax
![]() by HyRax » Mon Apr 09, 2012 3:09 pm
by HyRax » Mon Apr 09, 2012 3:09 pm
bass_straitener wrote:Great result. Were you trying for an economy run?
No, it was an innocent result from complying with speed limits for the double-demerit weekend. I did observe that my efficiency improved at 110kph, though. The car reported a consumption of 9.0 litres per 100 kilometres at 100kph but dropped to 8.4 when I went to 110kph.
bass_straitener wrote:Also any further impressions or reports on the tyres?
Tyres are still great. I'm now used to the floaty sensation you get around corners as I'm aware of how well they grip. Highway grip is excellent over the yumps, bumps and railway crossings of country roads. Damp road grip is excellent. Still have not had a real opportunity to test very wet grip during rain. Provoking deliberate push understeer is easy on dirt inevitably, but straight line grip on dirt is pretty good. Over certain country roads they were very noisy with an noticeable roar, but this may be the case for any tyre due to the coarseness of the surface.
zch91 wrote:Was that with cruise control? Nice results
Yes it was.
I was going to procrastinate, but I put it off...
-

HyRax - Posts: 1202
- Joined: Sat Jul 30, 2011 12:25 am
- Location: Sydney
- Car: ADM MY19 3.6R Outback
- Real name: Jeff
- Profile URL: viewtopic.php?f=10&t=15482
Re: Member Profile: HyRax
![]() by HyRax » Tue Apr 17, 2012 2:04 pm
by HyRax » Tue Apr 17, 2012 2:04 pm
Finally got a nice soggy chance today to see how the Kumho KU31 rubber fares in the wet (and it was dumping down today), and I have to say they perform very well!
In other news:
- Normal passive driving shows no slippage anywhere at anytime.
- In general driving, sharp deliberate turns around intersection corners do not break traction.
- Heavy straight-line acceleration does not break traction other than a tiny slip of the front wheels on a hard launch (bear in mind I'm not turbo-charged).
- Long sweepers under power produce some push understeer, but it is extremely predictable because it's gradual and grainy in feel (as opposed to the floaty sensation when dry), and grip is immediately restored upon lifting your foot a bit.
- Around roundabouts at a moderate pace, I could feel that there was less apparent grip in terms of feedback through the steering wheel, but the actual grip levels appear to be the same as normal.
- Straight-line braking is still feels as strong as in the dry. There is no slippage and no ABS engagement in moderate braking. Emergency braking works very well - from 70kph I stopped in roughly three, maybe four car lengths, so about 20 metres on the stock 2.5i brakes with stock pads. A second emergency brake test stopped shorter than the first by almost a whole car length, so given it was a cold night I'd say my brakes were also pretty cold and the extra heat helped the second brake test improve. ABS kicked in as expected and there was no untoward wheel slippage that could be felt on the very wet surface I was on (visible water trickle). There were no dotted tyre squeaks either unlike an ABS emergency brake on a dry road.
- Through standing water, there was a small degree of resistance as you'd expect, but interestingly it wasn't as much resistance as I was used to previously under Bridgestone RE050A's. In fact, I got the impression that I was cutting through the water a bit more effectively. Given the three giant centre grooves in the tyre, I have no doubt the water was able to escape more easily.
- Taking a long turn (not a sweeper) at 70kph+ where there is standing water halfway through the turn produced a nice splash and no sudden slide sideways into the next (empty) lane.
In other news:
- I've sent my Brembo's down to Mark (cruisn) to get them painted up. Will hopefully be on the car within the next 3 weeks! Can't wait!

- I've confirmed that the STi Master Brake Cylinder and Brake Booster is definitely different to the 2.5i's MBC and BB - the 2.5i MBC bolts on horizontally to the booster while the STi MBC bolts on a 45 degree angle to the booster. I've also found out that this unit I got came from an STi that drowned in the Brisbane floods, explaining the water inside the booster. I've gotten most of it out, but I'm wondering if it's worth using it at all. The MBC itself looks fine - just needs a bath in brake fluid before installation. It also appears that my 2.5i already has its check valve external to the BB as well as evidenced by a lump in the vacuum hose, saving the need to get an STi one to butcher up.
Last edited by HyRax on Wed Apr 18, 2012 6:52 pm, edited 1 time in total.
I was going to procrastinate, but I put it off...
-
HyRax - Posts: 1202
- Joined: Sat Jul 30, 2011 12:25 am
- Location: Sydney
- Car: ADM MY19 3.6R Outback
- Real name: Jeff
- Profile URL: viewtopic.php?f=10&t=15482
Re: Member Profile: HyRax
![]() by mynameisdaniel » Tue Apr 17, 2012 3:11 pm
by mynameisdaniel » Tue Apr 17, 2012 3:11 pm
How do you think the KU31 compares to the RE050A?
I made the same change in my last car and always regretted cheaping out on the tyres The car was FWD and I could hard launch it on the Bridgestone's fine (@ about 4,000rpm) right until the day they had to be replaced, if they did spin (only around corners) it was smooth, quiet and predictable and I never had the ABS kick in even in the wet. With the KU31s if I launched at all they would spin roughly and squeel, making the whole car hop, I was pretty disappointed. The Kumho's felt a bit better in the wet around corners but I think that came down to having full tread vs worn below the tread bar tyres.... The KU31s were wider than the Bridgestone's too so I expected a bit more...
I made the same change in my last car and always regretted cheaping out on the tyres

-

mynameisdaniel - Posts: 1224
- Joined: Mon Jun 13, 2011 1:47 pm
- Location: Adelaide, Australia
- Car: 07 Subaru Liberty GT tbSTi Sedan
- Real name: May or may not be Daniel
- Profile URL: viewtopic.php?f=10&t=15835
Re: Member Profile: HyRax
![]() by HyRax » Tue Apr 17, 2012 3:23 pm
by HyRax » Tue Apr 17, 2012 3:23 pm
Honestly I think they're great. I'm used to spending no less than $250 per corner as a minimum so I was initially hesitant about the KU31's, but in the end I've found them to be a great tyre for the price.
Yes, there are grippier tyres out there, but they are much more expensive. Side by side with the RE050A's, the KU31's grip at least as well as the RE050A's IMO and the only real cons I have found to date is all feedback related - some extra road noise, extra firmness in the harder compound making bumps and potholes a bit harsher, and a slight floaty sensation when cornering at pace (which I'm quickly getting used to).
Yes, there are grippier tyres out there, but they are much more expensive. Side by side with the RE050A's, the KU31's grip at least as well as the RE050A's IMO and the only real cons I have found to date is all feedback related - some extra road noise, extra firmness in the harder compound making bumps and potholes a bit harsher, and a slight floaty sensation when cornering at pace (which I'm quickly getting used to).
I was going to procrastinate, but I put it off...
-
HyRax - Posts: 1202
- Joined: Sat Jul 30, 2011 12:25 am
- Location: Sydney
- Car: ADM MY19 3.6R Outback
- Real name: Jeff
- Profile URL: viewtopic.php?f=10&t=15482
Re: Member Profile: HyRax
![]() by Corsair » Fri Apr 20, 2012 10:01 pm
by Corsair » Fri Apr 20, 2012 10:01 pm
Very good in-depth review on the tyres. I hope someone with RE002s write's up something similar. I'm going to have to get some new tyres soon and do not wish to spend $450 a corner.
What colour scheme are you getting?
HyRax wrote:[I've sent my Brembo's down to Mark (cruisn) to get them painted up. Will hopefully be on the car within the next 3 weeks! Can't wait!
What colour scheme are you getting?
I got this plan. It's called 'Save Ass'. And the way it works is this - I slip outta one of these windows and I run like a bastard!
-
Corsair - -stickered-
- Posts: 958
- Joined: Sun Sep 18, 2011 12:01 am
- Location: Melbourne
- Car: MY09 Liberty 2.5i
- Profile URL: viewtopic.php?f=10&t=15709
Re: Member Profile: HyRax
![]() by HyRax » Sat Apr 21, 2012 1:19 am
by HyRax » Sat Apr 21, 2012 1:19 am
I'm getting silver with blue decals for the Brembo's. I think they'll contrast really well against the car and wheels.
I was going to procrastinate, but I put it off...
-
HyRax - Posts: 1202
- Joined: Sat Jul 30, 2011 12:25 am
- Location: Sydney
- Car: ADM MY19 3.6R Outback
- Real name: Jeff
- Profile URL: viewtopic.php?f=10&t=15482
Re: Member Profile: HyRax
![]() by Corsair » Sat Apr 21, 2012 6:25 pm
by Corsair » Sat Apr 21, 2012 6:25 pm
I think so too. Look forward to the photos when they're done and installed. 
I got this plan. It's called 'Save Ass'. And the way it works is this - I slip outta one of these windows and I run like a bastard!
-
Corsair - -stickered-
- Posts: 958
- Joined: Sun Sep 18, 2011 12:01 am
- Location: Melbourne
- Car: MY09 Liberty 2.5i
- Profile URL: viewtopic.php?f=10&t=15709
Re: Member Profile: HyRax
![]() by HyRax » Sun May 06, 2012 9:12 am
by HyRax » Sun May 06, 2012 9:12 am
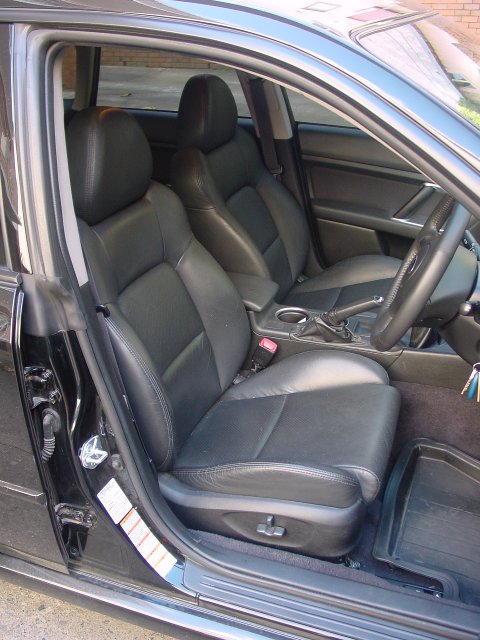
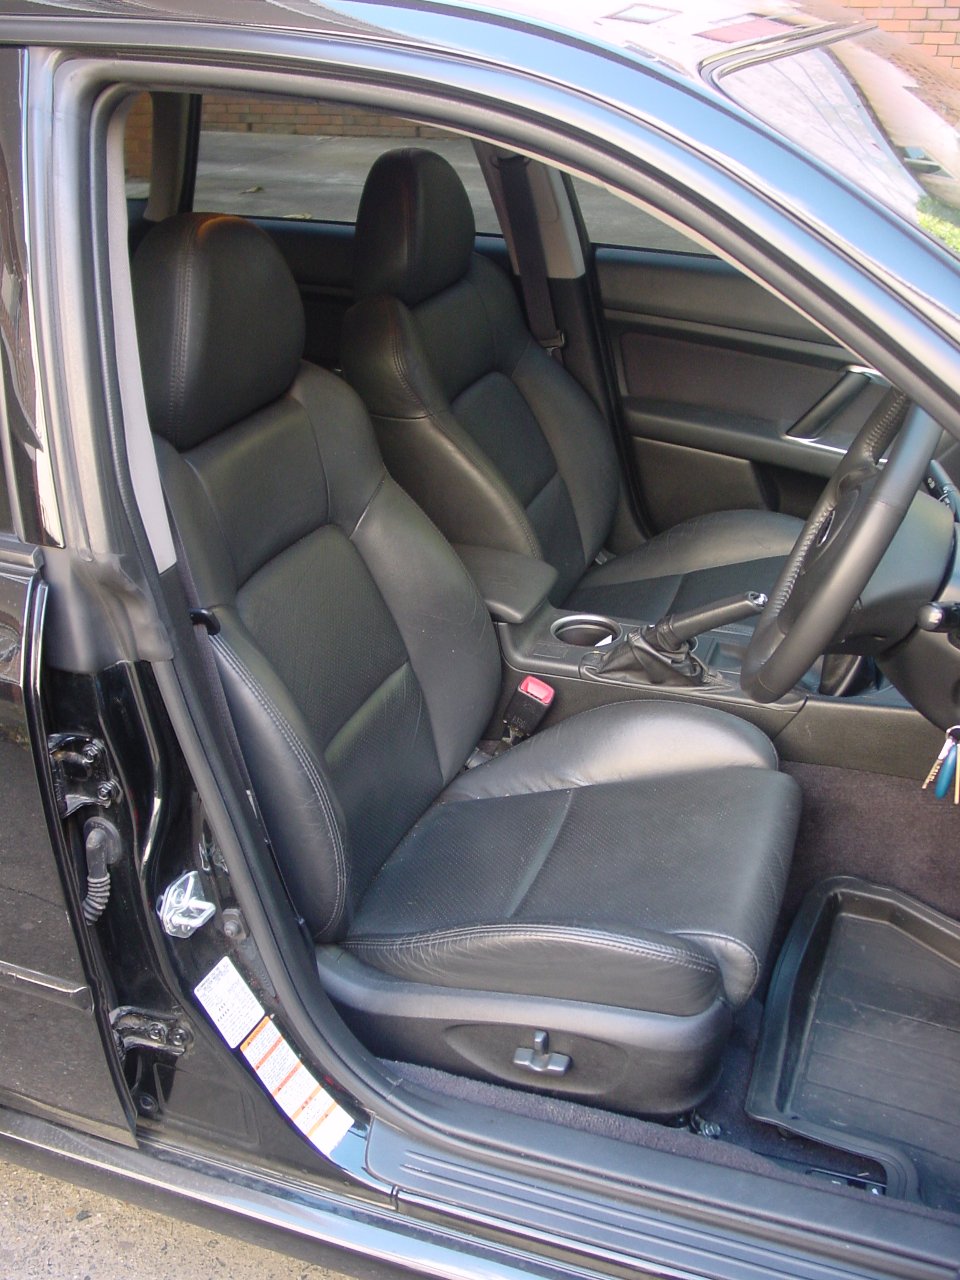
Continuing my trend for installing all my mods out of the order I expect to do them in, I installed a leather interior this weekend that I managed to score relatively cheap off eBay, replacing my rear seat with one from an MY08 Liberty Luxury Pack wreck and the front seats from an MY06 Liberty GT.
Since my car appears to be a Safety Pack car, I had to source seats with SRS side airbags or my insurance could become null and void (they're only $100 more expensive than non-airbag seats).
The driver's seat has electric adjustment, but the power connector from the car does not match up. I can plug in the seatbelt sensor and the airbag (and they work fine - airbag warning light stays off and the warning bell chimes when the driver's seatbelt is not connected in excess of 40kph then stops when you plug it in). The plug that does not connect is the Occupant Detection System connector which is the weight sensor in the MY08 seat that the MY06 seat appears to not have - this then links up with the lights on the ceiling that tell you when your passenger hasn't got their seatbelt on and the car chimes a warning accordingly. power connector for electric and heated seats. The ODS functionality is provided on the white seatbelt sensor cable.
The electric seat requires a separate power supply to make it work (MY08 connector has four pins on it, and the MY06 seat has a two-pin connector), so I'm probably going to have to go back to the wrecker to cut off the wiring loom from the GT and then see if I can use some spade connectors to connect the seat power to the car's 4-pin connector. I'm also going to check out an MY08 wreck to see if the seats are more directly compatible and if they are I'll buy them and just resell the GT seats later.
Luckily even though I can't adjust the driver's seat at the moment, it's already in a comfortable driving position. I have to say that the leather seats definitely feel more comfortable and supportive than the cloth seats and of course it looks (and smells) a lot nicer too!
Last edited by HyRax on Sun May 13, 2012 4:10 pm, edited 1 time in total.
I was going to procrastinate, but I put it off...
-
HyRax - Posts: 1202
- Joined: Sat Jul 30, 2011 12:25 am
- Location: Sydney
- Car: ADM MY19 3.6R Outback
- Real name: Jeff
- Profile URL: viewtopic.php?f=10&t=15482
Re: Member Profile: HyRax
![]() by Corsair » Sun May 06, 2012 11:46 am
by Corsair » Sun May 06, 2012 11:46 am
Geez. Nice effort. Did you install the seats yourself? And if I may be so rude, how much did you buy the set for?
I got this plan. It's called 'Save Ass'. And the way it works is this - I slip outta one of these windows and I run like a bastard!
-
Corsair - -stickered-
- Posts: 958
- Joined: Sun Sep 18, 2011 12:01 am
- Location: Melbourne
- Car: MY09 Liberty 2.5i
- Profile URL: viewtopic.php?f=10&t=15709
Re: Member Profile: HyRax
![]() by HyRax » Sun May 06, 2012 1:22 pm
by HyRax » Sun May 06, 2012 1:22 pm
Managed to suss out the power supply - the four-pin connector does indeed supply a 12v (green and yellow wire) and ground line (black wire). I got some aligator clips and hooked up the seat to test and viola - we have working seats! I'm still going to check out a set of MY08 seats advertised elsewhere to see if they can plug directly into the four-pin connector otherwise I'll just make a workaround solution with the forementioned spade connectors and cut GT loom.
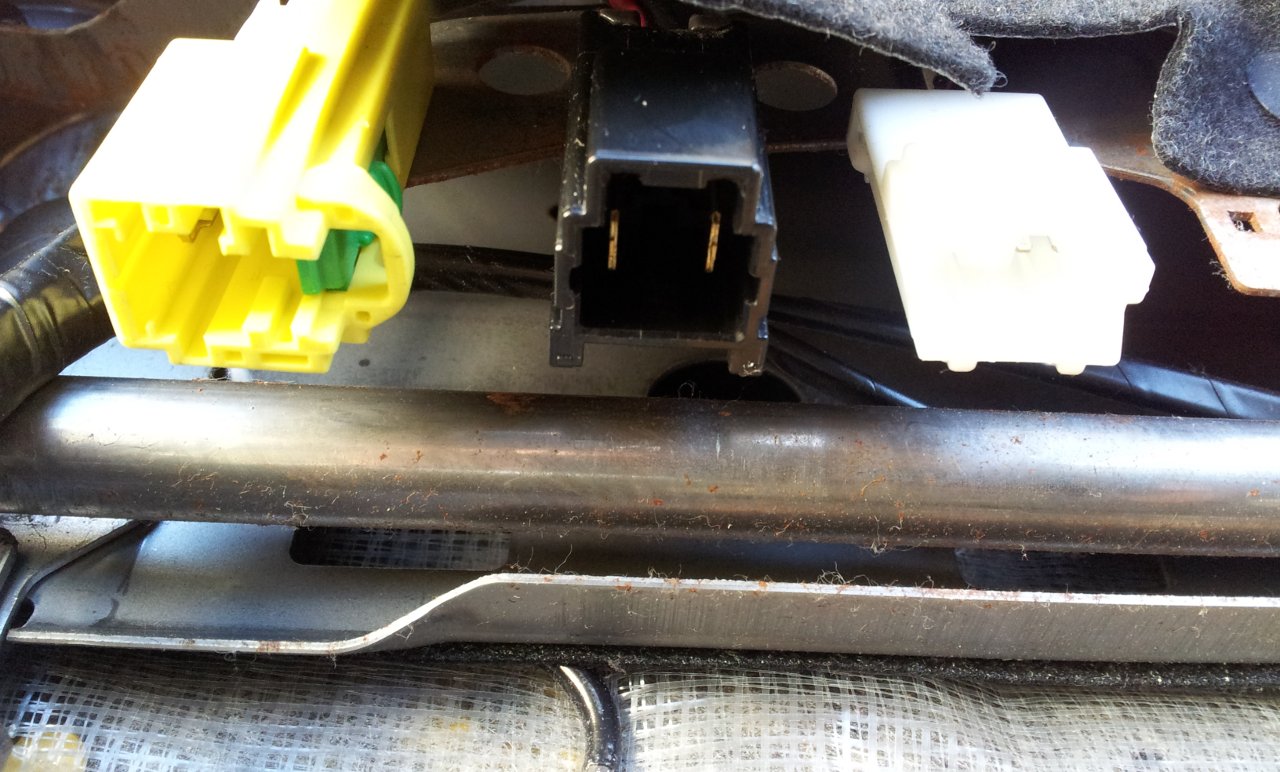
Here are the three connectors on the bottom of the MY06 GT seat. Left to right, airbag, 2-pin seat power, seatbelt sensor:

Click on image for full size!
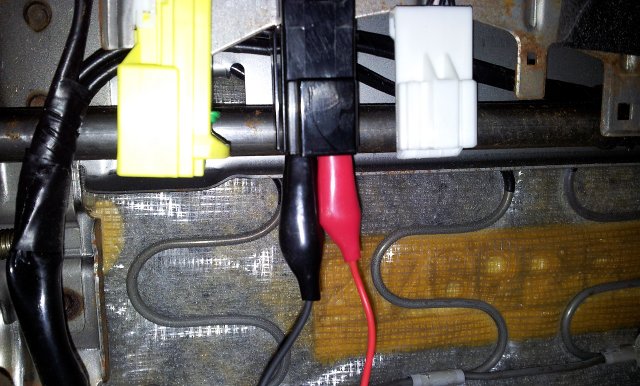
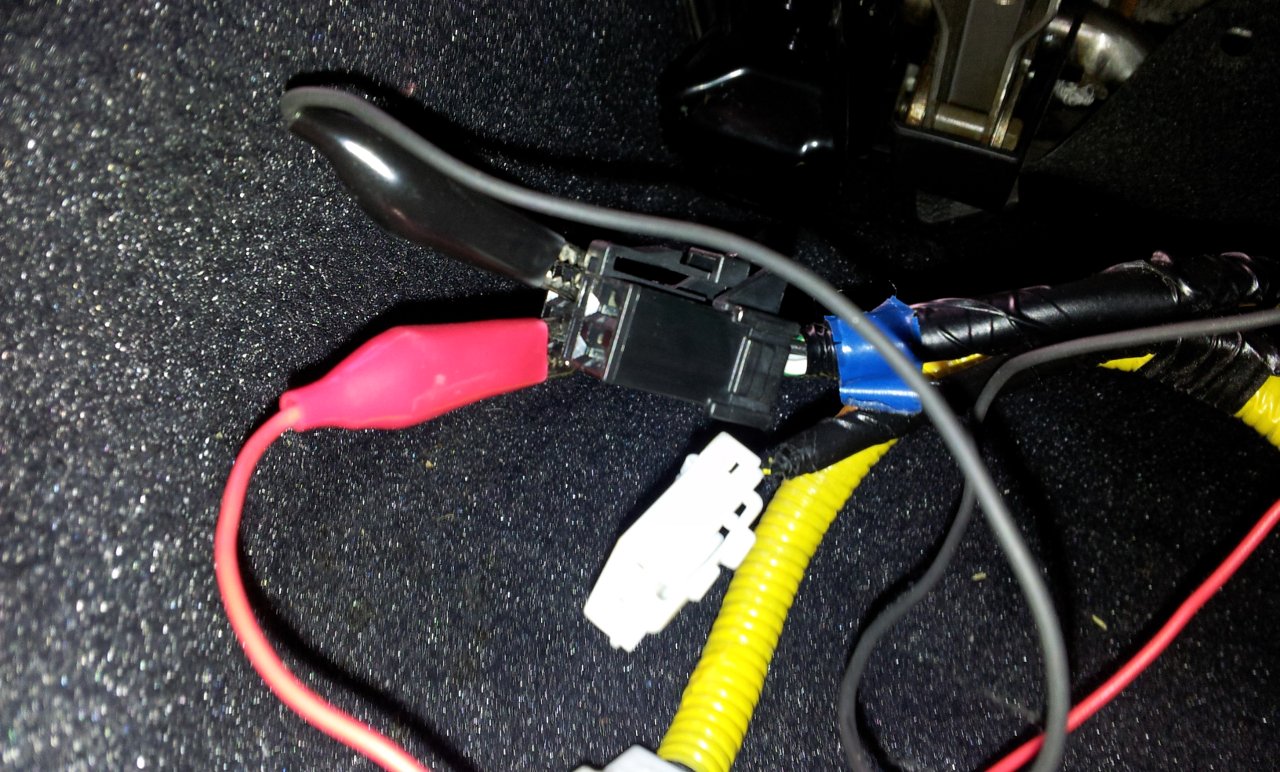
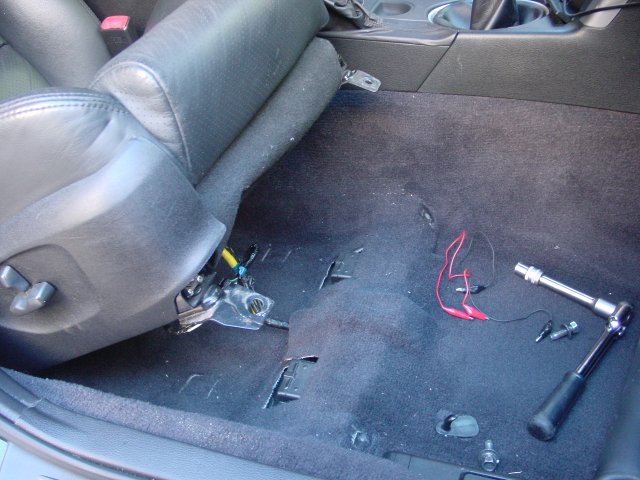
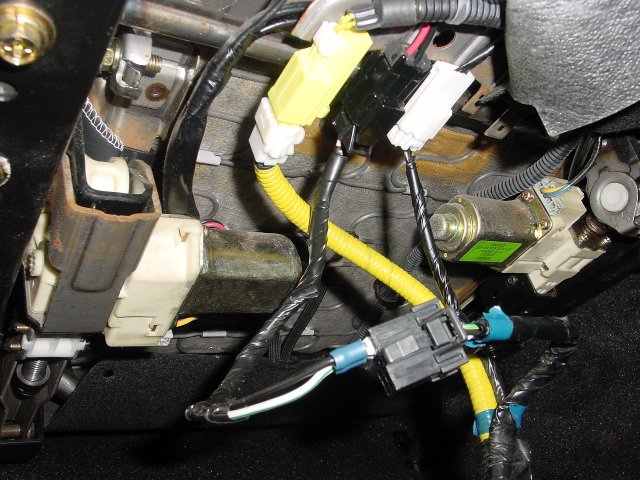
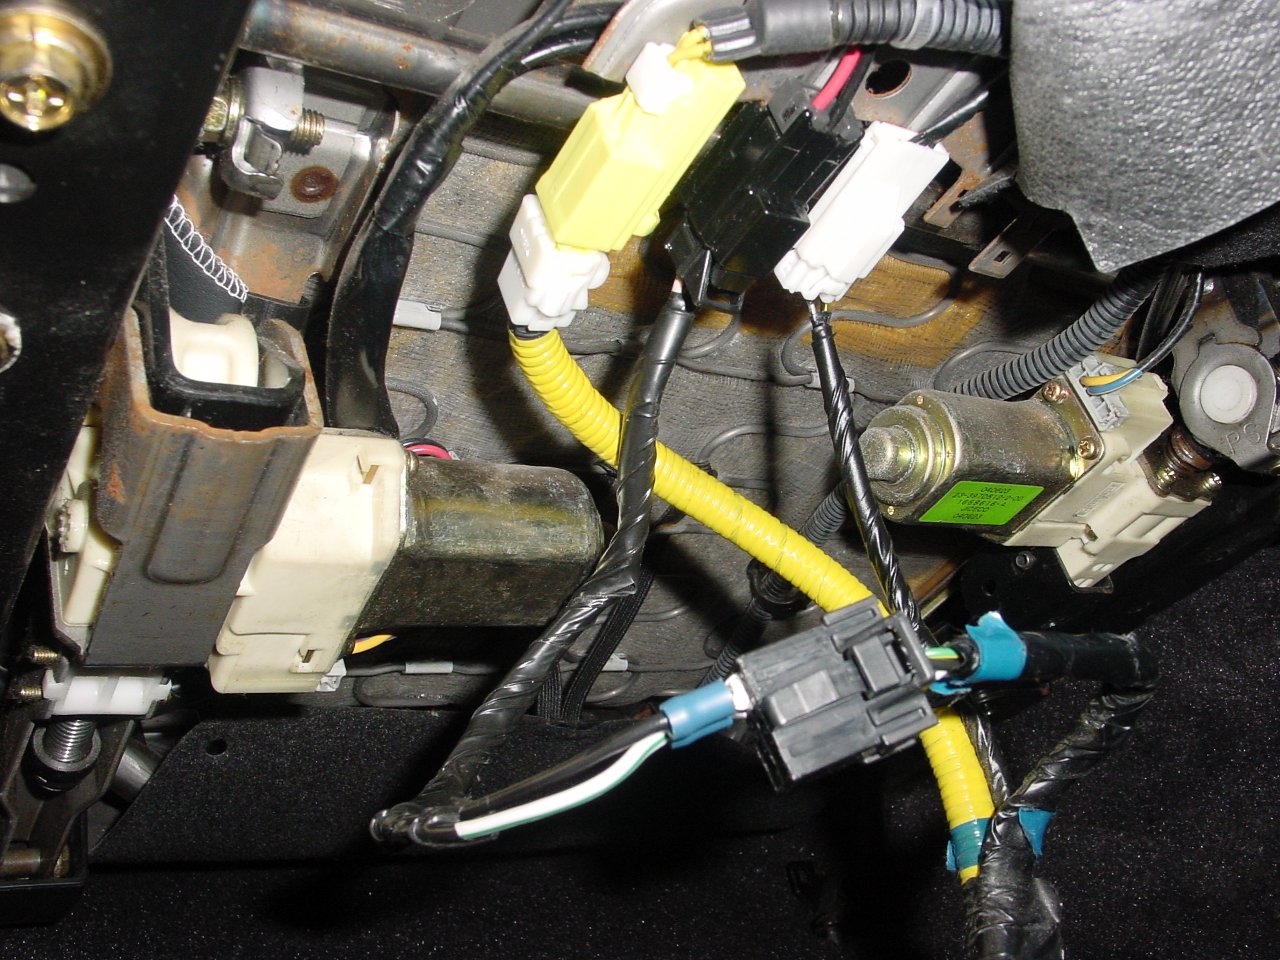
Here's the car's loom on the floor underneath the driver's seat. The yellow one is the airbag, the white one is the seatbelt sensor and the black one is the four-pin Occupant Detection System (ODS) connection. The left two pins are the 12v and ground lines. The other two lines are the data lines from the ODS sensor in the MY08 seats. In this pic I have attached aligator test lead clips to the 12v and ground lines.
EDIT: I just found that the black connector is NOT the ODS connector - it's something else. The ODS on MY08 is handled by the white seatbelt sensor line. I discovered this when I flipped over my MY08 cloth seats and discovered that the black 4-pin connector connects to a connector that just holds it - it's not actually wired to anything. That should mean that this connector probably provides power to MY08 powered seats and also probably the optional heater function we don't seem to get in Australia. I got hold of the MY06 GT loom and noticed that there was a separate 4-pin cable (not used in the GT) in addition to the two-pin power that ran the electric driver's seat adjustment, so it appears Subaru have rolled the functionality of power and heater into one cable. In any case, I need to try and find a set of MY08 electric seats to confirm.
EDIT2: With the new seats I thought I'd lost ODS functionality. Turns out the MY06 GT seats DO have ODS functionality and it passes through the seatbelt sensor cable. The "no seatbelt" alarm for the passenger went off when I had my first passenger since getting the new seats and started moving the car before they got their belt on.
EDIT3: In the pic below, the red cable is connected to the wrong pin. The pin connected in the photo is the seat HEATER power source and is only on when the car is on. The correct pin the the one next to the ground pin (basically the two top pins closest to the clip). This provides a proper 12v source and is always on, even when the car is off allowing adjustment of the seat when the car is not running. I discovered this when I inadvertently burnt out the heater/cruise control fuse (for some reason it's shared) after playing around with the seat too much. The fuse was easily replaced, but I've now moved the seat to the correct pin after consulting the workshop manual.

Click on image for full size!
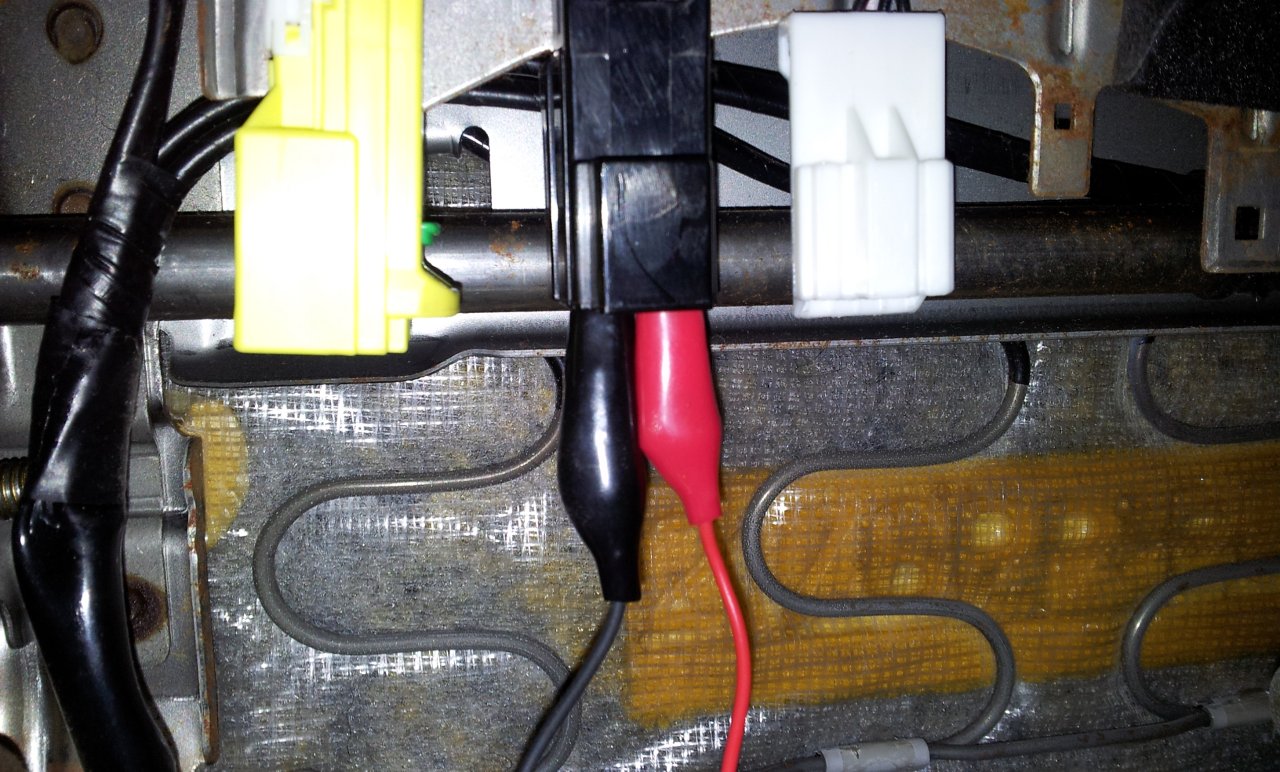
And the other end of the aligator clips are connected to the seat (note in this pic the clips are the wrong way around as I discovered later when pulling the slide adjustment switch forward which made the seat move backward instead, same with the tilt and backrest controls):
Click on image for full size!
Yep, they're super-easy:
I just missed out on a full immaculate set in Canberra for $400 (which is a ridiculous never-see-again bargain), but I ended up getting mine for $800 which is about $200 cheaper than the average wrecker usually sells a full front and rear set for. Some of this I'll get back when I sell the cloth seats.
Here are the three connectors on the bottom of the MY06 GT seat. Left to right, airbag, 2-pin seat power, seatbelt sensor:
Click on image for full size!
Here's the car's loom on the floor underneath the driver's seat. The yellow one is the airbag, the white one is the seatbelt sensor and the black one is the four-pin Occupant Detection System (ODS) connection. The left two pins are the 12v and ground lines. The other two lines are the data lines from the ODS sensor in the MY08 seats. In this pic I have attached aligator test lead clips to the 12v and ground lines.
EDIT: I just found that the black connector is NOT the ODS connector - it's something else. The ODS on MY08 is handled by the white seatbelt sensor line. I discovered this when I flipped over my MY08 cloth seats and discovered that the black 4-pin connector connects to a connector that just holds it - it's not actually wired to anything. That should mean that this connector probably provides power to MY08 powered seats and also probably the optional heater function we don't seem to get in Australia. I got hold of the MY06 GT loom and noticed that there was a separate 4-pin cable (not used in the GT) in addition to the two-pin power that ran the electric driver's seat adjustment, so it appears Subaru have rolled the functionality of power and heater into one cable. In any case, I need to try and find a set of MY08 electric seats to confirm.
EDIT2: With the new seats I thought I'd lost ODS functionality. Turns out the MY06 GT seats DO have ODS functionality and it passes through the seatbelt sensor cable. The "no seatbelt" alarm for the passenger went off when I had my first passenger since getting the new seats and started moving the car before they got their belt on.
EDIT3: In the pic below, the red cable is connected to the wrong pin. The pin connected in the photo is the seat HEATER power source and is only on when the car is on. The correct pin the the one next to the ground pin (basically the two top pins closest to the clip). This provides a proper 12v source and is always on, even when the car is off allowing adjustment of the seat when the car is not running. I discovered this when I inadvertently burnt out the heater/cruise control fuse (for some reason it's shared) after playing around with the seat too much. The fuse was easily replaced, but I've now moved the seat to the correct pin after consulting the workshop manual.
Click on image for full size!
And the other end of the aligator clips are connected to the seat (note in this pic the clips are the wrong way around as I discovered later when pulling the slide adjustment switch forward which made the seat move backward instead, same with the tilt and backrest controls):
Click on image for full size!
Corsair wrote:Geez. Nice effort. Did you install the seats yourself?
Yep, they're super-easy:
- Grab a 14mm socket.
- Tilt backrest completely forward.
- Slide the whole seat full forward.
- Remove cosmetic plastic covers over bolts.
- Undo two bolts at rear.
- Slide full back.
- Undo two bolts at front.
- Tilt the entire seat backwards so you can see underneath it.
- Unplug the three connectors (yellow airbag, black 4-pin power and white seatbelt sensor).
- Tilt the seat forward again so it's flat on the floor back in normal position.
- Remove the seat's headrest to give you more space to move vertically.
- Now lift the seat and pull it out the front door.
Corsair wrote:And if I may be so rude, how much did you buy the set for?
I just missed out on a full immaculate set in Canberra for $400 (which is a ridiculous never-see-again bargain), but I ended up getting mine for $800 which is about $200 cheaper than the average wrecker usually sells a full front and rear set for. Some of this I'll get back when I sell the cloth seats.
Last edited by HyRax on Wed May 30, 2012 12:10 am, edited 5 times in total.
I was going to procrastinate, but I put it off...
-
HyRax - Posts: 1202
- Joined: Sat Jul 30, 2011 12:25 am
- Location: Sydney
- Car: ADM MY19 3.6R Outback
- Real name: Jeff
- Profile URL: viewtopic.php?f=10&t=15482
-

bigBADbenny - Posts: 10420
- Joined: Tue Oct 04, 2011 6:36 pm
- Location: Collingwood, Melbourne
- Car: MY07 GT-B 6MT OBP Wagon
- Real name: Ben Richards
- Profile URL: http://tinyurl.com/agvbzop
Re: Member Profile: HyRax
![]() by HyRax » Wed May 09, 2012 11:43 am
by HyRax » Wed May 09, 2012 11:43 am
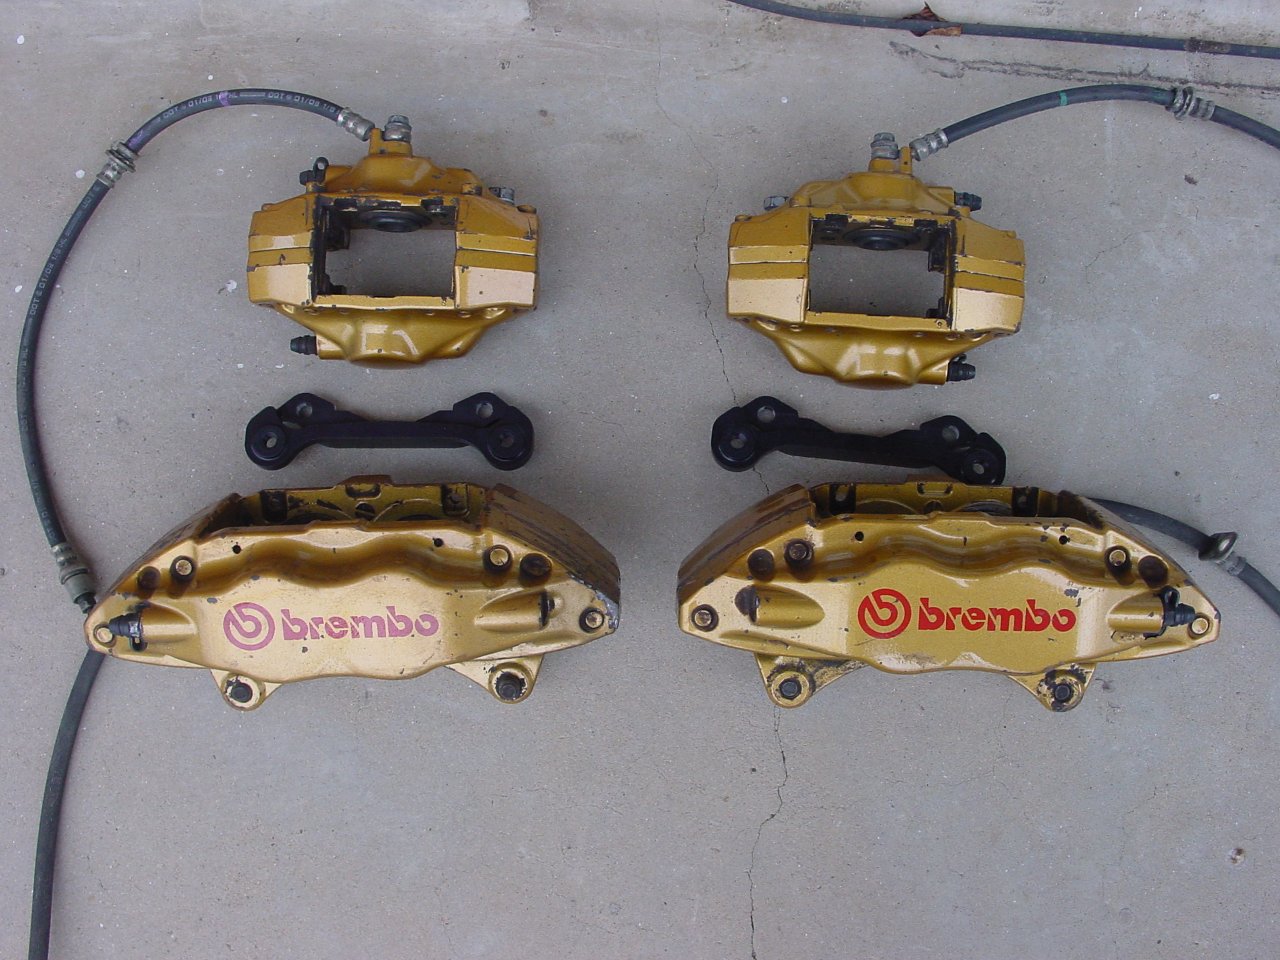
Yesterday my repainted Brembo's arrived back from the Master At Arts, cruisn (Mark), and I have to say they look amazing in the flesh! 
My Brembo's went from this:
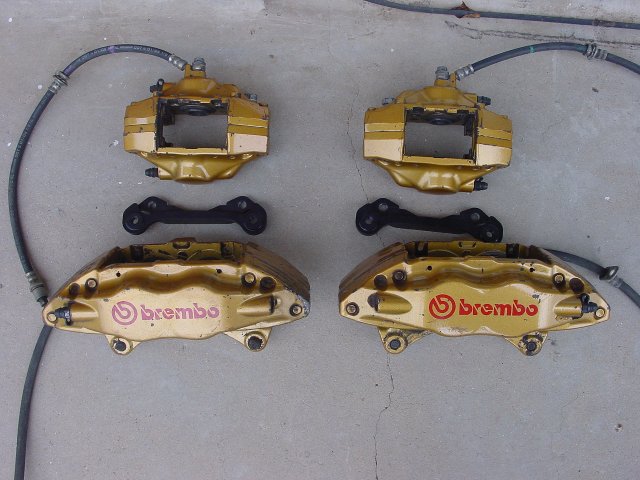
Click on the image for full size!
To this:
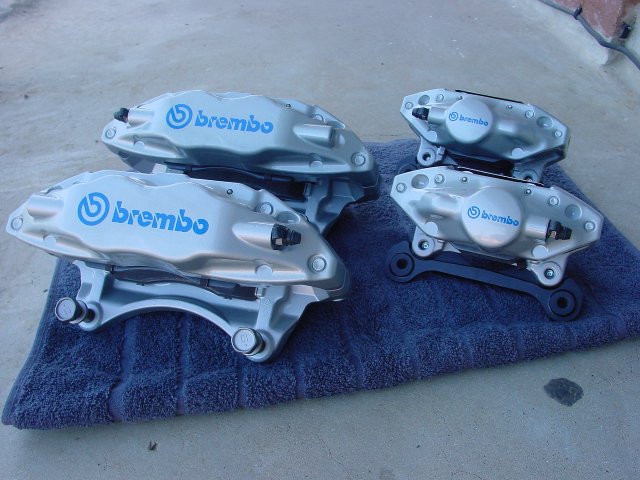
Click on the image for full size!
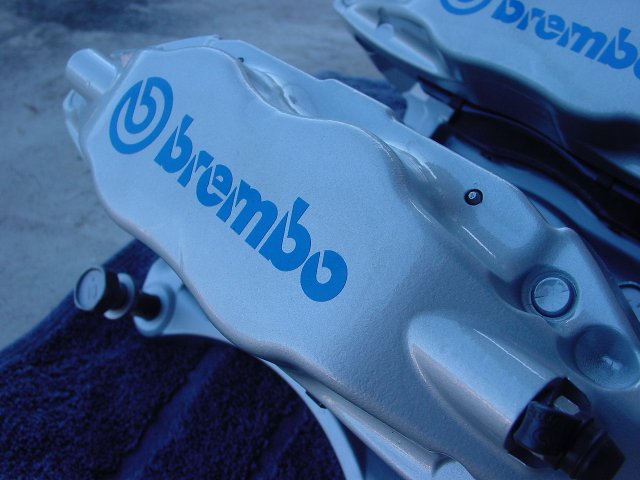
Click on the image for full size!
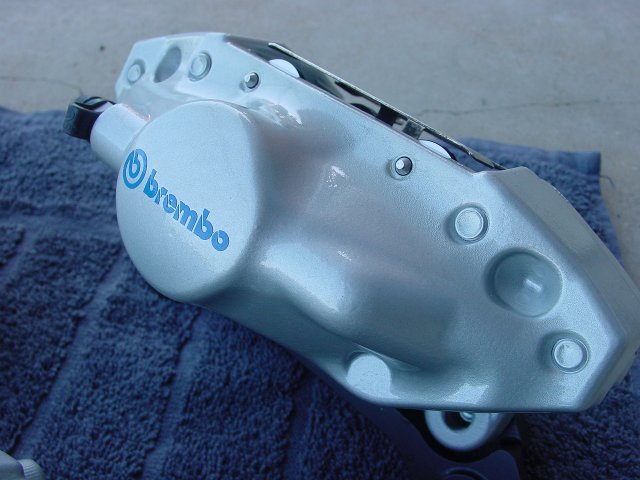
Click on the image for full size!
I am well and truely stoked. Many thanks to Mark for his time and effort. His attention to detail is second-to-none!
I was hoping to get them onto the car this weekend, but I am awaiting the outcome of the group-buy for braided brake lines and still need to get around to getting my handbrake shoes modified with more meat to suit the STi rear discs, so I suspect that it'll be next week or the week after before the Brembo's are installed.
My Brembo's went from this:
Click on the image for full size!
To this:

Click on the image for full size!

Click on the image for full size!

Click on the image for full size!
I am well and truely stoked. Many thanks to Mark for his time and effort. His attention to detail is second-to-none!
I was hoping to get them onto the car this weekend, but I am awaiting the outcome of the group-buy for braided brake lines and still need to get around to getting my handbrake shoes modified with more meat to suit the STi rear discs, so I suspect that it'll be next week or the week after before the Brembo's are installed.
I was going to procrastinate, but I put it off...
-
HyRax - Posts: 1202
- Joined: Sat Jul 30, 2011 12:25 am
- Location: Sydney
- Car: ADM MY19 3.6R Outback
- Real name: Jeff
- Profile URL: viewtopic.php?f=10&t=15482
Re: Member Profile: HyRax
![]() by bigBADbenny » Wed May 09, 2012 11:59 am
by bigBADbenny » Wed May 09, 2012 11:59 am
They look too good to use... NOT
Thanks for the braided lines heads up too.
Thanks for the braided lines heads up too.
-
bigBADbenny - Posts: 10420
- Joined: Tue Oct 04, 2011 6:36 pm
- Location: Collingwood, Melbourne
- Car: MY07 GT-B 6MT OBP Wagon
- Real name: Ben Richards
- Profile URL: http://tinyurl.com/agvbzop
Re: Member Profile: HyRax
![]() by HyRax » Sun May 13, 2012 2:54 pm
by HyRax » Sun May 13, 2012 2:54 pm
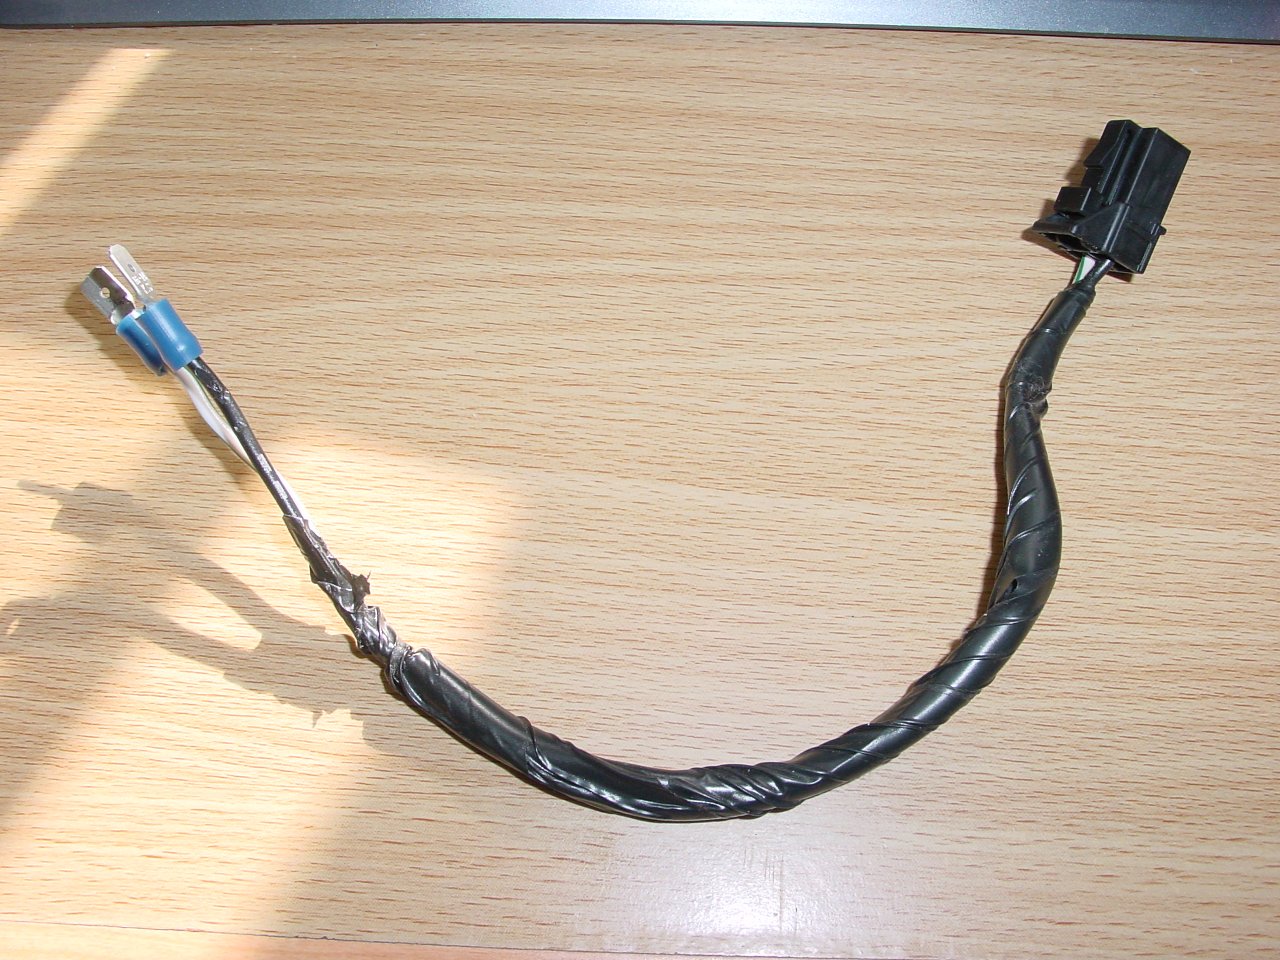
Sorted out the power wiring for my driver's seat today. Modified the chopped MY06 GT wiring loom, specifically the power cable for the electric driver's seat so I could connect power properly.

Click on the image for full size!
Soldered on two shoe connectors to insert into the MY08 4-pin power connector on the car.

Click on the image for full size!
Pulled the seat off again and removed the temporary aligator clips.
Click the image for full size!
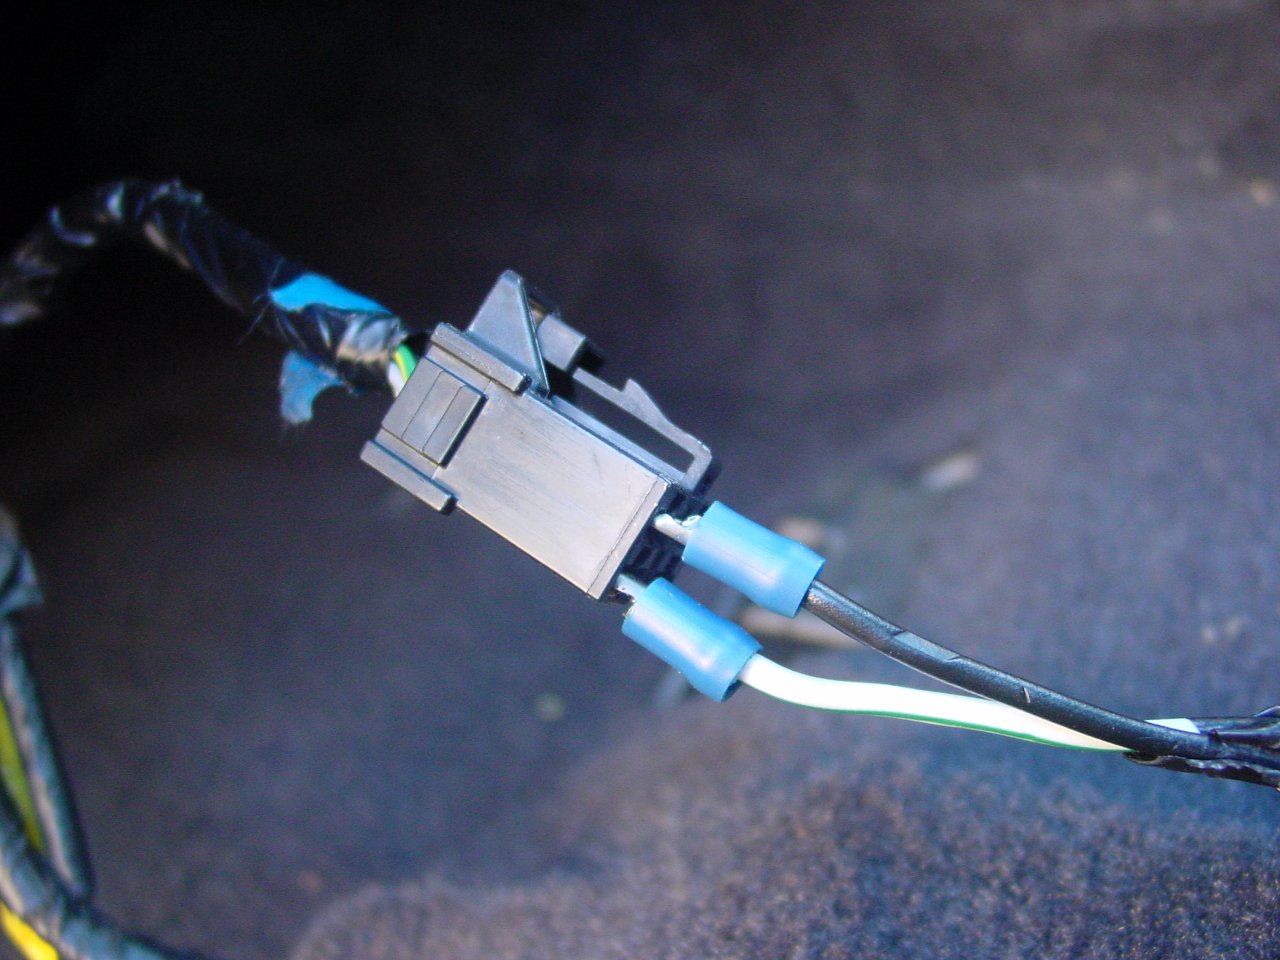
Connected the new cable to the MY08 power connector. Shoes fit perfectly and are a snug fit so they won't fall out on their own.

Click the image for full size!
Connected the native 2-pin connector to the seat as it originally used to be.
Click the image for full size!
Put it all back together and tested. Worked like a charm. Nice and solid.
Click the image for full size!
Click on the image for full size!
Soldered on two shoe connectors to insert into the MY08 4-pin power connector on the car.

Click on the image for full size!
Pulled the seat off again and removed the temporary aligator clips.

Click the image for full size!
Connected the new cable to the MY08 power connector. Shoes fit perfectly and are a snug fit so they won't fall out on their own.
Click the image for full size!
Connected the native 2-pin connector to the seat as it originally used to be.
Click the image for full size!
Put it all back together and tested. Worked like a charm. Nice and solid.
Click the image for full size!
I was going to procrastinate, but I put it off...
-
HyRax - Posts: 1202
- Joined: Sat Jul 30, 2011 12:25 am
- Location: Sydney
- Car: ADM MY19 3.6R Outback
- Real name: Jeff
- Profile URL: viewtopic.php?f=10&t=15482
Who is online
Users browsing this forum: No registered users and 17 guests