Looking good... Always a good incentive when you get such a great finished set of Brembo's back from Mark and then you have taken it to the next stage well and truly with a well installed set of seats...
That along with not ignoring your tune since you are like me and have an NA.... Where to next? Is there much left that you have planned?

Australian Liberty Owners Club
Member Profile: HyRax
Re: Member Profile: HyRax
![]() by Victripper » Sun May 13, 2012 4:44 pm
by Victripper » Sun May 13, 2012 4:44 pm
-

Victripper - Posts: 357
- Joined: Sun May 22, 2011 2:38 pm
- Location: Melbourne
- Car: MY12 Liberty Sports Premium Wg 2.5i
- Real name: Mark
Re: Member Profile: HyRax
![]() by HyRax » Sun May 13, 2012 5:48 pm
by HyRax » Sun May 13, 2012 5:48 pm
After this the only things left on the main list are finishing off the CarPC, getting the Brembo's on early next month once I receive the group buy braided lines, and better suspension (probably coilovers).
Beyond that would be small things such as lightened pulley, maybe a cosmetic item here and there, that kind of stuff. I don't want to do anything really big like supercharging.
Beyond that would be small things such as lightened pulley, maybe a cosmetic item here and there, that kind of stuff. I don't want to do anything really big like supercharging.
I was going to procrastinate, but I put it off...
-

HyRax - Posts: 1202
- Joined: Sat Jul 30, 2011 12:25 am
- Location: Sydney
- Car: ADM MY19 3.6R Outback
- Real name: Jeff
- Profile URL: viewtopic.php?f=10&t=15482
Re: Member Profile: HyRax
![]() by Victripper » Sun May 13, 2012 5:55 pm
by Victripper » Sun May 13, 2012 5:55 pm
So there is really no end to the Mods... They just get smaller for a short period then after that who knows?
-
Victripper - Posts: 357
- Joined: Sun May 22, 2011 2:38 pm
- Location: Melbourne
- Car: MY12 Liberty Sports Premium Wg 2.5i
- Real name: Mark
Re: Member Profile: HyRax
![]() by HyRax » Sun May 13, 2012 6:02 pm
by HyRax » Sun May 13, 2012 6:02 pm
Pretty much! Keeping mods spread out long term is a Good Thing(TM) - keeps renewing the fun of the car for longer. 
I was going to procrastinate, but I put it off...
-
HyRax - Posts: 1202
- Joined: Sat Jul 30, 2011 12:25 am
- Location: Sydney
- Car: ADM MY19 3.6R Outback
- Real name: Jeff
- Profile URL: viewtopic.php?f=10&t=15482
Re: Member Profile: HyRax
![]() by bigBADbenny » Sun May 13, 2012 6:12 pm
by bigBADbenny » Sun May 13, 2012 6:12 pm
Plus signing up for GB's and getting stuff from IM: strrreeeeettttching out your fun!
Question: the front seats on safety models all have power supplied whether electric or not?
Question: the front seats on safety models all have power supplied whether electric or not?
-

bigBADbenny - Posts: 10420
- Joined: Tue Oct 04, 2011 6:36 pm
- Location: Collingwood, Melbourne
- Car: MY07 GT-B 6MT OBP Wagon
- Real name: Ben Richards
- Profile URL: http://tinyurl.com/agvbzop
Re: Member Profile: HyRax
![]() by HyRax » Sun May 13, 2012 6:43 pm
by HyRax » Sun May 13, 2012 6:43 pm
bigBADbenny wrote:Question: the front seats on safety models all have power supplied whether electric or not?
Yup - all cars of the same or similar year model/generation should have the same basic loom with some connectors either not plugged in and taped back, or in my case, plugged into an empty socket that wasn't actually connected to anything anyway. Just acted as a holder.
I was going to procrastinate, but I put it off...
-
HyRax - Posts: 1202
- Joined: Sat Jul 30, 2011 12:25 am
- Location: Sydney
- Car: ADM MY19 3.6R Outback
- Real name: Jeff
- Profile URL: viewtopic.php?f=10&t=15482
-
bigBADbenny - Posts: 10420
- Joined: Tue Oct 04, 2011 6:36 pm
- Location: Collingwood, Melbourne
- Car: MY07 GT-B 6MT OBP Wagon
- Real name: Ben Richards
- Profile URL: http://tinyurl.com/agvbzop
Re: Member Profile: HyRax
![]() by HyRax » Sun May 20, 2012 9:29 pm
by HyRax » Sun May 20, 2012 9:29 pm
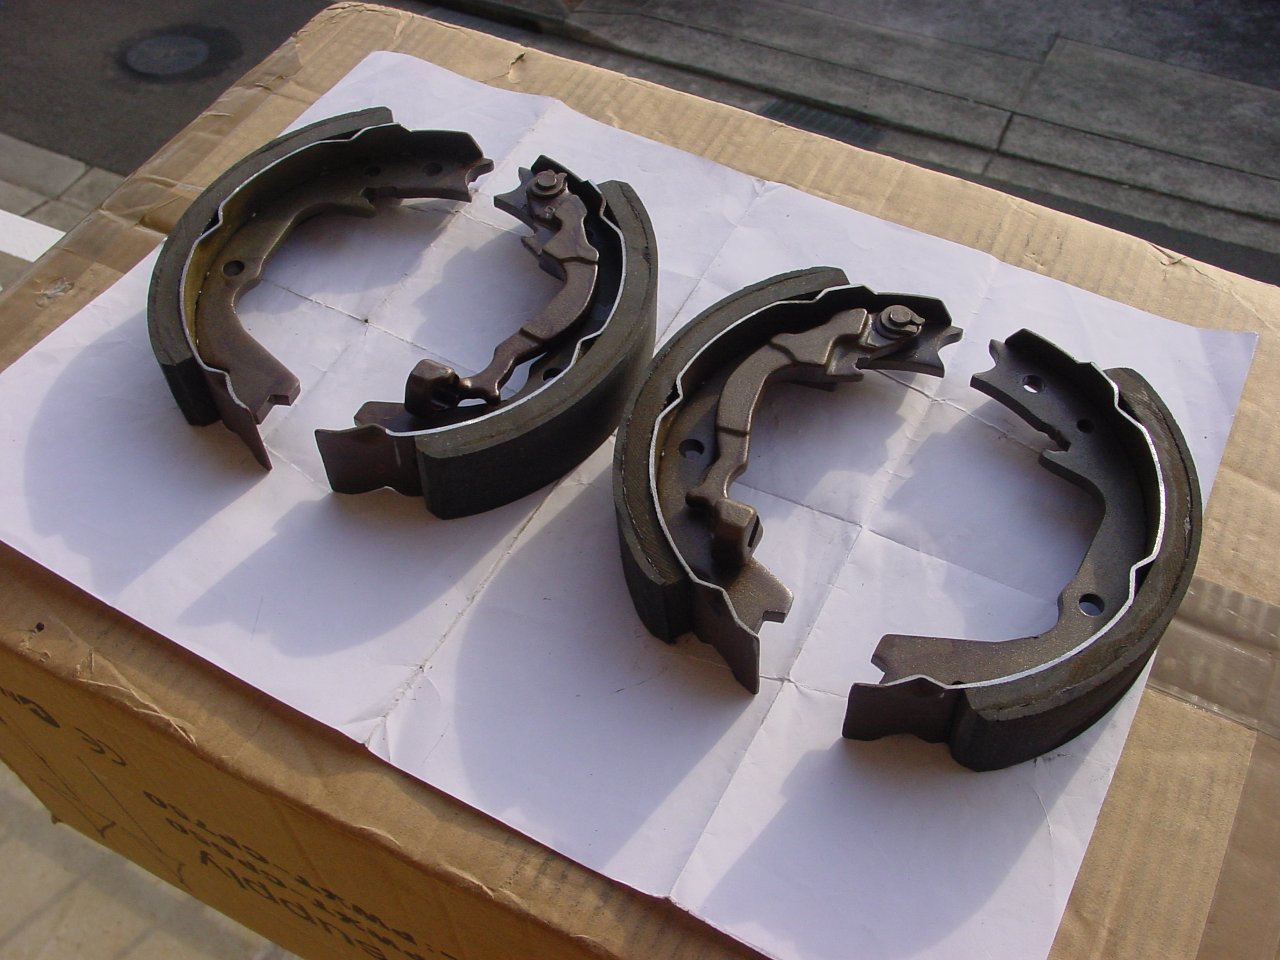
Got my modified MY08 handbrake shoes back to suit the larger rear STi discs for the Brembo upgade, courtesy of Marion Brake and Clutch in Belmore. They removed the factory pad and bonded on a new pad with the extra meat required to suit the larger rotor. It fits 100% perfectly flush to the inside of the STi disc. Impressive work and much cheaper than I expected too.

Click on the image for full size!
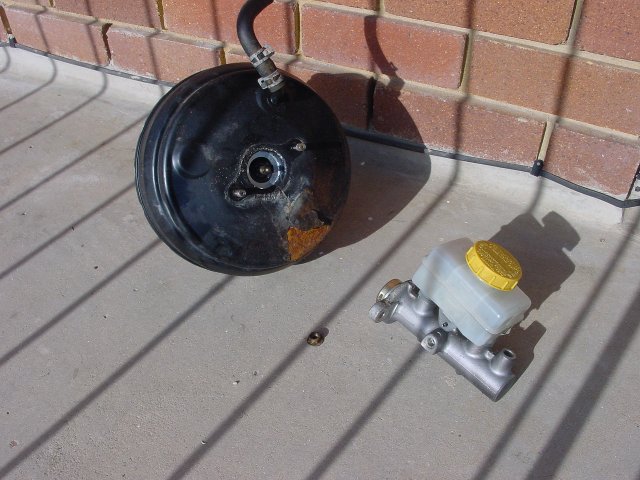
Also got a replacement STi Brake Booster and Master Cylinder after the original one I got was deemed unusable by my mechanic (the master cylinder is actually in good working order - it's just the brake booster that was too rusty due to salt water in it from the Brisbane floods). They're virtually identical except for one number (model/variant?) on the Bosch sticker of the brake booster.
New one from a wrecked MY05 STi:

Click on the image for full size!
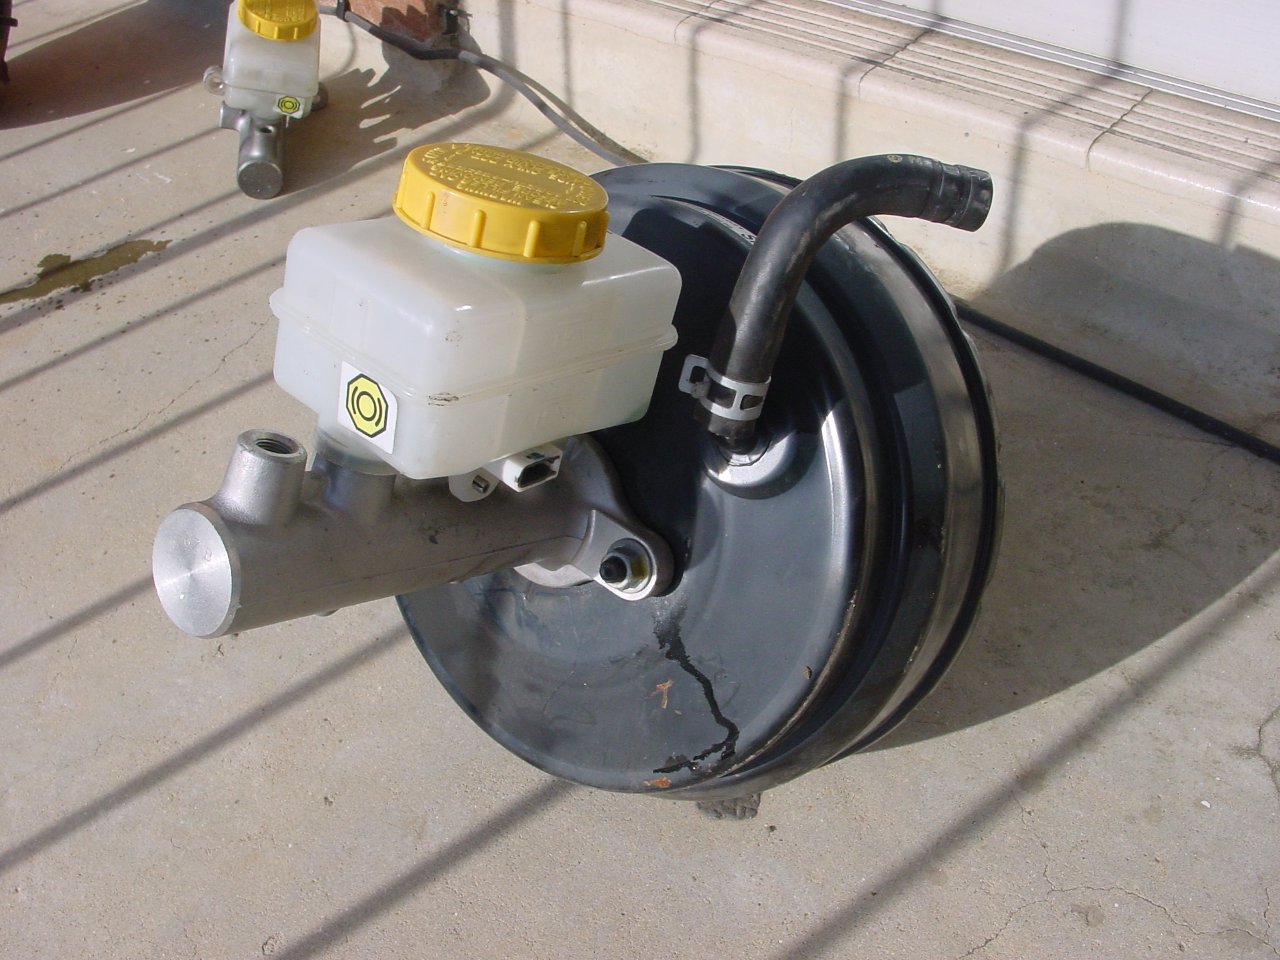
Old one from the flooded MY06 STi:
Click on the image for full size!
Everything is coming into place. Just need those braided brake lines now.
Click on the image for full size!
Also got a replacement STi Brake Booster and Master Cylinder after the original one I got was deemed unusable by my mechanic (the master cylinder is actually in good working order - it's just the brake booster that was too rusty due to salt water in it from the Brisbane floods). They're virtually identical except for one number (model/variant?) on the Bosch sticker of the brake booster.
New one from a wrecked MY05 STi:
Click on the image for full size!
Old one from the flooded MY06 STi:

Click on the image for full size!
Everything is coming into place. Just need those braided brake lines now.
I was going to procrastinate, but I put it off...
-
HyRax - Posts: 1202
- Joined: Sat Jul 30, 2011 12:25 am
- Location: Sydney
- Car: ADM MY19 3.6R Outback
- Real name: Jeff
- Profile URL: viewtopic.php?f=10&t=15482
Re: Member Profile: HyRax
![]() by Corsair » Tue May 22, 2012 10:31 pm
by Corsair » Tue May 22, 2012 10:31 pm
Best wishes for the install Hyrax. I went through three boosters before I got one that fitted.
I got this plan. It's called 'Save Ass'. And the way it works is this - I slip outta one of these windows and I run like a bastard!
-
Corsair - -stickered-
- Posts: 958
- Joined: Sun Sep 18, 2011 12:01 am
- Location: Melbourne
- Car: MY09 Liberty 2.5i
- Profile URL: viewtopic.php?f=10&t=15709
Re: Member Profile: HyRax
![]() by HyRax » Wed May 23, 2012 1:09 am
by HyRax » Wed May 23, 2012 1:09 am
Corsair wrote:Best wishes for the install Hyrax. I went through three boosters before I got one that fitted.
Before one fitted?? How did the other ones not fit? Looking at the MY04/05/06 STi BB's at the wrecker, they all appear to be physically the same size (though I notice there is what appears to be a variant number on the Bosch sticker is different, but the model/part number is the same).
Didn't you get an STi BB and MBC fitted on yours in the end?
I was going to procrastinate, but I put it off...
-
HyRax - Posts: 1202
- Joined: Sat Jul 30, 2011 12:25 am
- Location: Sydney
- Car: ADM MY19 3.6R Outback
- Real name: Jeff
- Profile URL: viewtopic.php?f=10&t=15482
Re: Member Profile: HyRax
![]() by Corsair » Wed May 23, 2012 7:38 pm
by Corsair » Wed May 23, 2012 7:38 pm
HyRax wrote:Corsair wrote:Best wishes for the install Hyrax. I went through three boosters before I got one that fitted.
Before one fitted?? How did the other ones not fit? Looking at the MY04/05/06 STi BB's at the wrecker, they all appear to be physically the same size (though I notice there is what appears to be a variant number on the Bosch sticker is different, but the model/part number is the same).
Didn't you get an STi BB and MBC fitted on yours in the end?
No, sadly not. I will be returning the GTB one that Mark kindly lent me to try. The one I had installed came from another 2.5i.
You have three options for replacing the booster... A new one from Subaru (roughly $1,000 including installation), a second hand one sourced by a mechanic (for half the cost of a new one) or a self sourced part (for about half the cost of the second hand one). The GTB booster didn't fit my car according to my mechanic, the second one didn't work (a peril of second hand parts I guess) and the third one did.
Here's hoping you have better luck than me!
I got this plan. It's called 'Save Ass'. And the way it works is this - I slip outta one of these windows and I run like a bastard!
-
Corsair - -stickered-
- Posts: 958
- Joined: Sun Sep 18, 2011 12:01 am
- Location: Melbourne
- Car: MY09 Liberty 2.5i
- Profile URL: viewtopic.php?f=10&t=15709
Re: Member Profile: HyRax
![]() by HyRax » Wed May 23, 2012 7:55 pm
by HyRax » Wed May 23, 2012 7:55 pm
Hmmm... Well, the one I have is an Impreza STi BB, not a Liberty booster and everyone on the Legacy forums appear to be having plenty of luck, so we'll see how mine goes then.
Do you know in what respect the GTB booster didn't fit? Having a look at my engine bay, there seems to be a reasonable amount of room there.
Do you know in what respect the GTB booster didn't fit? Having a look at my engine bay, there seems to be a reasonable amount of room there.
I was going to procrastinate, but I put it off...
-
HyRax - Posts: 1202
- Joined: Sat Jul 30, 2011 12:25 am
- Location: Sydney
- Car: ADM MY19 3.6R Outback
- Real name: Jeff
- Profile URL: viewtopic.php?f=10&t=15482
Re: Member Profile: HyRax
![]() by HyRax » Tue Jul 24, 2012 6:09 pm
by HyRax » Tue Jul 24, 2012 6:09 pm
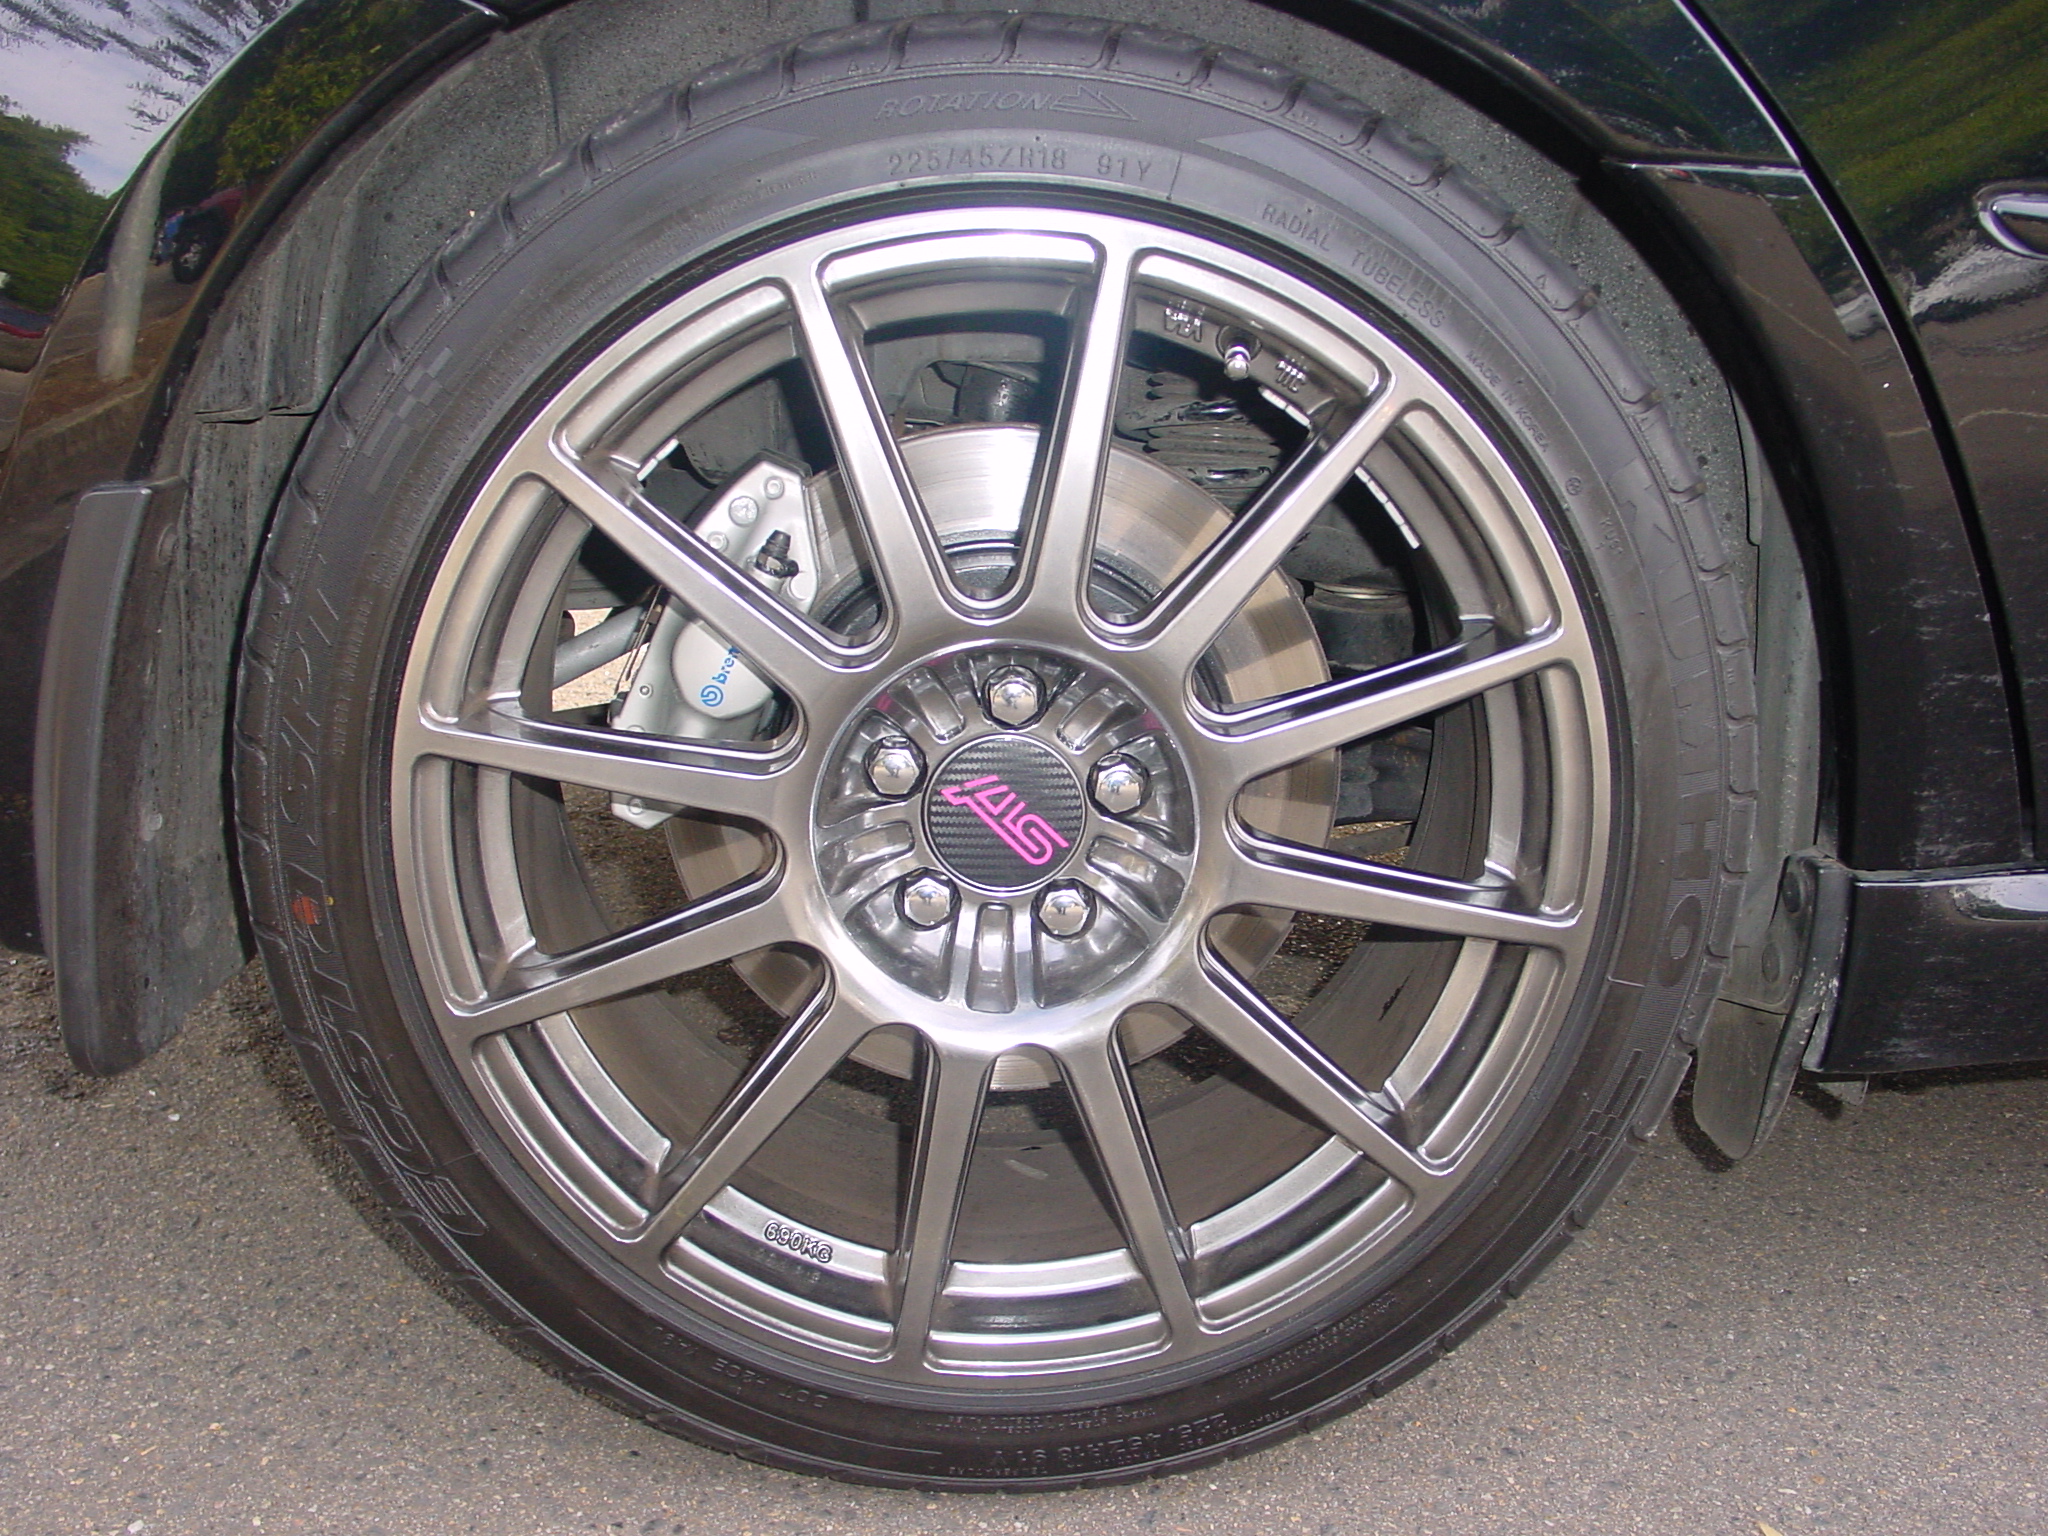
So having finally received my Goodridge braided brake lines, I set about finally getting my Brembo calipers installed on the car.
Since I elected to go for the full Brembo conversion including native rear STi rotors with 190mm handbrake, I also had to install my modified handbrake shoes. Total gear replaced:
Here's a before and after pic of the rear assembly showing the thicker shoes, deleted dust shield and an incorrectly positioned triangle piece at the top (corrected after the photo was taken).

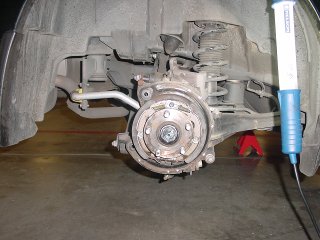
Click on each image for full size!
The handbrake assembly was surprisingly easier than I expected - the springs and shoes are easy to remove and re-mount. The hardest part of the handbrake assembly was removing the shoe from the handbrake cable itself because the spring is bloody strong where it pinches onto the shoe. Beyond that, the dust shield was removed by drilling out the spot-welds.
I forgot to get snapshots, but the lines swapout was a bit of a pain on the rear - the flare nuts were well and truely stuck on but they came off with a bit of degreaser and perseverence with a flare nut wrench.
Front calipers went on without a hitch, but the rears were a downright pain in the arse - not because of the calipers themselves, but because of the Kartboy adapters. I wholly DISCOURAGE the use of Kartboy adapters in a Liberty Brembo conversion - get Mark's custom-made adapters instead! I wasted a good few hours grinding metal away from the hub assembly bit by bit with an angle grinder until the Kartboys were no longer touching anything and allowed me to get the bolt holes to line up! Grind, test fit, grind, test fit, grind, test fit. What a pain. I probably only shaved off about 3mm in the end, but still - it took a long time because I didn't want to over-do it, and I'm no grinding expert. In any case, the rears eventually bolted on nicely and are quite solid - nothing loose (sorry, forgot to get photos as at this point my patience was wearing thin).
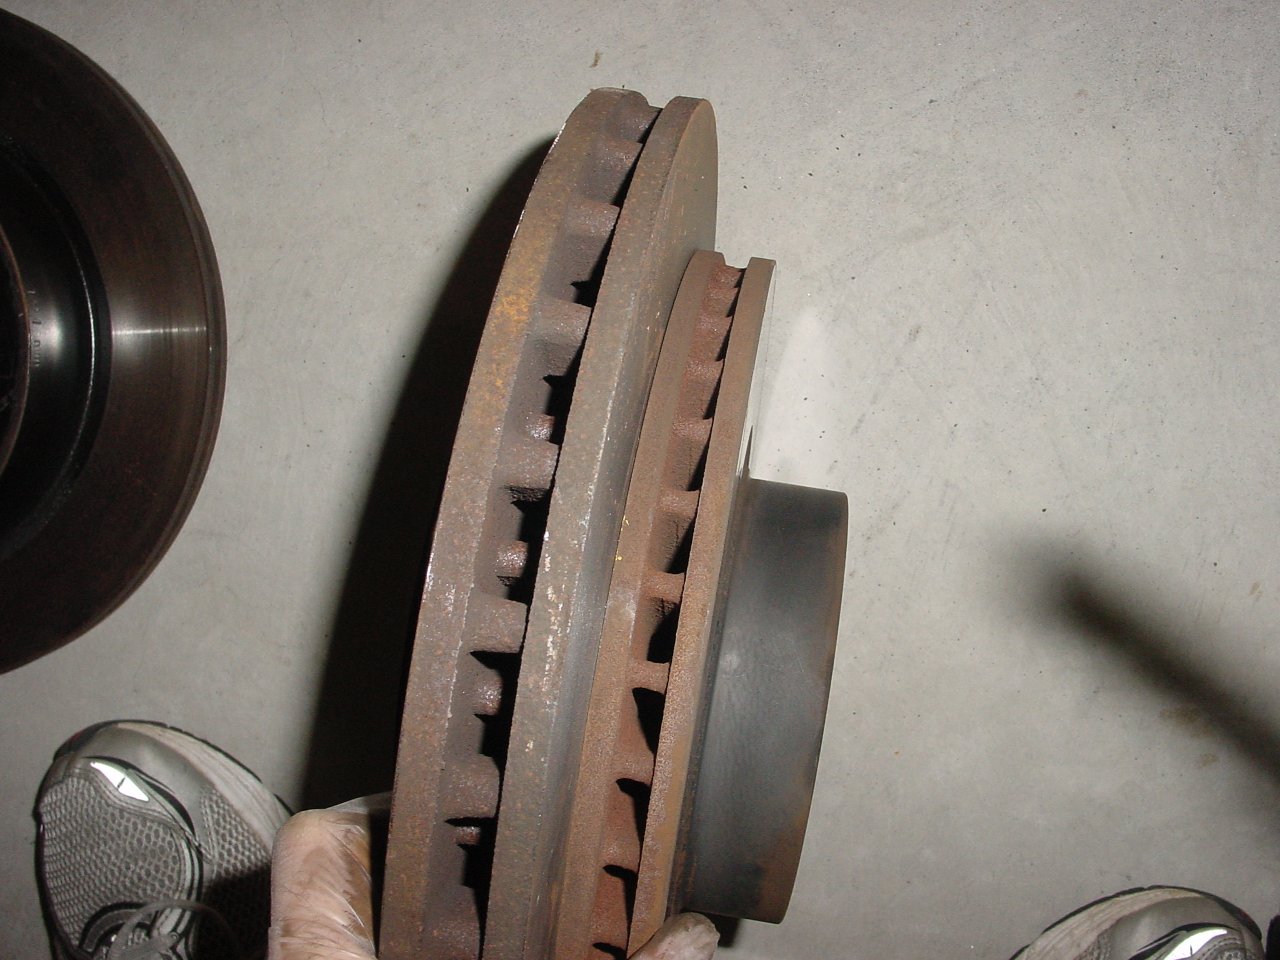
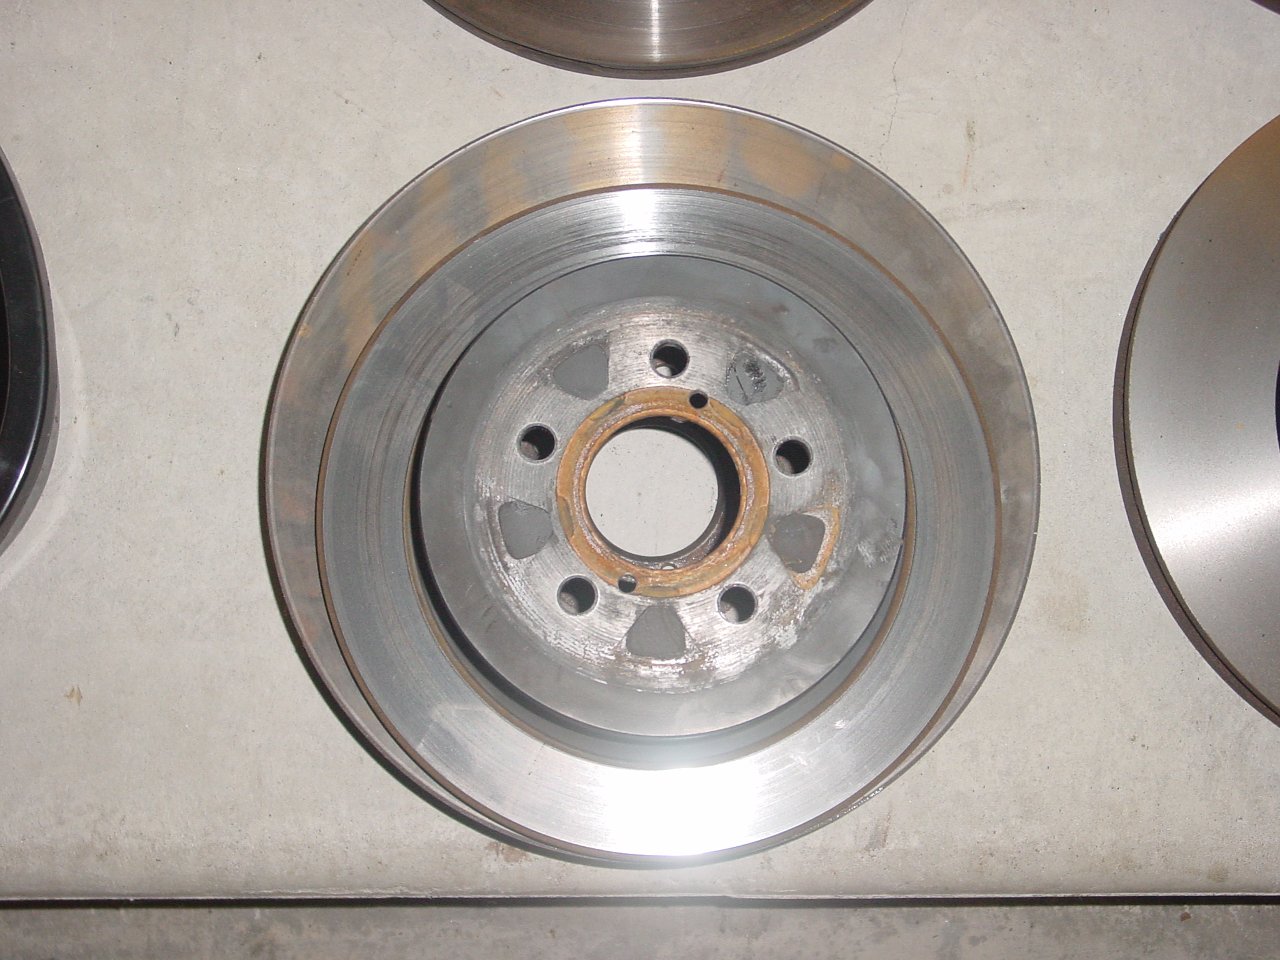
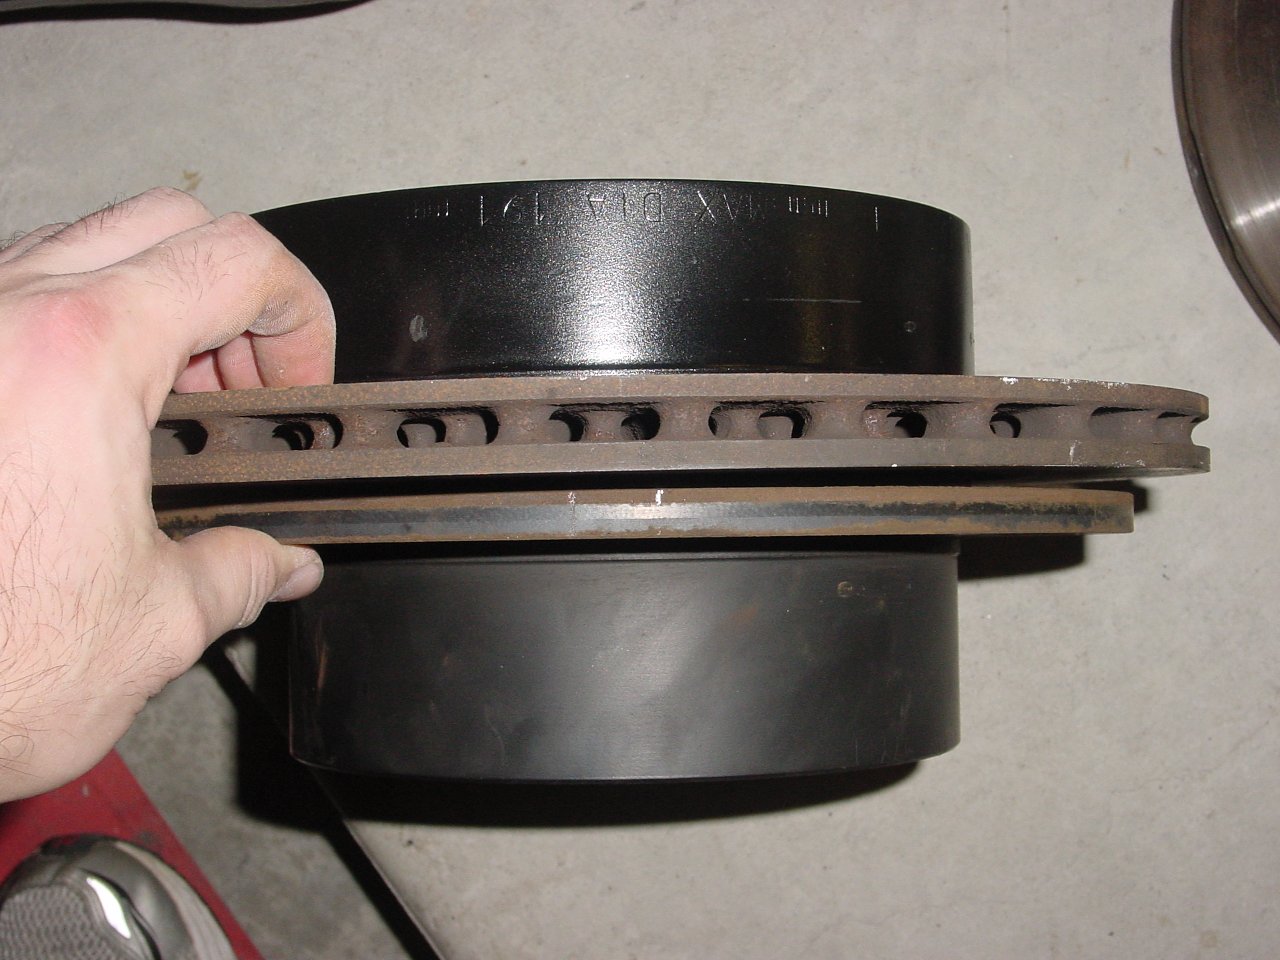
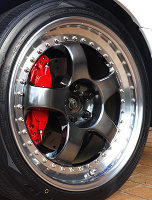
Couple of snapshots to show the difference in size between the OEM and STi front rotors...
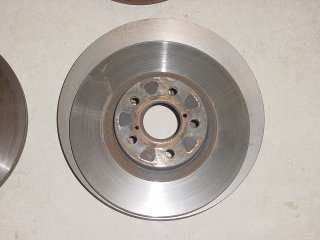

Click on each image for full size!
...and a comparison of the rear rotors:
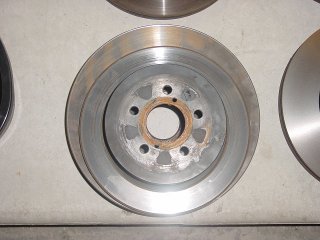

Click on each image for full size!
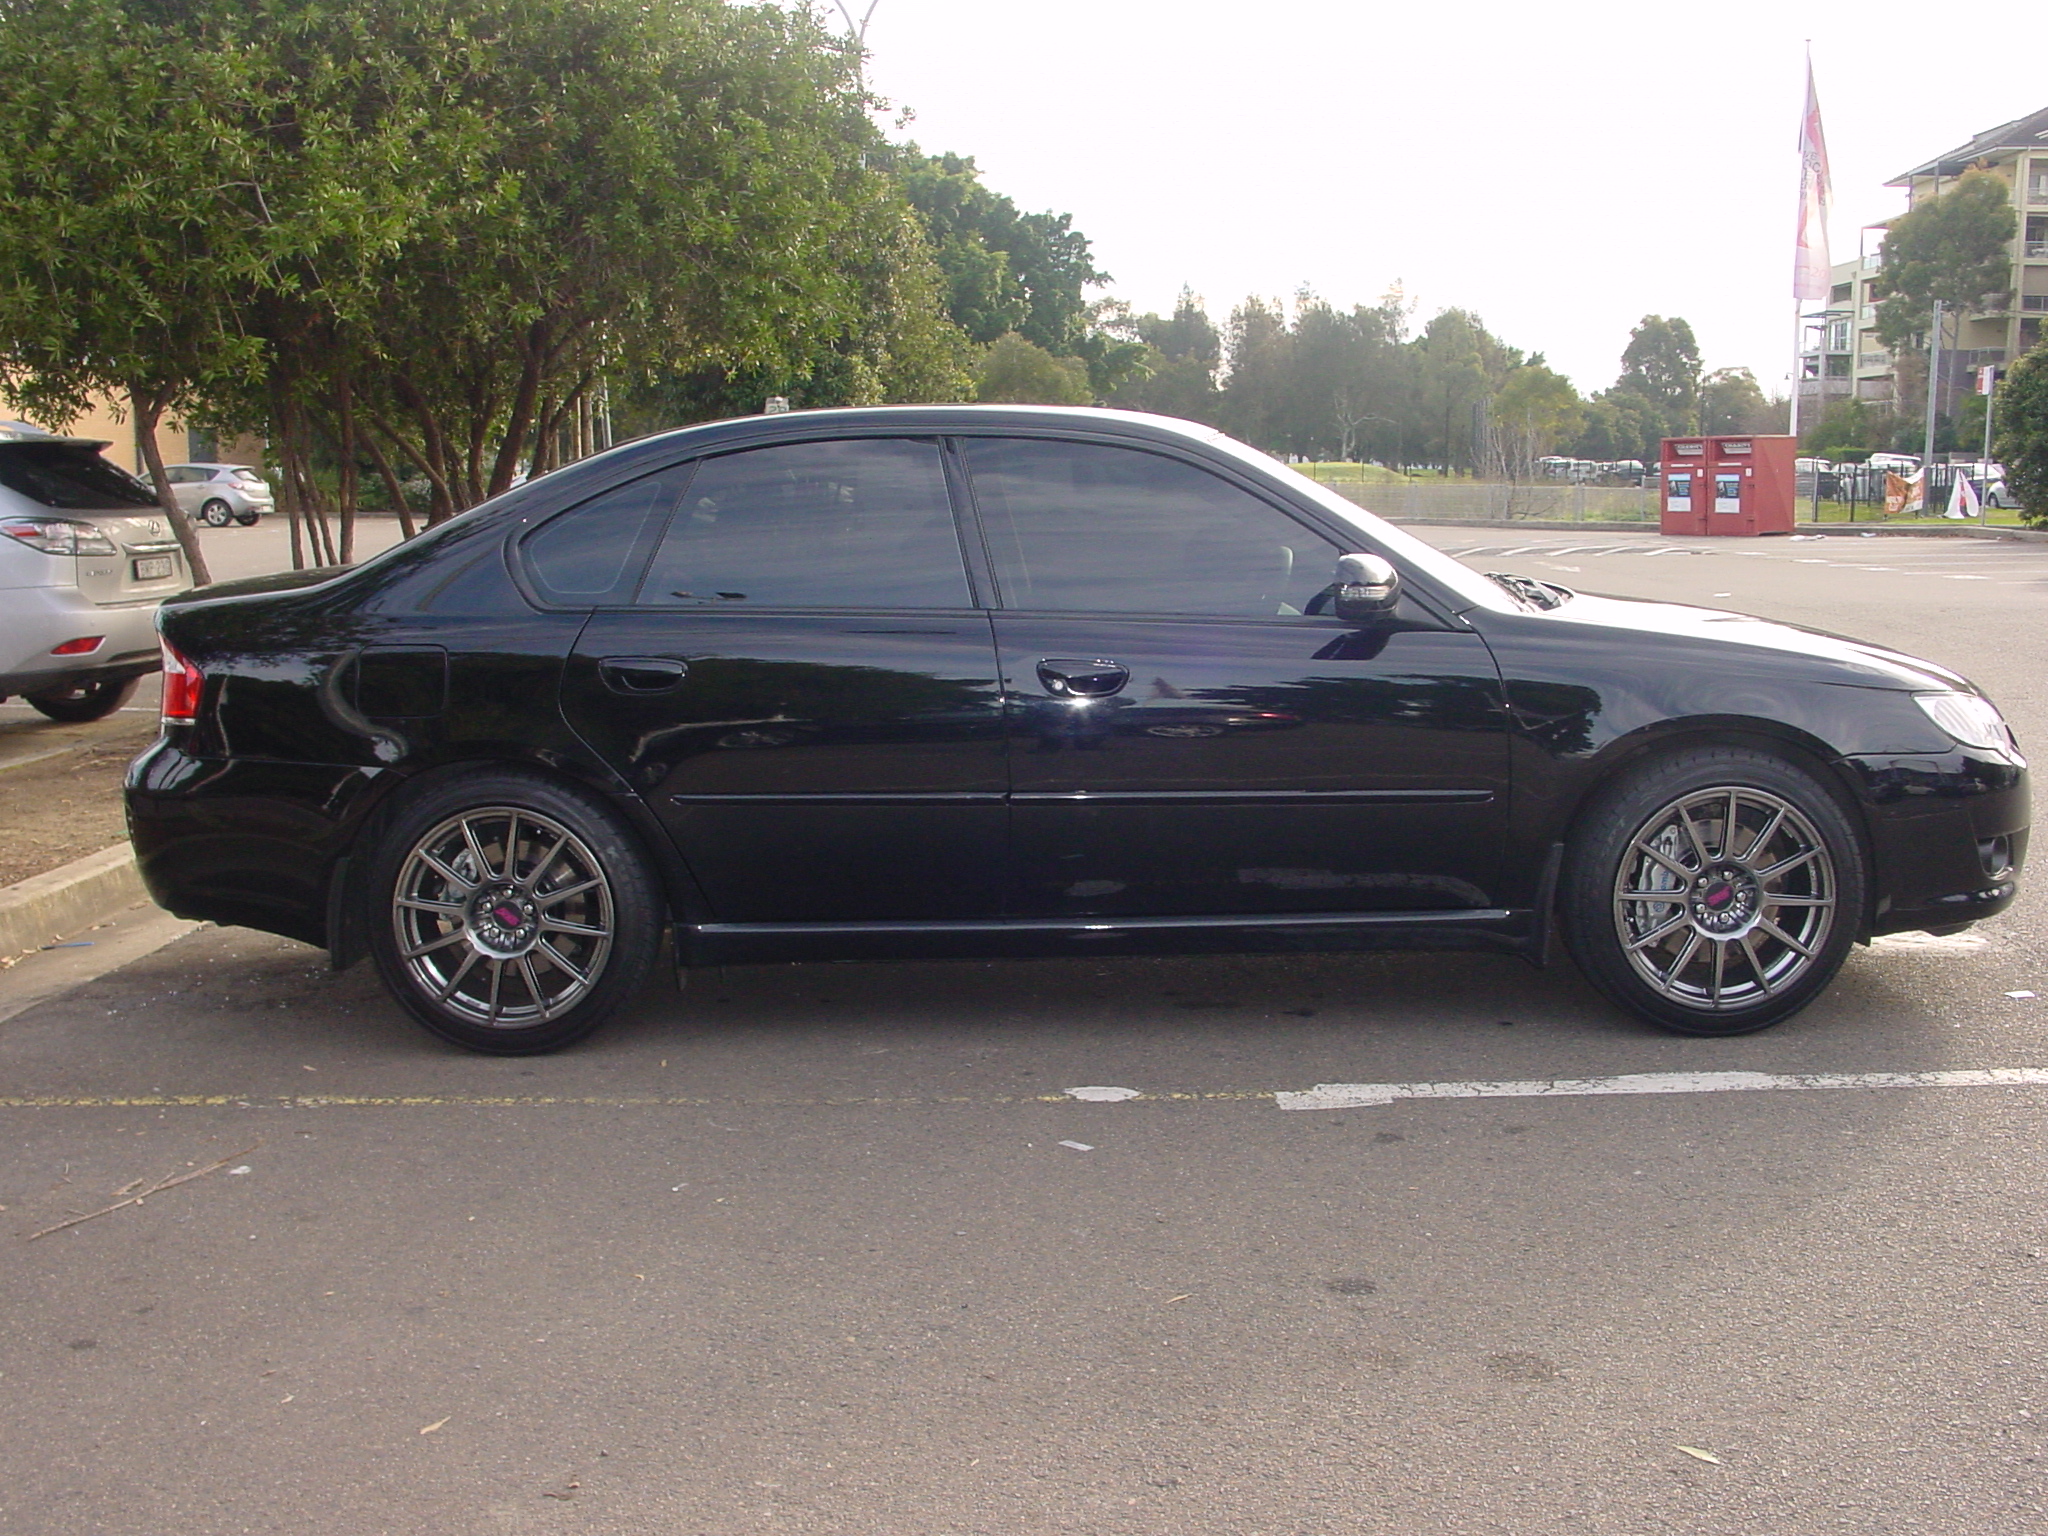
And after everything has been put back together:

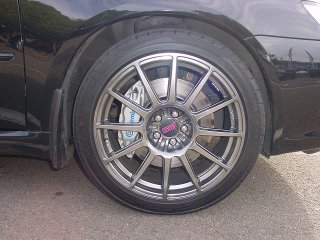
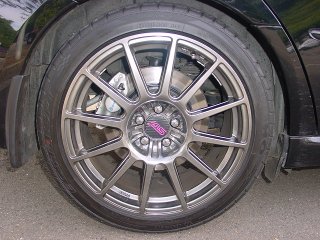
Click on each image for full size!
Braking performance has greatly improved as one might expect - light braking sees the car bite down far harder than I've been used to under the OEM brakes meaning I've had to retrain myself to tap the brake lighter in casual braking. Hard braking is suitably jarring compared to OEM and initial tests with a marker and a metre wheel indicate an average 4m shorter brake distance from 80kph to zero compared to the OEM brakes. The discs are machined rotors without slots and the pads are what came with the Brembo's with more than 50% meat remaining which are definitely not OEM, but they don't look like anything special either. This approach was done to save a little money on the project but I expect will improve when I eventually buy a new set of pads and some DBA 4000 or similar discs later down the track.
Cosmetically, the brakes and discs fill out the 18" wheels VERY nicely and the silver and blue colour combo I went for I think gives a nice contrast to black to give a slightly understated look without standing out too much.
Bleeding the brakes was a breeze - under five minutes per wheel despite having two sides of each caliper to do.
Coming up next, the STi Brake Booster and Master Brake Cylinder - I orginally intended to do this at the same time as the Brembo upgrade, but after having a good hard look at it, I could see that everything in the engine bay would be easy, but I do not possess the appropriate tools to undo two of the four nuts holding the booster onto the firewall inside the cabin - I'd need a double universal joint combo socket set to be able to do it properly because they're right behind the steering column, so I'll do that at a later date.
Since I elected to go for the full Brembo conversion including native rear STi rotors with 190mm handbrake, I also had to install my modified handbrake shoes. Total gear replaced:
- Four rear handbrake shoes replaced with thicker shoes from a wrecked MY08 Liberty
- 6 rubber hose lines with 6 Goodridge braided brake lines
- Two rear disc rotors with STi rotors
- Two front disc rotors with STi rotors
- Two rear single-pot calipers with Brembo two-pot calipers
- Two front two-pot calipers with Brembo four-pot calipers
- Deleted both rear dust shields from the rear hub to allow space for the larger rear discs
Here's a before and after pic of the rear assembly showing the thicker shoes, deleted dust shield and an incorrectly positioned triangle piece at the top (corrected after the photo was taken).
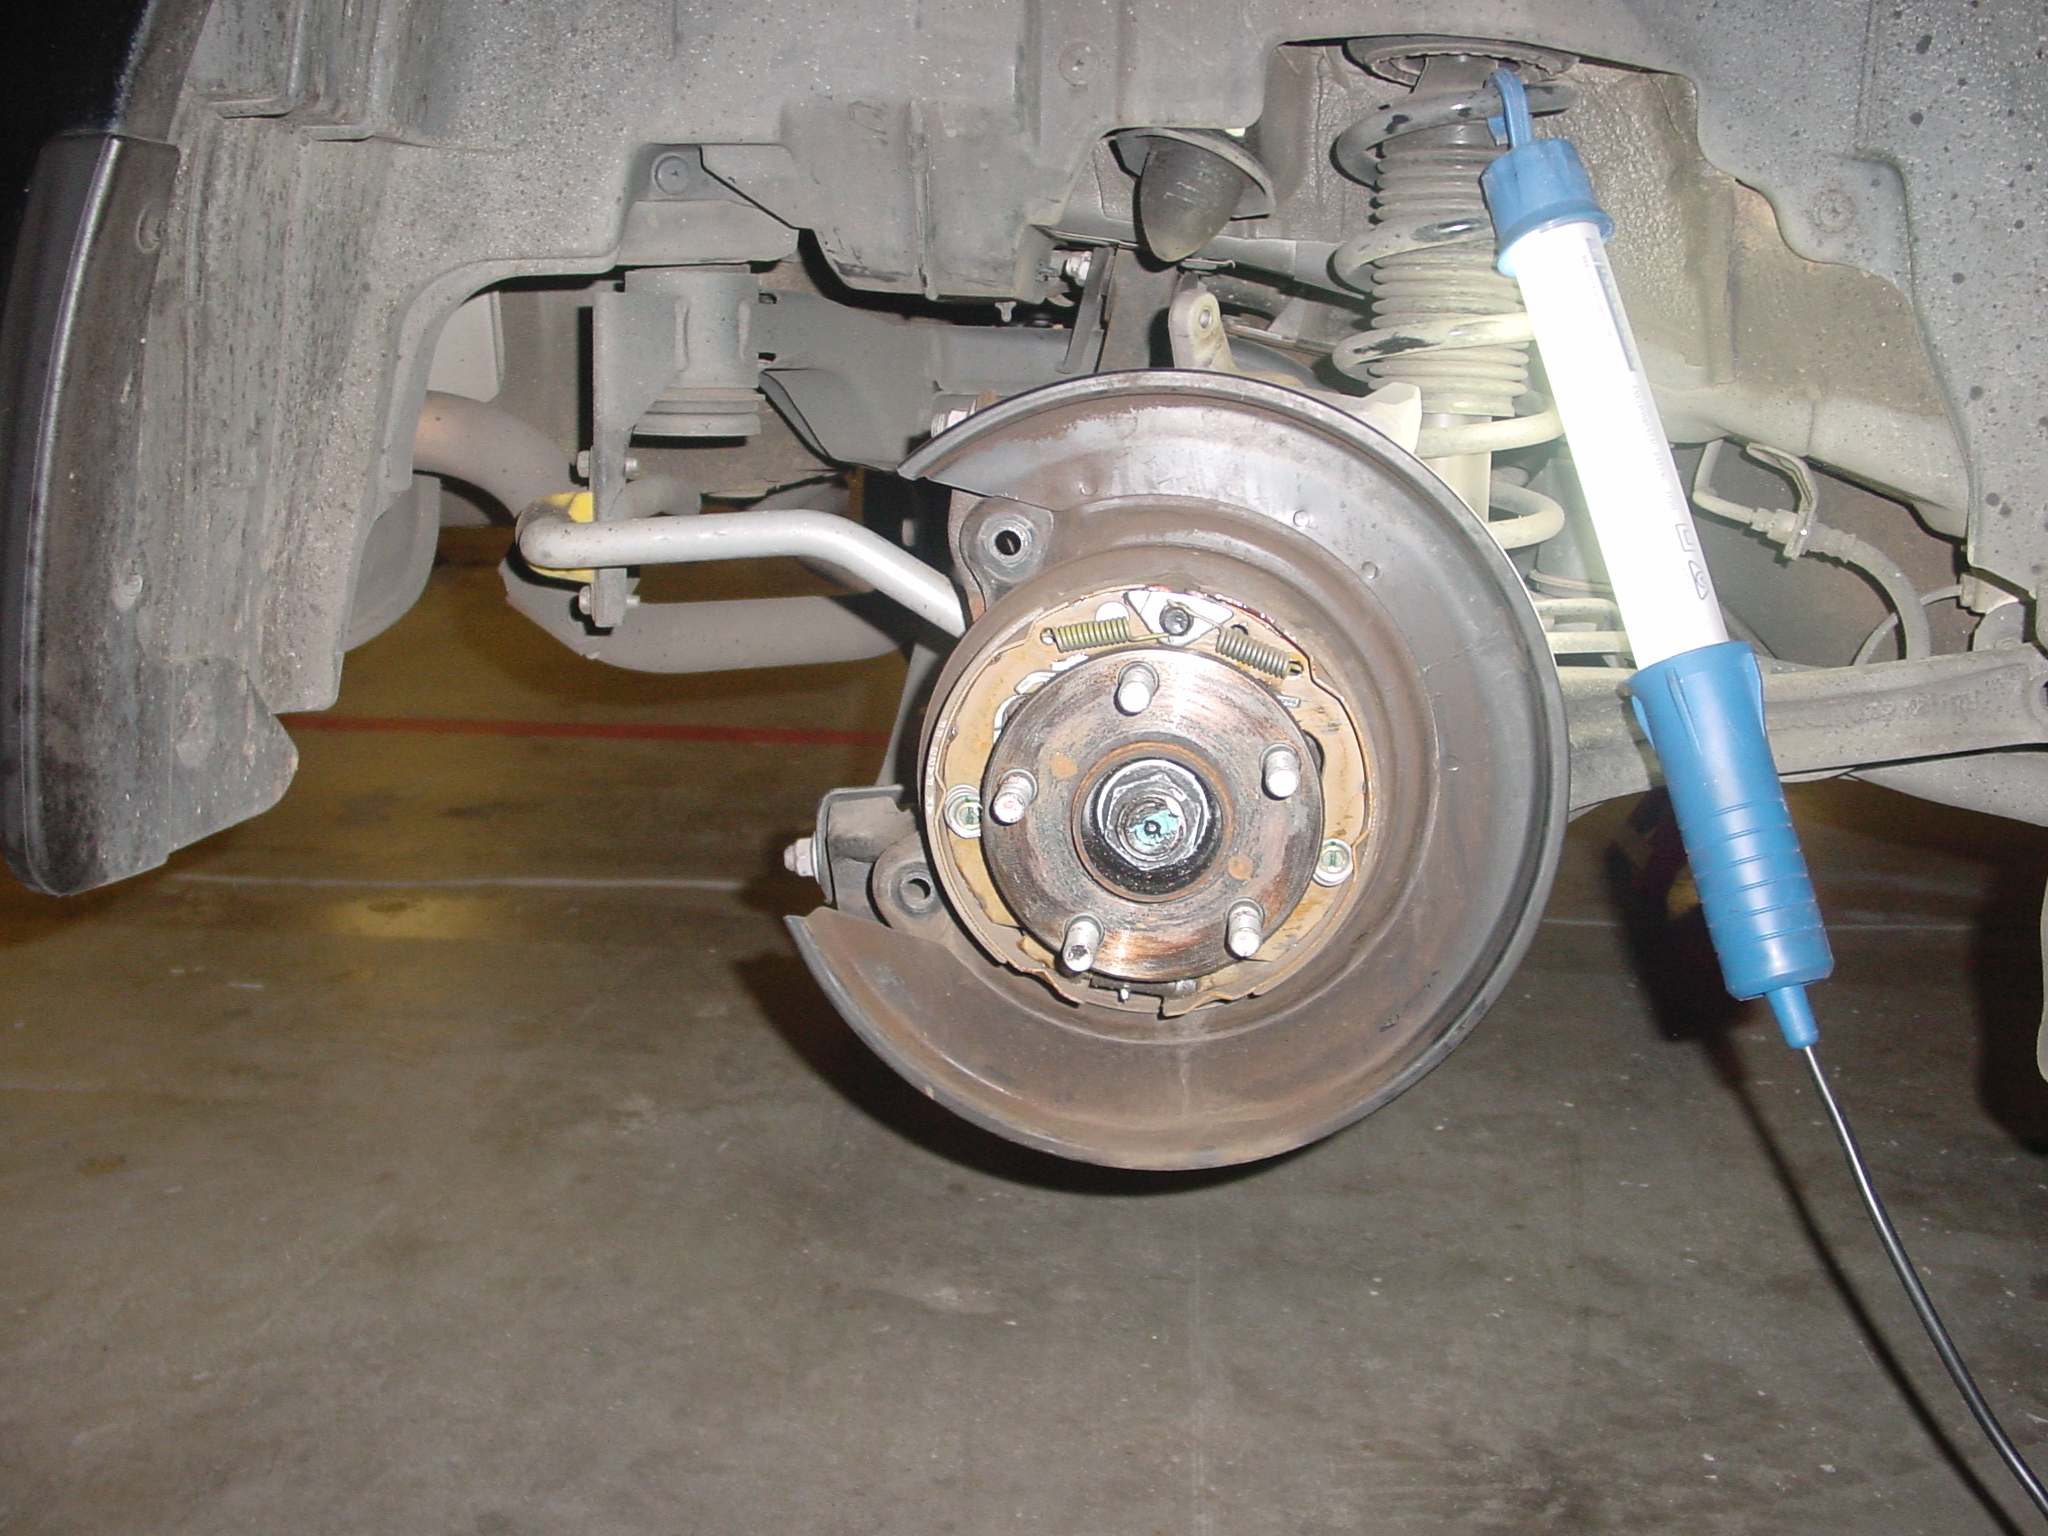
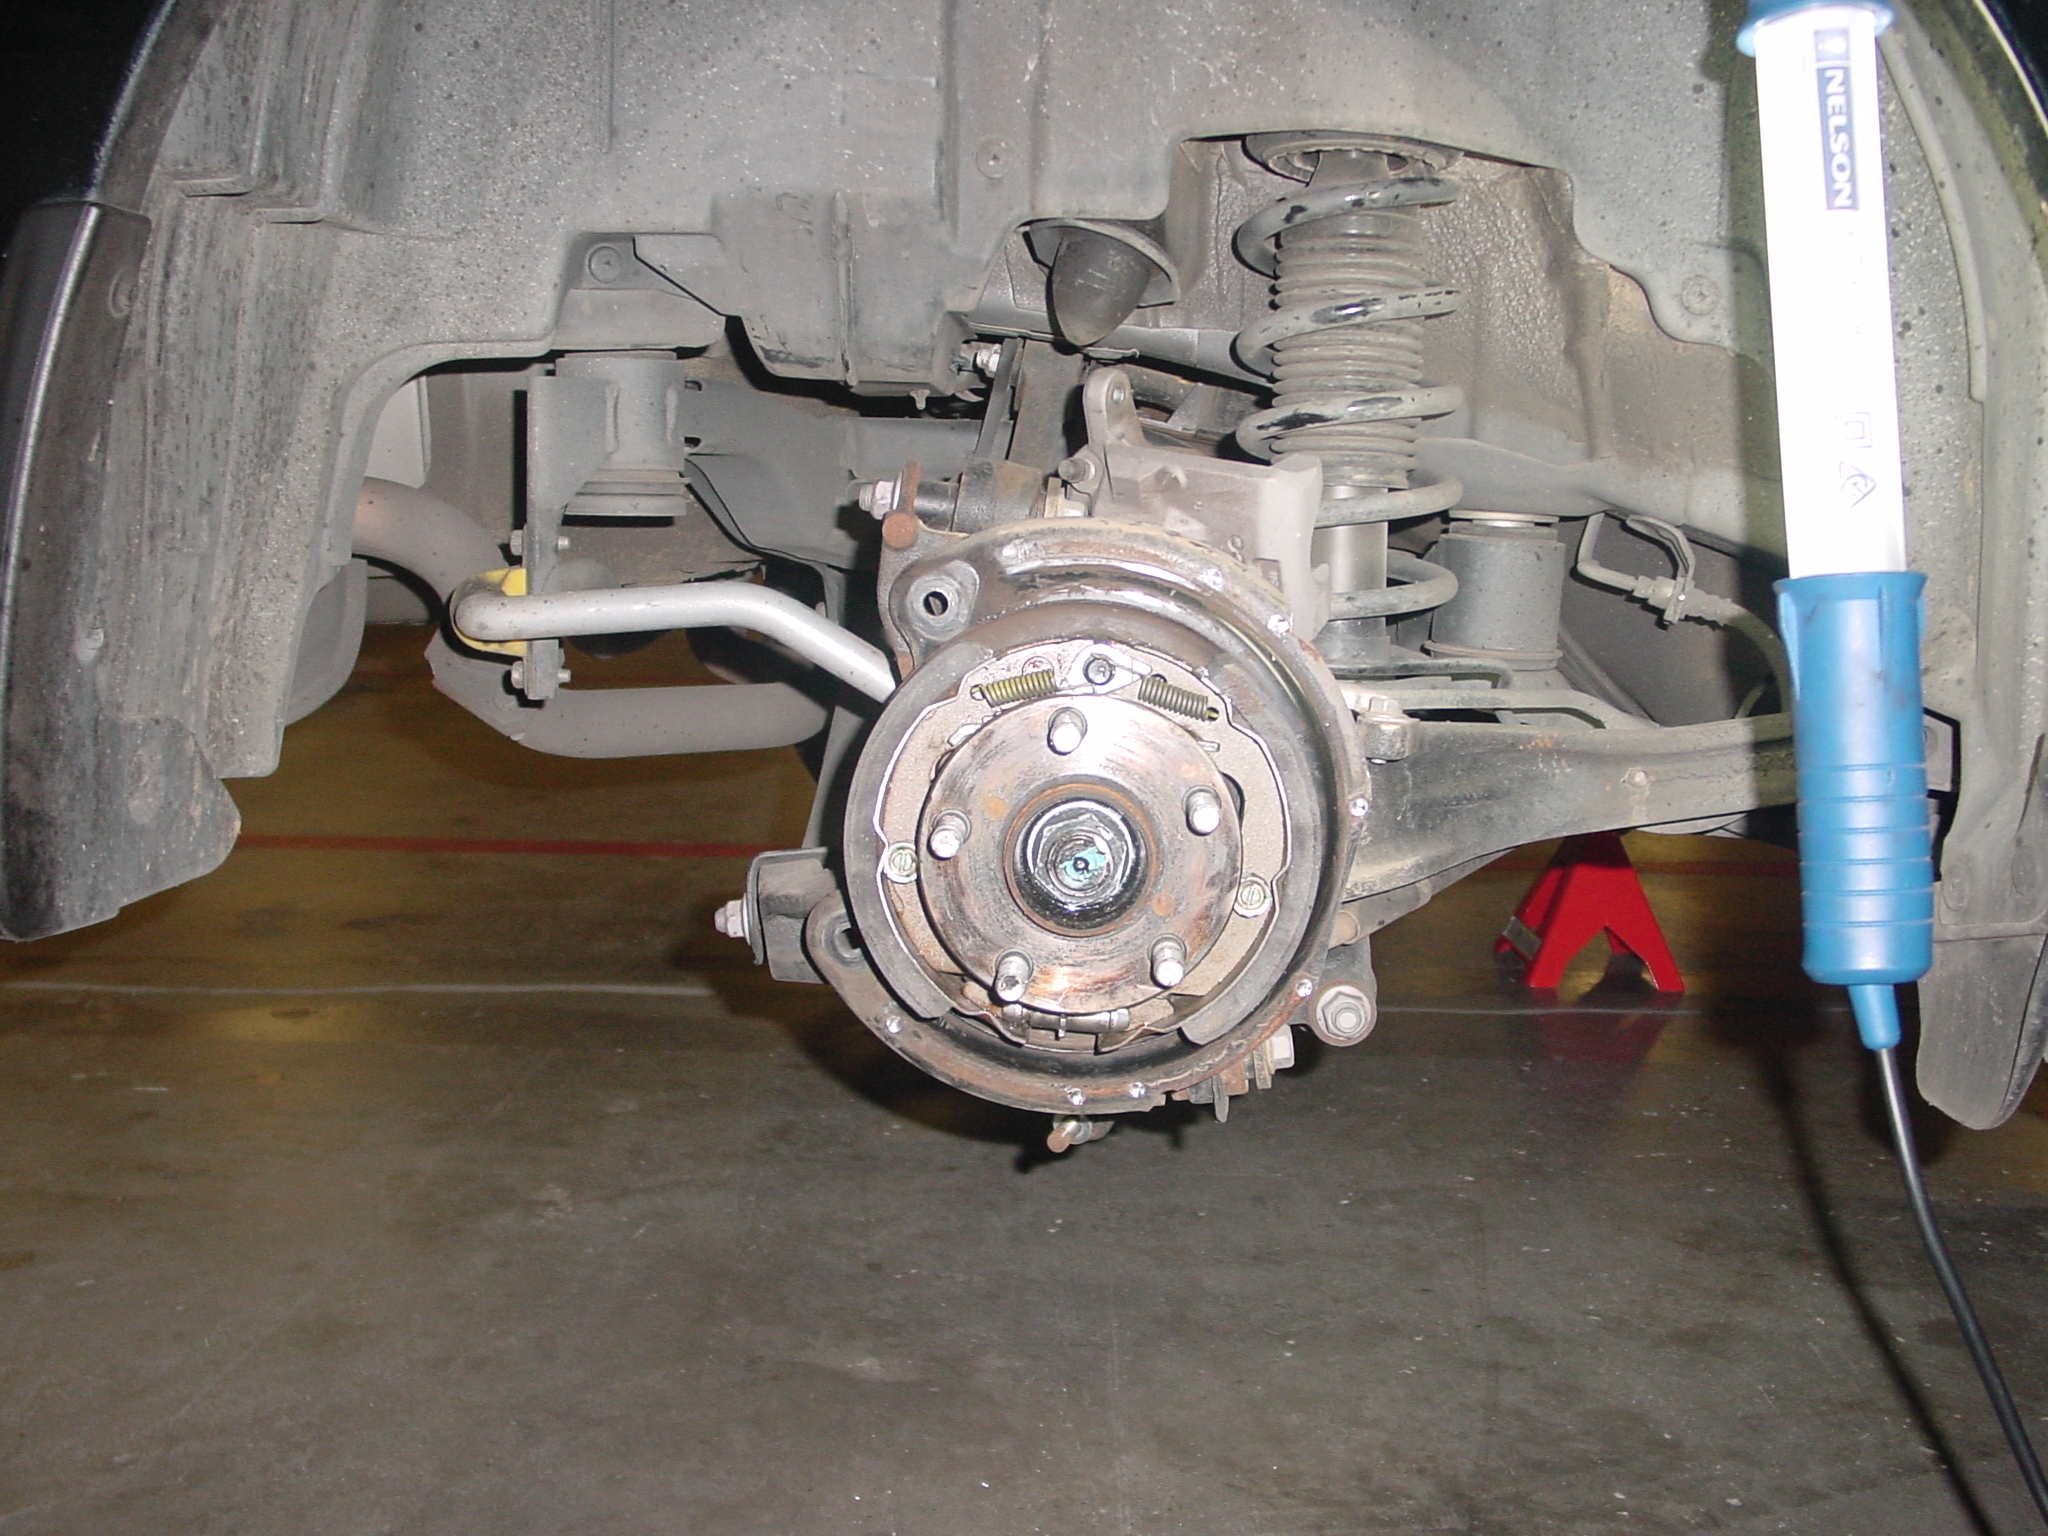
Click on each image for full size!
The handbrake assembly was surprisingly easier than I expected - the springs and shoes are easy to remove and re-mount. The hardest part of the handbrake assembly was removing the shoe from the handbrake cable itself because the spring is bloody strong where it pinches onto the shoe. Beyond that, the dust shield was removed by drilling out the spot-welds.
I forgot to get snapshots, but the lines swapout was a bit of a pain on the rear - the flare nuts were well and truely stuck on but they came off with a bit of degreaser and perseverence with a flare nut wrench.
Front calipers went on without a hitch, but the rears were a downright pain in the arse - not because of the calipers themselves, but because of the Kartboy adapters. I wholly DISCOURAGE the use of Kartboy adapters in a Liberty Brembo conversion - get Mark's custom-made adapters instead! I wasted a good few hours grinding metal away from the hub assembly bit by bit with an angle grinder until the Kartboys were no longer touching anything and allowed me to get the bolt holes to line up! Grind, test fit, grind, test fit, grind, test fit. What a pain. I probably only shaved off about 3mm in the end, but still - it took a long time because I didn't want to over-do it, and I'm no grinding expert. In any case, the rears eventually bolted on nicely and are quite solid - nothing loose (sorry, forgot to get photos as at this point my patience was wearing thin).
Couple of snapshots to show the difference in size between the OEM and STi front rotors...
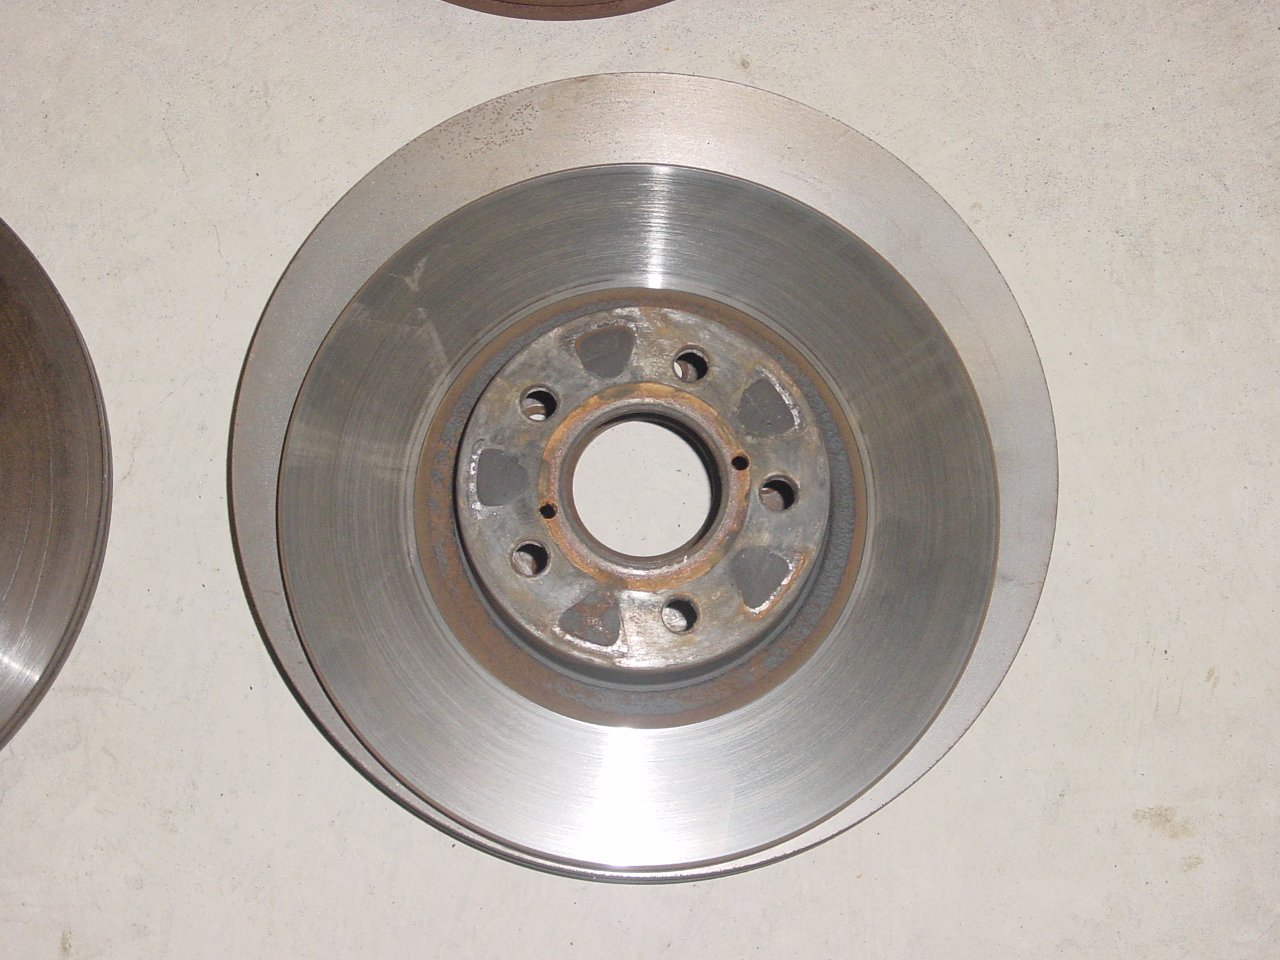
Click on each image for full size!
...and a comparison of the rear rotors:
Click on each image for full size!
And after everything has been put back together:

Click on each image for full size!
Braking performance has greatly improved as one might expect - light braking sees the car bite down far harder than I've been used to under the OEM brakes meaning I've had to retrain myself to tap the brake lighter in casual braking. Hard braking is suitably jarring compared to OEM and initial tests with a marker and a metre wheel indicate an average 4m shorter brake distance from 80kph to zero compared to the OEM brakes. The discs are machined rotors without slots and the pads are what came with the Brembo's with more than 50% meat remaining which are definitely not OEM, but they don't look like anything special either. This approach was done to save a little money on the project but I expect will improve when I eventually buy a new set of pads and some DBA 4000 or similar discs later down the track.
Cosmetically, the brakes and discs fill out the 18" wheels VERY nicely and the silver and blue colour combo I went for I think gives a nice contrast to black to give a slightly understated look without standing out too much.
Bleeding the brakes was a breeze - under five minutes per wheel despite having two sides of each caliper to do.
Coming up next, the STi Brake Booster and Master Brake Cylinder - I orginally intended to do this at the same time as the Brembo upgrade, but after having a good hard look at it, I could see that everything in the engine bay would be easy, but I do not possess the appropriate tools to undo two of the four nuts holding the booster onto the firewall inside the cabin - I'd need a double universal joint combo socket set to be able to do it properly because they're right behind the steering column, so I'll do that at a later date.
I was going to procrastinate, but I put it off...
-
HyRax - Posts: 1202
- Joined: Sat Jul 30, 2011 12:25 am
- Location: Sydney
- Car: ADM MY19 3.6R Outback
- Real name: Jeff
- Profile URL: viewtopic.php?f=10&t=15482
Re: Member Profile: HyRax
![]() by cruisn » Tue Jul 24, 2012 6:21 pm
by cruisn » Tue Jul 24, 2012 6:21 pm
Nice work. 
I had the same problem with the last set of kartboys I fitted to a Forester......
Thats what led me to make mine.
I had the same problem with the last set of kartboys I fitted to a Forester......
Thats what led me to make mine.
-
cruisn - Posts: 6560
- Joined: Tue Nov 03, 2009 8:09 pm
- Location: Melbourne
- Car: MY02 GTB E Tune
- Real name: Mark
Re: Member Profile: HyRax
![]() by bigBADbenny » Tue Jul 24, 2012 6:28 pm
by bigBADbenny » Tue Jul 24, 2012 6:28 pm
Awesome AND as usual - inspirational
Also - are you using a brake master cylinder stopper?
Also - are you using a brake master cylinder stopper?
Last edited by bigBADbenny on Tue Jul 24, 2012 6:30 pm, edited 1 time in total.
-
bigBADbenny - Posts: 10420
- Joined: Tue Oct 04, 2011 6:36 pm
- Location: Collingwood, Melbourne
- Car: MY07 GT-B 6MT OBP Wagon
- Real name: Ben Richards
- Profile URL: http://tinyurl.com/agvbzop
Who is online
Users browsing this forum: No registered users and 19 guests